
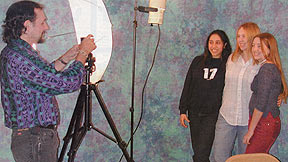
Lighting the Way– A simple light kit gives a professional touch to any photographic experience for subjects and photographer, alike.
Virtually every digital camera offers artificial lighting, namely its flash. And, the flash on your digital camera has its uses, chiefly to bring added light to dark subjects.
But, so often, picture quality is sacrificed as a result of employing the flash. Although many cameras do allow you to adjust the amount, or intensity, of the flash brightness, still the result can be less than satisfactory, often delivering heavy shadows or washed-out, flat images.
A better alternative is the use of another artificial lighting source, an external light that you control to enhance and illuminate your subject. Using external lights can turn your snapshots into true photographs, delivering the warmth, depth and professional touch that will make your shots truly impressive.
Think of it this way: We live in a three-dimensional world. The subtle shadings of form are what our eyes perceive when defining visual reality. Light illuminates the edges and shapes, whether it comes from a source like the sun, or the gentle glow of a table lamp. Unlike your camera flash, which sends all light straight toward the subject, natural light sources emanate from different directions–maybe even from several directions simultaneously.
The bright light of the flash produces a picture that is essentially flat, with all natural shading eliminated. When you work with external lights, you are able to increase the quantity of light while still maintaining some sense of the natural variations of brightness and darkness that communicate depth.
Professional film photographers use external flash systems that are connected to the camera for flash ignition but are separate from the camera body. This allows the light source, or sources, to be positioned independent of the camera. In professional photography, multiple flash units, placed varying distances from the subject, are used so a proper balance can be achieved. Such systems can be quite expensive, plus only a few of today’s digital cameras will even accept a connection to an external flash unit.
The use of bright lights on stands can present a less-expensive alternative for the amateur photographer, one that produces instant results that can be analyzed and modified until photo satisfaction is achieved.
Color Temperature
Light is rated by a system that measures color temperature on a Kelvin scale. At the top of the scale is outdoor, or sun light. The color temperature of bright sunlight is different than that of a cloudy day. Indoor incandescent and fluorescent bulbs have a much different color temperature than outdoor light.
Your camera automatically analyzes the light at hand and adjusts itself to make sure that its images capture and reproduce accurate colors based on the light that is present. This is known as white balance. Remember how a prism uses the color white to create all other colors? The concept is the same here. By determining the color temperature of the light, your camera defines a reference for white and then uses that to produce the proper hues for all other colors.
In general, your camera’s automatic white-balance system can be trusted to do the job, but there are situations in which it can be fooled. Many digital cameras allow you to manually set or establish the white balance, by telling your camera what type of light is present–sunny, cloudy; or indoor artificial light. In general, your camera’s default settings are for outdoor light. When shooting indoors, you’llfind that very seldom is sufficient natural light present, so the camera’s flash takes over. The light from the flash is balanced to mimic the color temperature of outdoor sun. Therefore, the default setting in the camera remains in place, matching the flash.
When you set up your own indoor lights, you also instruct the camera’s flash not to fire. The lower color temperature of the indoor lights produces a light that looks more yellow. Unless you change the white balance of your camera to indoor, incandescent light, that same yellow tint will appear in your pictures, only much more pronounced. By manually selecting the white balance, colors return to normal and your pictures will appear as they should.
The Light Kit
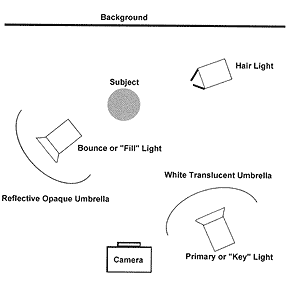
Lighting Layout – An opaque reflective umbrella is used as the Bounce or “Fill” Light as seen in this diagram of effective light placement for illuminating a subject.
In my mind, the most important lighting tool for any photographer (or videographer for that matter) is the umbrella. If you take a bright light and point it at your subject, the subject will be hit with harsh highlights and dark, contrasting shadows. The job of the umbrella is to diffuse that light and make it softer. This way you get to take advantage of the increased brightness of light but in a way that appears more natural.
The umbrella can be used in a couple of different ways White umbrellas are made of a semi-translucent material which allows you to aim the light through material and or to your subject. As the light passes through, it becomes softer, and you adjust its intensity on the subject by moving the umbrella closer to, or farther away, from the subject.
The other approach is to use the umbrella to bounce the light on the subject. Instead of shining the light through the umbrella, the two are turned so that the light is facing away from the subject. The light strikes the umbrella’s round, curved shape and bounces off in all directions, with a certain amount landing on the subject. Again, you adjust the brightness level by moving the umbrella closer to the subject. However, because a certain amount of the light passes right through the white umbrella and is not reflected back, the light is much less intense.
The opaque umbrella does not let any light through therefore its only purpose is for bouncing light. The inside surface of the umbrella is coated with a highly reflective material so that all light striking its surface is reflected back. Still, the light is much softer and more diffused than if light had been pointed directly at the subject. If the lining is silver in color, the bounced light will be pure and have no tint. Often, a gold-reflecting material is used to add a warm hue to the light, which can be particularly flattering to man subjects.
Creating Depth
As we discussed earlier, we perceive depth through the contrast of light and dark. The most common light source is the sun. Therefore, we are used to seeing our world illuminated by a single, strong source of light, creating a bright side and a dark side. However, light from that single south is also bounced or reflected from other objects (walls, cars, the ground, etc.) so the contrast is not extreme but a gentle balance of light and dark. We want to achieve this same appearance when using artificial light.
Our strongest light is known as the key light. Generally, we want it to shine on our subject from the front and just off to one side. By placing the light to one side, we split the subject in half, bright and dark. Placing the light in the center would send all shadows straight back, making the subject appear flat, or without the depth that we want to show. I generally use my white umbrella with the light shining through for this primary light source.
Fill light is used to reduce contrast so that shadows appear less dark and details in the darker areas are still readily visible. The fill light represents the reflected light of our world, so it is not as bright as our primary, or key, light. In this situation, I use my bounce umbrella with the opaque reflective material. It will usually be positioned on the opposite side of my key light and positioned so that this other side is brighter but not as strong as the key light. It may be beneficial to add several fill lights in order to achieve a balanced appearance, with each one working on a specific shadow, or area of the scene.
Some shadows can remain visible, but you want to keep an eye out for distracting shadows, such as the tip of the nose on the upper lip. This is caused when the key light is too high, forcing shadows down. In general, it is preferred to have shadows more off to the side and angled down only slightly.
Another problem to watch out for is when the umbrella is reflected in the eyewear of your subject. It may be necessary to move the key light off to the side to avoid the big, white circles in the glass, which can ruin your shot.
The Hair Light
When taking pictures of people, one of the subtle but important things to add is the hairlight. Again, looking to nature, the sun will add a bright highlight to hair, an extra sheen that enhances a person’s appearance in our mind. Adding a hair light is like icing on the cake, the extra bit of sweetness that will make a good picture even better.
Hair lights are usually small, focused on a limited area. Various methods are used to concentrate the light. The most common way is with the barn doors that are attached to the front of the light. The doors or flaps, are closed down, so that light can only exit through a small opening. Another technique is to use a snoot, which attaches to the front of a light, narrowing its beam to a concentrated area.
The Background
It is always important to consider the background of your shot, both in terms of how it looks and how it will be lit. We know that the background should not be brighter than the subject, causing a backlight problem. However, it can be important to have some light in this region to provide a separation between the subject and the background, again demonstrating depth and dimension.
Over the years, I have acquired a few backdrops, items that I can use to hang behind a person or object, to give me a nondescript background. These can be anything from plain or patterned cloth to special pieces of plastic material (4×6 feet), specifically to be used as a photographic background. Even a pastel-colored bed sheet can work in a pinch. Hung behind my subject, I can go to the ugliest location and instantly turn it into an acceptable photographic backdrop, and come away with beautiful pictures.
I have two stands and a crossbar with spring-loaded clips that hold my background in place. The crossbar will retract down to 8-feet, or stretch out to 15-feet wide, enough for a small group shot. The entire kit cost me less than $200 and has been put to use countless times.
A Little Money Maker
Once your have a little light kit, your are no longer a person taking snapshots; you become a photographer. I tested this theory at a recent bazaar/fundraiser for our local school. I set up my lights and background in a corner and had a table with my laptop computer and color printer. For $10 a pop, folks were lining up to take home an 8×10-inch photo of their kids, often ordering multiple copies. Local “family photographers” commonly charge $50, plus $35 for each additional 8×10, so I was giving a good deal and more than covering my paper and ink costs. It ended up being one of the more successful and lucrative fundraising operations of that day.
by Douglas Stevenson
Leave a Reply