
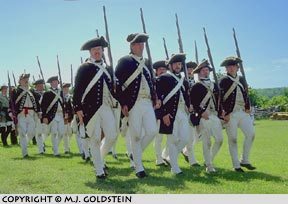
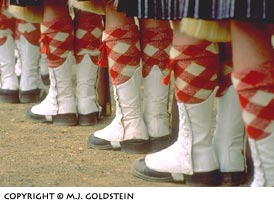
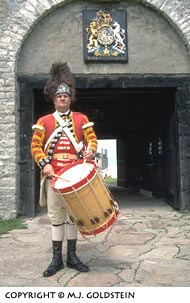
The ‘bird’s eye view’ is always effective when photographing military drills from a short distance away. The secret is to not be shy when it comes to leaving the ‘viewer position’, to place yourself for a good shot. Photographic rules are not the only ones to be broken on occasion!
This image was done while down on one knee with a 24mm lens and a monopod, just off to one side of the marching troops, to where I dashed just before they arrived. By the time I was noticed by the “marshals”, I had a half dozen exposures, and was on my way to my next location. (Fort Wellington, Prescott, Ontario)
You could describe an historical pageant as any event in which one group of people tries to show another group of people how a particular historical occasion might have looked. Many of these occasions are of a military nature. The re-enactment of the Battle of Gettysburg, held each year on the Fourth of July, is a famous example. There are “re-enactors” all over North America, thousands of them, who follow the calendar of pageants each summer. They spend the season shooting at each other while wearing a variety of uniforms, just for the fun of it, in a series of planned engagements. This same calendar is followed faithfully by herds of photographers, amateur and professional alike, who know a great photo opportunity when they see one.
The preparation for the Battle of Georgian Bay–a three-day event involving hundreds of people, a number of ships, and weaponry and uniforms from both the American Revolutionary War and the American Civil War–inspired this writing. Held every three years, the re-enactment encompasses the towns of Midland and Penetanguishene in Ontario, Canada, both of which boast an historical past. (The Battle of Georgian Bay, incidentally, never took place in reality, nor did my participation in it this year, as I came down with stomach flu on the critical Friday morning.)
Long before you start running film through your camera at historical pageants, you need to do some homework. At the very least, you need a schedule, so you can decide what to shoot. Better still, you should befriend an organizer.Armed with sketches and a detailed timetable, you can go over the ground in advance, planning your “shooting stands” and anticipating lighting problems. For example, how will you light a “night attack”? Will your flash be adequate for the parade as it passes? Can you coax somebody into carrying your big reflector and dashing about with you?
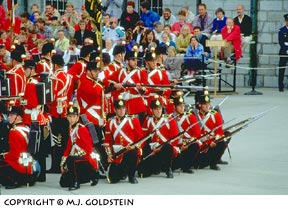
The famous Sunset Ceremony, held at Fort Henry in Kingston, Ontario during the summer months, is a photographic potpourri of military formations, close-order drilling, and gun firings. The secret here is a long telephoto lens and a camera support, to put the photographer close to the action without getting his eyebrows singed. In this situation, it’s a good idea to have two camera bodies at hand, so that one is always loaded. The most famous photo made of this Ceremony was done by a Kingston photographer, on the last night of the
ceremony season, on his last frame of film, in the final two minutes of the ceremony. (Fort Henry, Kingston, Ontario)
A lot of your shooting will be close-ups of small groups of people. If you’re using crisp mid-day sunlight, you must be prepared to provide specific amounts of fill flash at short notice. A lot of event photography is “grab shooting,” and the hats, helmets, and poke bonnets of bygone days throw large black shadows over peoples’ faces.It’s imperative that you use a flash that delivers a specific “f-stop” amount of light. I always use one f-stop of fill flash less than the aperture setting for ambient light when shooting slide film. This results in photographs of faces and back- or side-lit subjects with nice shadows for three-dimensional molding, but which retain detail in the shadows.
If you’re using modern equipment with automatic features, set your camera for shutter-speed priority, and a shutter speed that is within the flash sync speed range, with which you can hand-hold and get sharp pictures. (I often cheat and use a monopod.) Set your auto flash fill for -1 F-stop of compensation, and you’re in business. You may have to set the camera or the flash for “slow sync,” in which the camera shutter speed is controlled by your ambient light meter setting and not the flash.
If you’re using older equipment, you’ll have to determine the correct exposure for the ambient light for front-lit subjects. My technique (in pre-Nikon F100 days) was to measure the ambient lighting off the palm of my hand.The correct aperture setting is then one F-stop open from that measurement. John Shaw extols the virtues of this method in his books, and it worked for me for almost twenty years. (I still use it to check auto-exposure honesty.)When you’ve set your lens aperture, set your flash for one F-stop less output than that aperture setting.Check the sun’s location. For side-lit subjects, increase the flash output and open your lens aperture setting by a full F-stop. For backlit subjects, make it two additional F-stops. (Remember that, after making the shot, you should return both settings to the front-lit reference settings.)If the sun is ducking in and out of the clouds, and you’re not using modern equipment, you have a problem!
Does your flash take too long to recharge using internal batteries? Think about getting an external battery cable and using an external “gel cell” power pack for very quick recharges.You’ll find a 135mm lens will be your most useful focal length for all but the “grand scenic.”Don’t plan to spend much time fiddling with filters, tripods, or photo rucksacks.Use a vest with a zillion pockets or a “fanny pack” (belt bag) with extra lens holders supported by it. On a hot summer day, carry a bottle of water, as well.
By all means, plan to do portraits of individuals or small groups. You’ll find most participants eager to cooperate; they welcome your interest. If you precede your shooting with a few questions about uniforms, weapons, and each person’s role in the pageant, you’ll not only have more co-operation, but you’ll also enjoy better insights into the background of the event.However, don’t neglect abstracts–stacks of guns, rows of cannon, a series of marching feet, or just hands doing or holding something interesting. Cross-belts and buckles make great images.
Make good use of selective focus. One soldier in sharp focus, with an entire army behind him, just a bit soft, is very effective. One child’s face in sharp focus, gazing in wonder at the excitement as it unfolds … you get the idea.
Be prepared to fall on your face! Shots of soldiers from ground level, as they stand tall against the sky, are always winners. Use that “worm’s eye view.”Try to find a ladder, a roof, or the top of a truck to utilize to shoot down on the scene.
The “bird’s eye view’ also works well.Use all your framing techniques, break the horizon, look for patterns, tilt your camera. Zoom your zoom and pan your shots–and don’t get sick on the day of the event.

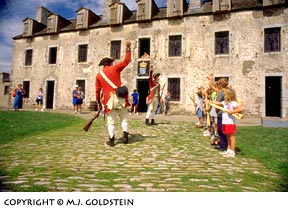
Since so many of these pageants feature demonstrations with spectators looking on, it’s always effective to photograph both groups at the same time. This image was made from knee level, using a 24mm lens, for that long depth of focus. Breaking several horizons makes this photo dynamic. (Canada Day, Fort Henry, Kingston, Ontario)
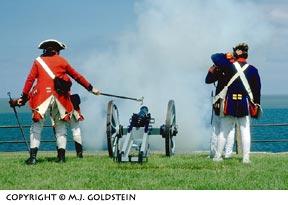
Catching an artillery piece at the moment of being fired is extremely difficult. This should be an image made on a tripod, and not be a hand-held shot, as the photographer’s hand will inevitably jump when the gun goes off.
Many of the better pageants will realize there are photographers that wish to catch the moment, and they will “prompt” you, as to when to release the shutter. If not, and if there will be a series of firings, the best bet is to watch the procedure first, and note at which point the gun fires. Use of a motor drive is perhaps not the best idea, as you might well miss that critical moment. (Fort Niagara, Lewiston, New York)
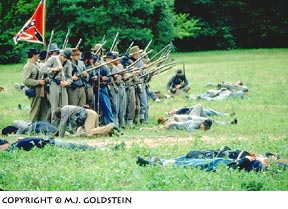
Every once in a while, you find an action shot that says it all. Here, the flag defines the period of history, and the group being portrayed. The obvious casualties establish a feeling of sympathy, even horror, at a scene which is probably very close to what would have actually been common during the American Civil War. The stance of ‘readiness’ and preparation among the participants gives tension to the photo, as they peer into the empty space in front of them – there’s certainly something out there to be confronted! Breaking the horizon with the re-enactors makes this image dynamic. Matthew Brady would have loved this photograph, but it was a tough thing to get hand-held grab shots with the large format cameras of the day.
This shot was far more successful than the one I made just prior to this one, where the participants were firing. This image was made using a 300mm zoom telephoto on a monopod, from my viewing position on the sidelines. (Battle of Gettysburg, Gettysburg, Pennsylvania)
Close-ups of hands, feet, heads, guns, etcetera, are often a clever way of portraying action, while allowing the viewer to exercise some imagination. There are often opportunities to use the compositional techniques of repetitive pattern and leading lines, when similarly dressed pageant participants are doing the same thing at the same time, usually in a military context. Short telephoto lenses are ideal for this kind of shooting. (Citadel, Halifax Nova Scotia)
Photographs of tough, grizzled drill sergeants instructing small children are always winners. It’s my observation that when parents yell abuse at their children, the children cry, or call their lawyers, but when a guy in a uniform and a three-day beard does it, they laugh and giggle, and work hard to please him. Go figure.
In this image, made with a 24mm lens with polarizer and warming filter, the instructors, with ramrods in their hands, are teaching the process of loading the Brown Bess musket. The British Army could get off three shots a minute with this weapon on a good day, and the kids are learning just how that was done. (Fort Niagara, Lewiston, New York)
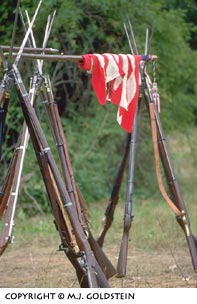
Environment shots of military equipment are always effective in helping to portray the feeling of “being there”. Here, the stacked muskets specifythe period of military history, more closely defined by the Union flag. A bit of fill flash is useful in striking highlights from any brightly reflective surface. (Battle of Gettysburg, Gettysburg, Pennsylvania)
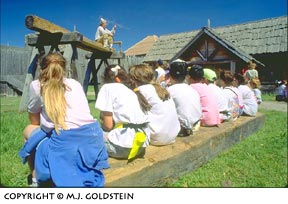
This is an image that combines techniques of leading lines, worm’s eye views, repetitive pattern, and children with an instructor. What else could you ask for?
The instructor is carefully placed to fill the negative space in the sky. Two leading lines (the beam upon which the instructor sits, and the children on the bench) draw your eye into the image) All the children are focussed on the instructor, which also draw the eye to him. Getting down low, and using a 24mm lens, gives this shot a different perspective, which makes it effective. (St. Marie Among the Hurons, Midland, Ontario)
Portraits of pageant participants can often be made in “destination specific” locations, which then “place” the image, geographically. The advantage of the pageant environment is that participants are willing, and have the time, to be photographed, and will pose and place themselves where you wish. The usual short telephoto lenses are perfect for these shots. (Fort Niagara, Lewiston,New York)
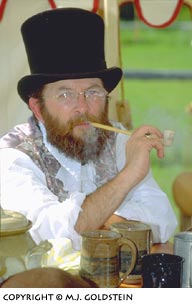
Closeup portraits are often useful for establishing mood, and for historical detail. The antique pipe is a nice touch, but I would have preferred that the subject was wearing more authentic-looking glasses! The head, with the hat, was carefully placed at an ‘intersection of thirds’ in the frame.
Use of fill flash in this shot produces some nice highlights, in eyes and on other reflective surfaces, and a 135mm lens got me in close, without pushing a camera up my subject’s snoot! If using autoexposure, be sure that you remember to remove any filters from your lens before shooting, if you’re not using TTL flash. (Battle of Georgian Bay, Midland, Ontario)
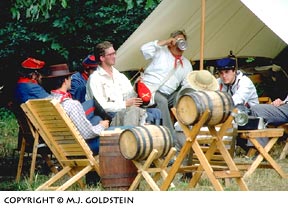
Allison and I arrived at the ‘Battle of Gettysburg’ re-enactment site, some hours before thebattle was to take place. To our delight, we discovered both sides were presently taking it easy in their encampments, to which we were invited. We spent several hours with both groups, using 50mm and wide-angle lenses, and flash fill, to portray the environment of an army at rest.
We were able to chat with participants, make copious notes on various aspects of the military techniques of the day, and of course, enjoy a different kind of photography to the usual battle images we would later make.
The general feeling of this image is that it’s a rebel encampment. The kegs of homebrew ‘white lightning’ and the general air of informality, reinforce that impression. Research indicates that only the Confederate artillery wore the red ‘kepi’, and so this initial impression seems to be borne out in fact. Historical fact is sometimes challenged by these events, where the “good ol’ boys” of both camps might be caught photographically while visiting each other!
Incidentally, be prepared to show a business card that states your status as a photographer (no need to specify “pro” or “amateur”!)This will often gain you access to areas that the tourist will never see. (Battle of Gettysburg, Gettysburg, Pennsylvania)
by Michael Goldstein
Leave a Reply