
When you’re composing a great photograph, there are many aspects to keep in mind.
In addition to light angle and quality, depth-of-field, and shutter speed, there are other elements that work to create a perfect composition–design elements.
Part 1 of this series of articles covered the design concepts of line, color, and the value of subjects. Part 2 covered shadows, isolating and framing the subject, and pattern and texture.

Use other objects to help bring out the shape of everything in the image.
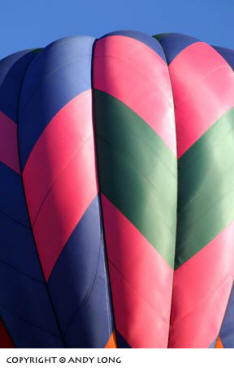
SHAPE AND FORM
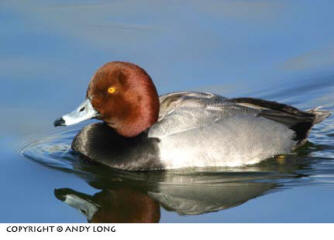
Everything has shape and form to it. Accentuating these so a composition is mainly a study in shape and form takes a keen eye. Developing that kind of eye is the one element in photography that’s still the work of the photographer rather than the equipment being used. While shape and form might seem to be one and the same, there is a difference between them.
Shape is the distinguishable outline of the subject, while form includes the nuances of shadow that help give the shape depth. Shape can be a simple silhouette, because–by the very definition–shape is the outline, and this is what is emphasized in a study of shape. Form is a three-dimensional look at shape.
Emphasizing shape and form is a subject many still-life artists deal with constantly, but for a nature photographer, it means searching out subtleties in what’s in front of the camera. An easy way to start looking at shape is to find a couple of objects whose shapes are mirrors of one another.
Good places to start looking are the different national parks in Utah. Because of the different shapes of the formations, searching out ones in which the pieces fit together like a jigsaw puzzle can make a different way to look at the overall picture. Trees can also be good sources of mirrored shapes.
Another way to look at shape is with macro photography. If your equipment allows you to move inside a flower, you can capture the shape and form of just a small portion. One thing I like to do with macro work is to use a teleconverter placed on the camera body, followed by extension tubes, and then a macro lens.
This structure allows for extreme close-up work in which a small portion is isolated, and you can bring out the nice shapes and curves of individual petals or parts of the flower.
Artistic flair plays a part as you move in and out from the subject and change angles. Bringing in the shape and form element works best with subjects that are sitting still rather than with wildlife. Their stationary nature allows you the time to move around to search out the exact location and framing necessary.
Training your eye to look at your environment a little differently can open up an entirely new door for your photography. When you go out into field with the idea of emphasizing shape and form, your specific goal may result in your taking fewer pictures, but it will also give you new insight into how you look at things.
REFLECTIONS
Reflections are all around us–in water, in windows, on metal objects, and in dew drops early in the morning.
Getting good reflection photos is not as straight forward as it might seem, especially when you’re working with reflections in water. If the water is perfectly calm, there are a couple of considerations to keep in mind, particularly if your image is of an animal in the water.
You need to make sure the entire reflection of the animal is seen, and part of its head or a body part isn’t cut off. While the reflection is a secondary part of the image, chopping off part of the animal in the reflection is just like cutting off the top of its head in a typical portrait shot.
Going the other direction with water, if the objective is to have reflections in the water as the primary subject, the condition of the water is critical. Glassy water needs to have a good bit, if not all, of the subject showing above the line of delineation. Water with ripples from a breeze can be a bit tricky.
The longer the exposure, the more smoothed-out the ripples become. While this effect can create nice results, to achieve the most impact, stopping the action with a faster shutter speed allows the subject to maintain its appearance while applying an impressionistic feel to the resulting image.
Depth-of-field can be a problem here if you’re shooting close-range subjects, as you do lose depth in order to get the needed speed. It’s best to be able to work an area that is a fair distance away using a larger zoom lens, where depth is greater further away from the shutter plane.

Above: Poor in-camera crop. Be careful not to cut off the head of a duck reflected in the water. It leaves the viewer wanting to see it all.
Left: Rippling on the water can help create an impressionistic reflection image.
The big problem with window reflections comes in two parts. The first part is placing yourself in a position that allows you to avoid including yourself or a tripod leg in the photo.
Photographing a window that’s above the camera works great; otherwise, you have to be off to the side to eliminate unwanted subjects in your reflection from happening. If you’re working off to the side of the glass, the second part of your problem is you need to have plenty of depth-of-field to keep everything in focus, as the viewer’s eye will probably take in everything–reflection, window, window frame–and it all needs to be in focus.
This shouldn’t be a concern, as longer shutter speeds won’t hinder the image unless the subject being reflected is a tree and there’s a bit of a breeze moving the branches. If the reflection is on very old glass, there are waves in the glass that don’t allow a perfect reflection.
This effect is acceptable, since it will add to the overall feel of the shot.
Heading out to the garden or flower field can offer you an entirely different set of opportunities. Dew drops on the ends of leaves or petals open up many new subjects. If the dew drop is large enough, the plants and flowers behind it are reflected and even magnified in the drop of water.
The biggest problem is with depth-of-field. Because you’re on the ground, you would think you would be in the image, but the dew drop will actually show what’s behind the drop and not your side of it.
Because you’re photographing in macro mode, you want to stop down as far as possible to capture both the reflection in the droplet and the leaf or petal to which it is clinging. A little drop-off in focus is acceptable, but you need to have some in focus.
Since close-up equipment is being used, the background that is showing up in the dew drop will be a blur because of the shallow depth-of-field in macro work.
COMBINING ELEMENTS
While focusing on one of the design elements is an easy task, finding subjects where two or more of these can be employed can make for very interesting photos. Some combinations are easier to work with than others, and some are very difficult to find. Many times, combinations of elements just happen and are not a result of your seeking them out.
The combination of multiple elements can be either subtle or quite obvious. When a photograph combines a couple of elements together, this helps the viewers get a better feel about the picture.
They might not know exactly why they like the image better than another one, but they know there’s something about it they like. As the photographer, you have to force the creative side of your brain to kick into overdrive to make the magic happen.
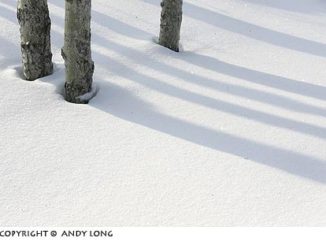
One of the easier combinations is line and shadow. If the sun is low on the horizon, you can use a feature like a fence as a lead-in line element that takes the viewer into the picture. Without the shadow, the image works. But having a nice shadow of the fence on the ground makes the image stronger, adding the second element of the shadow as a strong lead-in line.
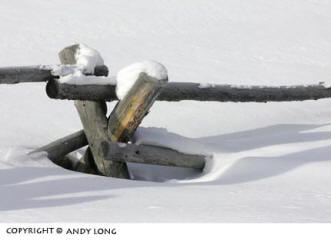
Above: Combining shadow, line and texture.
Left: Combining line and shadow.
Above: Combining color and texture with another color and texture.
Right: Combining color, line, shape and form.
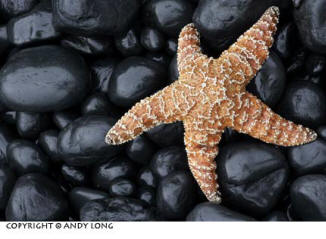
Isolating and color are other design elements that work together well. If the subject being isolated has some strong color to it and jumps out from the background, the main subject is much stronger than one that is close to the same color as the background.
No matter what combination you’re using, keep in mind the objective of combining elements is to create strong photography.
Some photographers start out having an eye for what makes a good image. Others have to work to develop it. If you’re in the latter group, concentrating on the design elements is a good way for you to work to develop a good eye for composition–that and going out to make a lot of photos.
Read Part 1: Line, Color and Value Placement of the Subject
Read Part 2: Shadows, Isolating and Framing the Subject and Pattern and Texture
by Andy Long
First Light Photo Workshops
All text, screen shots & photos: © 2006 Andy Long. All rights reserved.
Leave a Reply