
NOTE: This article is for older versions of Photoshop
(prior to CS6/CC), but the fundamentals still apply.

Copyright © John Watts
Mt. Whitney, Sierra Nevada Range
In the last article, I talked about 2 of the 8 basic elements of a good color print–Contrast and Color.
Over the next 2 articles, I’m going to talk about one of the tools used to control these elements–Curves.
Purpose
The Curves Adjustment Layer is used for contrast control and color correction. Curves are very similar to Levels in what they can accomplish, but you have much more control with Curves.
With that extra control come challenges–there is quite a bit more complexity with Curves.
By the way, I personally like to use Levels first (think of a “hatchet”) and then Curves for any necessary fine-tuning (think of a “scalpel”).
Where to Find It
You can click on the “New Adjustment Layer” button in the Layers Palette (the “Yin-Yang” like button), and choose Curves in the drop-down list.
You can also go to the “Layers” menu, then “New Adjustment Layer” and choose it from that menu. You can also access Curves in the “Adjustment Panel” in CS4.
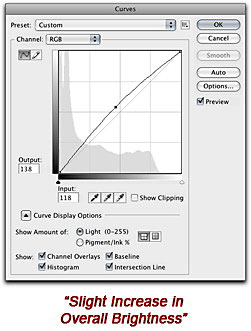
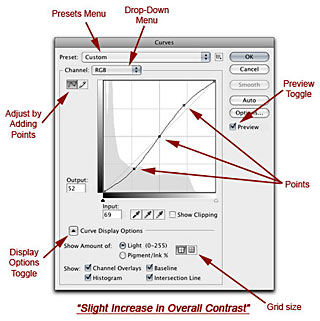
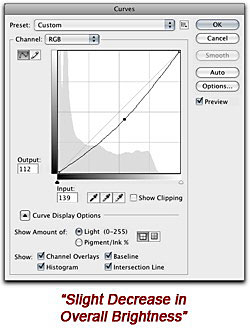
In the examples on the left, you can see what Curves look like with (from top to bottom) a slight increase in overall brightness, a slight increase in overall contrast, and a slight decrease in overall brightness. In addition, you can click on the Presets Menu to see some different preset configurations provided by Photoshop.
How Curves Work
Like Levels, Curves deals with “dark” pixels (bottom left) and “light” pixels (top right). The difference is that you can choose where to make your adjustments as well as how many adjustments you want to make, by adding points (discussed below). It has been said that Levels is like a “hatchet”, whereas Curves is like a “surgical scalpel”.
Unlike Levels, you can, for instance, lighten only the shadows without affecting the highlights, lighten midtones without affecting shadows or highlights, increase contrast in the highlight area only, and so on–again, there is quite a bit more control with Curves than there is with Levels.
Also, unlike Levels, Curves are not intuitive at all–it takes a lot of work and practice to master them, but just like learning to drive a car with a stick shift, the results are well worth it.
An Explanation of Some of the Features
The Drop-Down Menu and Color Channels as well as the Preview Toggle serve the same function in Curves as they do in Levels.
When you click on the Display Options Toggle, you’re given some extra choices. It is best to leave all of these at the default settings; however, you might like changing the Grid Size for more precise control.
“Points”
1.) The simplest way to make adjustments is by Adding “Points”. Rather than moving sliders, like in most adjustment layers, you will add “Points”. You can add as many points as you like. Simply clickon the Baseline (the slanted line running from the bottom left to the top right of Curves) at the location you would like to add a point.
2.) I typically have a minimum of three points (see the diagram above): One at the Midtones (at the halfway mark on the baseline), and then one each on either side of the Midtones point, also called the “Three-Quarter Tones” on the dark side and “Quarter Tones” on the light side. Until you get more comfortable with Curves, this is a great place to start.
3.) To move a point, you can drag it with your mouse cursor. You can also click on the point you’d like to change, making it “active” (the point turns into a small solid black square), and use the arrow keys on your keyboard. Curves works best when you make small incremental moves – I highly recommend using the arrow keys.
4.) After you add your points, you can move between them by clicking on the individual points with your cursor, but this can get cumbersome. Instead (in CS3 or earlier), you can press “Control” + “Tab” (“Control” + “Shift” + “Tab” to go backwards) to shuffle between points and change your “active” one. In CS4, simply use the “+” and “-“ keys to shuffle between points.
5.) If you only want to change a small portion of your curve, or you want to avoid unwanted movements in your curve if you move a particular point, you can set “anchor” points to keep the rest of the curve from moving.
6.) To keep your curve smooth and avoid unwanted “bumps”, it is best to move your Points away from the Baseline at a 45 degree angle, or perpendicular to the Baseline.
7.) To remove a point, simply drag it out of the grid and it will disappear.
Next Month, we’ll discuss how to adjust contrast, brightness and color using Curves.
by John Watts
Leave a Reply