
NOTE: This article is for older versions of Photoshop
(prior to CS6/CC), but the fundamentals still apply.
Frustrated by the fact that your photographic prints don’t look like your monitor, and vice versa?
You’ve got a “Color Management” issue!
Ah, do the words “Color Management” instantly give you a headache? They shouldn’t.
Read on…your color is to manage easier than you think.
Important Note: If you have not read Part 1 of this article, Click Here to read it. I discuss Color Management’s purpose, as well as Steps 1 and 2 of the “4 Successful Steps to Color Management”.
Step 3 – Assure that you have proper Lighting Conditions and Perception
It has been my experience that of the 4 steps to Color Management, this one is the most overlooked. I want to prove my point on Perception.
Have you ever walked inside a building after being outside in bright sunlight, and had to wait for your eyes to adjust to the inside lighting conditions? Our eyes adjust to the environment around us, which is why, when you are working on your images on your monitor, it is important to:
1.) Change monitor screen theme colors to neutral gray
I love my grandkids too as my desktop background, but they distract my eyes: start with a neutral color when doing critical adjustments – you’ll be surprised at the difference!
2.) Reduce room lighting
Your room lighting should be subdued, but not completely dark.
3.) Avoid “loud” wall colors
The best colors, of course, are grey and white.
4.) Be conscious of the color of your clothes
Wear neutral grays and black, not a colorful Hawaiian shirt.
If you take care of these properly, it makes interpreting what you see on your monitor easier.
Use a Proper Light Source for Viewing your Prints:
Your light source should ideally be 5000°K, or “D50”. The light fixture should be placed off to the side of your monitor, fairly close, but not so close that it causes major glare on your monitor screen.
There are many sources for 5000°K/D50 bulbs and fixtures. I would suggest a search on the internet or a visit to your local hardware store or office supply store. I personally like the Solux products or the Ott Lites. A good inexpensive and readily available alternative would be to buy GE Chroma50 or similar 5000°K fluorescent bulbs on the internet or your local hardware store.
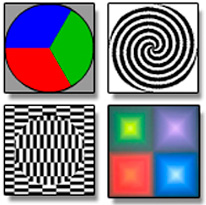
Our eyes are miracles, but….! Do not underestimate how easily our eyes (and by extension, our brain) can be tricked. Magicians make a living exploiting this fact all the time.
Take a look at these websites for proof that “Perception is not always Reality”:
www.michaelbach.de/ot
www.colorwiki.com/wiki/Image:Pink_green_dots.gif
Bottom Line: You may not be seeing what you think you are seeing! Give yourself an “edge” and eliminate as many variables as possible.
Step 4 (Optional) – Soft-Proof your Images in Photoshop
Soft Proofing is a previewing procedure that Photoshop uses to “see” the results of your Printer Profile. In other words, it allows you to view on your calibrated and profiled monitor what your image will look like when it is printed (using your Printer Profile). This is truly WYSIWYG – What You See Is What You Get!
However, a few things to note:
1.) Even with soft-proofing, you will never get your monitor to be a 100% accurate representation of your print, and vice versa, due to the different physical light properties between your monitor (emitted light) and your print (reflective light). It will never be perfect, but it will be extremely close!
2.) You cannot soft-proof in Photoshop Elements.
3.) With some of today’s modern printers, the visible changes when you turn on soft-proofing may be minimal. Typically, the you will see the most visible changes in bright primary colors and shadow detail.
4.) If you know what paper surface you will be using for a particular image, Soft-Proofing should be active before you start working on that image in Photoshop.
How it Works:
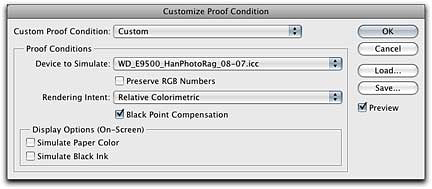
1.) Go to “View” -> “Proof Setup” -> “Custom”
2.) Go to “Device to Simulate” and select your printer profile from the drop-down list.
3.) “Rendering Intent” should be “Relative Colorimetric” and “Black Point Compensation” should be checked. Leave “Display Options” unchecked.
4.) Click “OK”.
* You can toggle this soft proof on and off by going to “View” -> “Proof Colors” or by using the speed key: Mac: “Command’ + “Y” or Windows: “Control” + “Y”.
* Soft Proofing is active when the profile name shows up in the Document Window’s title bar.
* You can save this soft proof setup by clicking on the “Save” button. The saved name will now show up in the list, “View” -> “Proof Setup”.
Until the next column, have fun and stay well!
by John Watts, Watts Digital Imaging

Leave a Reply