
If a picture is truly worth a thousand words, then here’s an overall visual representation of a proper Workflow in Photoshop.
Notice that your Workflow centers on creating a Master File.
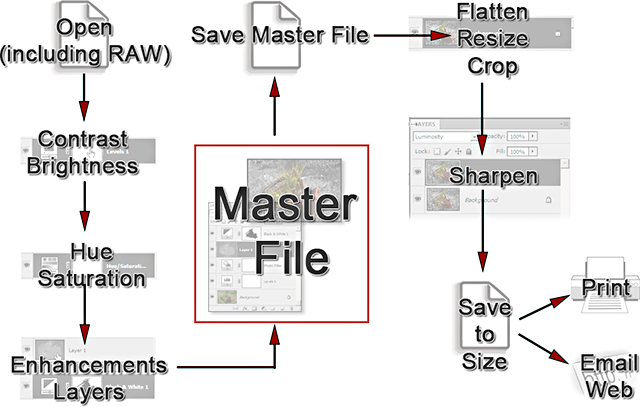
Creating a Master File is NOT for every image. It’s for those images that you want to spend time with, doing all that’s necessary to make your image “pretty”.
What is a “Master File”?
It’s a 16-Bit, un-flattened, un-sharpened, un-cropped, un-resized file designated as such in its file name.
Why create a Master File?
~ It’s Multi-purpose: Use it to create separate files for a specific print size or printer, for the Web, for magazine output, etc. and you’ll stay consistent between those files.
~ It’s easily correctable for color, contrast, cropping, enhancements, etc. non-destructively (no critical loss of data).
~ Sharpening is applied according to your print size: Let’s say that your Master File is created from a RAW file. It might be around 11”x16.5” at 300 ppi. If you sharpen for this size and reduce the file to prep for a 4×6 print, it will be over-sharpened.
Save your Master Files as TIFF files, not JPG files:
It is important to save your Master Files as TIFF’s, not as JPG’s. There are three reasons:
1. Every time that you open, work on, and save a JPG, there is degradation because the JPG compression scheme is not “lossless” – a TIFF is “lossless”.
2. You cannot save a JPG in 16 Bit.
3. You cannot save a JPG with Layers.
TIFF vs PSD
For all practical purposes, there is no difference between the TIFF format and the PSD format. My personal preference is TIFF, for two reasons:
1. A TIFF file is recognized in more programs and operating systems than a PSD.
2. Most professional photo printing services need a TIFF file in order for their specialized software (Printer “RIP’s”) to work properly.
That being said, there are two related situations in which you might want to save your Master File as a .PSD rather than a .TIFF.
1. Your original file is large to begin with (over 200 MB).
2. Your Master File becomes large (over 200 MB).
Examples:
~ It’s not unusual for me to work with 200 to 400 MB 16-bit Drum Scans from film transparencies, and a Master File with many layers can easily become 600 or 700 MB, which makes things very cumbersome and slows down my computer tremendously.
~ If I’m working on a complicated RAW file that involves a lot of specialized layers, my Master File could get bigger than 200 MB, even though my original RAW was only 20 MB or so, again slowing down my computer.
By turning off the “Maximize Compatibility” in my “Preferences” and saving these files as a PSD, the file size remains the same size, or sometimes even a bit smaller.
To turn off “Maximize Compatibility” (Applies only to PSD’s, not TIFF’s):
On a PC, go to the “Edit” Menu -> “Preferences…” -> “File Handling”
On a Mac, go to the “Photoshop” Menu -> “Preferences…” -> “File Handling”
In both versions: Change “Maximize PSD and PSB Compatibility” to “Never” in the drop-down menu.
“Dangers” to turning off “Maximize Compatibility”:
This function is designed to ensure that you can open your PSD file in previous versions of Photoshop, which can add significantly to your file size with functionality you may never need. For most people, this is not an issue, and you can safely turn off this function.
Until the next column, have fun and stay well!
by John Watts, Watts Digital Imaging
Leave a Reply