
Think of Panels as miniature workspaces, each accomplishing a different function. There are almost two dozen different panels available to you, but in the spirit of K.I.S.S. (Keep It Super Simple), I would suggest that you start with just the nine essential panels, and add those you deem necessary as you gain more experience with Photoshop. Here are details on two panels:
The Navigator Panel:
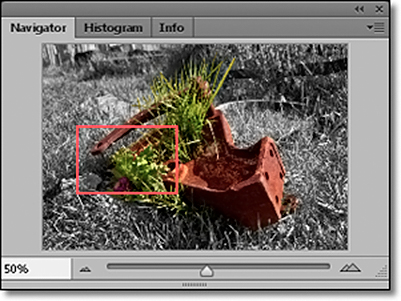
The Navigator Panel allows you to “navigate” around your image at large magnifications.
~ When your image is enlarged bigger than your Document Window, simply drag the “Red Box” with your mouse to the desired location.
~ Notice that the magnification of your image shows at the bottom, along with Sliders to reduce and enlarge.
~ This is also a good time to review these navigation “Speed Keys”, as this is where you’ll use them in conjunction with the Navigator Panel:
View: (Mac in Parentheses)
Control (Command) + “+ ”
Control (Command) + “ – ”
Control (Command) + “0 ”
“F” Key
“Tab” Key
Navigation:
“Navigator” Panel
“Space Bar” Key + Left Mouse Button
Enlarge Image Size
Reduce Image Size
Fit to Monitor Screen
Toggle through Standard & Full Screen Modes
Toggle to Show/Hide all Panels
Drag with mouse to desired location
Drag with mouse to desired location
The History Panel:
Use the “History Panel” as well as the “Visibility” and “Trash” Icons in the Layers Panel frequently (discussed in The Power of Layer Masks in Photoshop: Part 2). These are excellent ways to discover “what-if” scenarios and/or to make instant corrections on your image.
~ Every time you perform a function that changes your file, a “History State” is created. Click on the name of your desired location above the last entry to go back in “History”.
~ By default, Photoshop will save 20 History States. You can change it in “Preferences” -> Performance”, but probably don’t need to, as any more history states, and you’ll start to slow down your computer.
~ If you go back and forth between various History States and don’t work on and change your image, all the history states that follow are saved.
~ If you go back to a previous History State, then change your image, all the history states that follow are dumped.
~ When your image is closed in Photoshop, all of the current History States are lost. This is one reason you work in Adjustment Layers, discussed in my Apogee Photo article here.
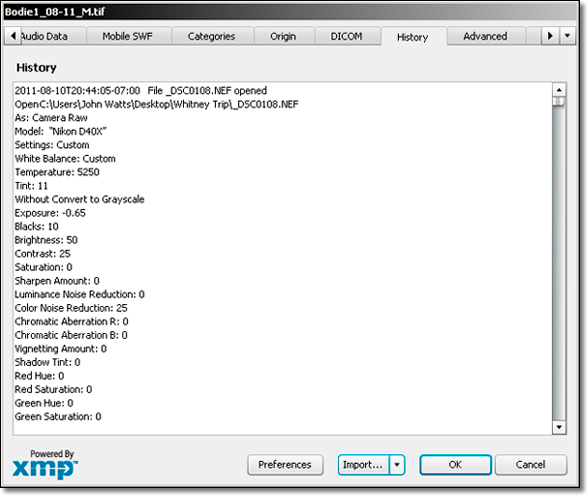
~ If you activated the “History Log” in “General Preferences”, a “History Log” is created (including what you did in Adobe Camera RAW) in your Metadata, and can be accessed (with an image opened that you’ve previously worked on) by going to “File” -> ” File Info…” -> “History”.
Scroll across the top and click on the “History” Tab.
Until the next column, have fun and stay well!
by John Watts, Watts Digital Imaging
All text & photos / screen shots: © 2013 John Watts, Watts Digital Imaging. All rights reserved.
Leave a Reply