
One of the beauties of Photoshop is the ability to make changes locally, not just globally. So lets look at photoshop layer masks. There are two main techniques to “localize” your changes. One is to make a “selection” using tools such as the Magic Wand or Lasso tools, then creating an Adjustment Layer/Layer Mask to make your changes to that selection. The other technique, and one that can be far quicker, is by using Brushes and Layer Masks.
The purpose of a Layer Mask is to hide or reveal portions of a layer. It is where you manage your selections. You will either “paint” (with the Brush Tool) or “draw” (with the Lasso Tool or Magic Wand Tool) to “shape” your Layer Mask. We are going to concentrate on using Brushes.
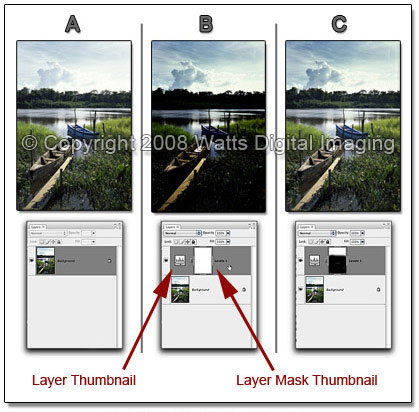
Let’s use the images above as an example. In Image “A”, I have a nice image, but the sky is washed out. In Image “B”, I am making a levels adjustment for contrast to punch up the sky, but obviously the foreground is too dark. If I had used a selection tool such as the magic wand on the sky, it would probably take awhile to make that selection. Instead, in Image “C”, I “mask out”, with a few quick strokes of the brush tool, the areas that I don’t want affected by the Levels layer. These changes show up as black in the Layer Mask thumbnail.
So how did I do that? I chose the Layer Mask Thumbnail (the box on the right) by clicking on it once in the adjustment layer. Then, with the Brush Tool active, I “painted” in the image using “Black” as my foreground color to hide the areas I don’t want affected by the layer–where I “paint” shows up in the Layer Mask Thumbnail as black. The areas that are white in the thumbnail reveal the layer.
Just keep remembering:
Black “Hides”, White “Reveals”

where do I find or create a photoshop layer mask ? Three places:
1. When you create an adjustment layer, Photoshop automatically adds a “Layer Mask Thumbnail” to your layer (the white box on the right).
2. For a new layer or background layer, click the “Add a layer mask” button in the layers palette. It’s one of the series of buttons at the bottom of the layers palette shaped like a box with a circle in it. Once clicked, you will see a layer mask thumbnail added to your layer.
3. You can also go to the “Layer Menu” -> “Layer Mask” -> “Reveal All” or “Hide All”. Your choice will depend on whether you want to reveal or hide the effects of the whole layer.
Okay, so now you’re ready to get started on photoshop layer mask:
1. Decide which layer that you want to apply the layer mask to, and highlight it in the layers palette.
2. Now, click once in the layer mask thumbnail, and a thin line will highlight it to show that the layer mask is active.
3. In your image (not in the thumbnail), you are going to “paint” the areas that you want to hide and reveal with the brush tool. The foreground color is the active brush tool color. Remember, a black brush “hides” and a white brush “reveals” the effects of the layer.
Here are a few pointers to help you fine-tune the process and speed things along when creating a photoshop layer mask:
- You can switch between a black and a white brush color using the “switch” feature in the tools palette, or use the speed key “X”. Remember, the foreground color is the active brush color. I find it handy to keep my left finger on the “X” key and toggle the brush color back and forth as needed.
- You can automatically choose black and white as the foreground and background colors by pressing the appropriate button in the toolbox (see the image above of the toolbox).
- You are not limited to black-and-white brush colors for hiding or revealing–you can vary the brush transparency by using different shades of gray. Double click on either the foreground or the background color in the toolbox and the “color picker” will pop up. Choose different values of gray as desired.
by John Watts, Watts Digital Imaging
Leave a Reply