
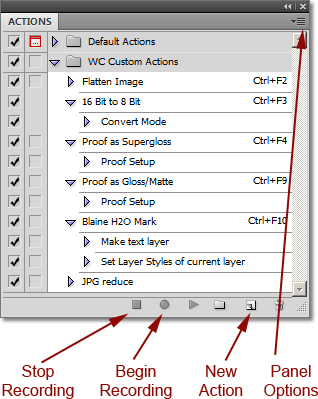
ACTIONS
Purpose:
An “Action” is a way of stringing together a series of commands (A “Macro”) by pressing one key combination rather than a series of commands. This allows you to initiate repetitive functions easier and quicker.
Screen shots: © 2011 John Watts. All Rights Reserved.
Where to Find:
You can create and view existing Actions in the “Actions” Panel.
Suggested Actions:
There are Default Actions included with Photoshop – feel free to explore them. However, there are a few Actions that I created that I use on a regular basis.
> Flatten Image
> Convert from 16 Bit to 8 Bit
> Load Printer Profile
You’ll discover that creating an Action for a repetitive function will save all sorts of time. Such as…
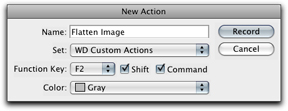
To set up a “Flatten image” Action:
1. Open an image that needs flattening and then go to the “Actions” Panel.
2. In the New Action Dialogue Box (see example)name your Action, such as “Flatten Image”, and choose an appropriate function key (or combination). Here’s what I use: For Mac, “Command” + “F2”, and for Windows, “Control” + “F2”.
3. Press the “New Action” button at the bottom of the Panel, or go to the Panel Options menu and select “New Action…”.
4. Click on the “Record”Button. (At this point, all steps that you perform will be recorded until you press the “Stop Recording” button.)
5. Go to “Layer” -> “Flatten Image”.
6. Now, press the “Stop Recording” button at the bottom of the Panel. You can also go to the Panel Options menu, and select “Stop Recording”.
Now, when you press “Command” + “F2” (or whatever you choose) in the future, your image will be flattened, saving you quite a bit of time.
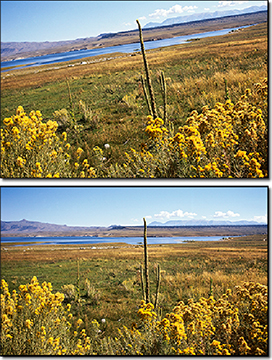
STRAIGHTEN YOUR HORIZON
Is the horizon in your digital image not straight? If not, it can be very distracting. Here’s an easy way to straighten it in Photoshop and Elements:
© 2011 John Watts. All Rights Reserved.
CS5:
1. Choose the “Ruler Tool”. To access it, click the “Hidden Tool Triangle”in your Tools Panel under the “Eyedropper Tool”.
2. Draw a line along your horizon.
3. Press the “Straighten”button in the Options Bar at the top of your program.
CS4 and earlier:
1. Choose the “Ruler Tool”(It’s called the “Measure Tool” in CS2 and earlier). To access it, click the “Hidden Tool Triangle”in your Tools Panel under the “Eyedropper Tool”.
2. Draw a line along your horizon.
3. Go to the “Image”menu, choose “Image Rotation” (or “Rotate Canvas” in earlier versions), choose “Arbitrary…”, leave the number and direction alone, and click “OK”.
Viola! Your horizon is now straight! By the way, this technique works equally well if you need to straighten vertically, such as architectural photography.
by John Watts, Watts Digital Imaging
Leave a Reply