
Copyright © Jim Austin
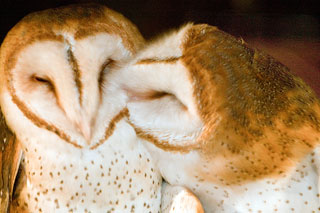
Kissing Barn Owls: Affectionate owls embrace at a display in the South Carolina Aquarium. Barn owls have asymmetrical ears and facial features shaped like a satellite dish that funnel sound, which helps them triangulate the location of prey.
As a barn owl gave her mate an affectionate peck, I wondered “Why are owls in an aquarium?” Just a hoot away from Charleston’s harbor, at the South Carolina Aquarium, the two barn owls were at home in an exhibit of the Southeast Appalachian watershed. Taking photos at the aquarium, I learned that Charleston’s aquarium offers more than just views of underwater life. It immerses you in an underwater world.
Join me to learn how to photograph in an aquarium.
DARK MATTERS
Aquarium tanks can be so dark it takes your mind awhile to adjust. Often you must photograph through thick glass that reflects light back to your lens. The ambient light is fluorescent or tungsten. Coping with all these challenges is valuable; you can improve your editing and shooting skills.
Copyright © Jim Austin
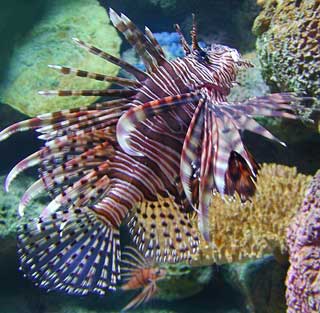
Capture the Color: A Lionfish at the Denver Aquarium was shot with diffused flash, with the lens placed on the tank glass. The flash added shadow detail and made colors brighter.
GETTING READY TO CATCH FISH
Before you leave, get all your gear into one bag. You want to keep it simple. Take one camera to an aquarium. Leave the cell phone behind. Take your point- and- shoot camera if you can use it with Manual mode settings.
Since aquarium glass can be scratched, attach a rubber lens hood to your lens if you can. The rubber does not damage the aquarium glass when pressing a lens against it.
Leave your tall tripod at home since most aquariums do not allow them. Smaller tripods like Gorillapods, however, can be helpful to steady your camera. A circular polarizing filter that allows for auto-focus is handy to cut down glare when you photograph the water’s surface from above. Take extra batteries. Pack a flash diffuser.
BRING SOME LIGHT ALONG
Smaller flashes on point and shoot cameras, without diffusion, cause bright white reflections in aquarium glass. The secret is to make the flash softer, larger, but less directional. When using flash, reflections are the main problem. So, diffuse the flash with a small soft-box. Change your shooting angle; try to get lower or go higher than eye level when shooting through glass in order to get the least distortion and to minimize any flash reflections.
Copyright © Jim Austin
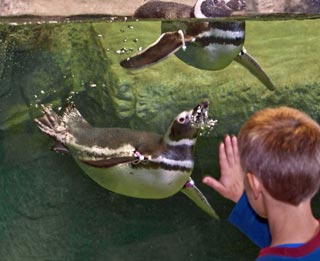
Shoot Subjects Close to the Glass: Diffused flash helped to keep these fast diving Magellanic penguins sharp. There was no reflection because I shot at an angle to the tank.
For example, to capture these diving Magellanic penguins, I attached a home-made diffuser on my flash. Instead of shooting directly at them, I moved so the reflection from on the glass would not bounce back to the lens. It takes more time, but to reduce flash reflections I photograph from an angle so the flash is not perpendicular to the glass tank. The payoff is an evenly lit action shot.
HIGHER ASA: FASTER SPEEDS
Remember to reset your ASA to a fast setting: on a digital SLR, my standard is 1600, and I also use 3200 and 6400. This higher ASA causes noise that looks like grain. We’ll find the solution to this issue later in the article.
Shooting moving sharks and fish, you should make a lot more exposures than usual. Take 5-10 times the number of shots you usually take.

Copyright © Jim Austin
Interactions: At Denver’s Aquarium, scuba divers put on a show. Use a fast lens and set your camera drive to Continuous Mode and you’ll be ready to catch the action.
To accomplish this, set your drive mode to continuous so you can take a series of rapid shots. Instead of trying to catch a decisive moment, just pick a stable or slow-moving subject.
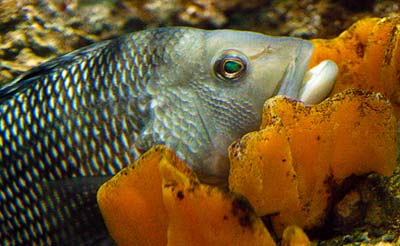
Find interactions between people and fish that are close to the glass. By doing so, you can reduce distortion caused by water between you and your aquarium subjects.
If you can, choose Aperture priority (marked by the letter A on your mode dial). Select large apertures of f/2.8 , f/4, and on up to f/5.6. Even at ASA 1600 the light may be too dim to use any smaller apertures.
Think about the shutter speed you are using; at 1/30th of a second or slower, you may get a blurred image. Instead of changing to a faster speed, try panning with your moving subjects. You can also set your flash to rear curtain synch, or second curtain synch for a motion effect.
STABILIZE FOR SHARP SHOTS
Low light means long shutter speeds, and these create blur when you hand hold a lens. So, if you have Image Stabilization or Vibration Reduction, switch it on.
While they won’t turn an out of focus shot into a sharp one, these features boost sharpness for photographs in the low light of an aquarium.
Copyright © Jim Austin
Match the Light Source: I changed the White Balance setting in the camera to match the Fluorescent lighting.
Copyright © Jim Austin
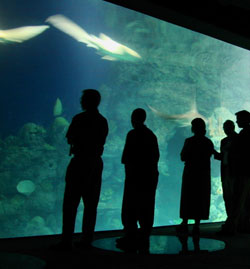
People in Shadow: For aquarium silhouettes, set your camera exposure meter to spot meter, take a reading off an area of water in the tank area.
LIGHTING AND COLOR
Identify the type of light source in the tank if you can. Then, adjust your White Balance mode to Florescent or Tungsten. If the sun is the main light source, use Auto White Balance (AWB). To get photos of fish that are full of color, you can boost the saturation setting in your DSLR if your camera allows it. Or, if you prefer, do this in Adobe Lightroom or Adobe Camera RAW.
For silhouettes, change your Metering Mode to Spot meter. Point the camera at the fish in the water, and then wait for visitors to walk in front of your lens as they look at the tank. People will appear silhouetted.
ACQUARIUM MANNERS
Always avoid flashing people in the face in dark aquariums by cutting your flash output power. Ask permission from parents to photograph children. If you bring your own kids, lend them a point and shoot and turn off the flash, so they can take some shots. If you meet loud cell phone users who are glued in place, ignore and go around them; any confrontation will just take away your valuable photography time.
PHOTOSHOP TIPS
After downloading from your memory card, open Photoshop or Photoshop Elements. To see your entire image on screen, just hit the Tab key. This hides Photoshop’s panels. Then type CTRL + letter O. Your picture will become as large as possible onscreen. Grab the Clone Stamp to get rid of white spots in the water, or unwanted reflections.
Copyright © Jim Austin
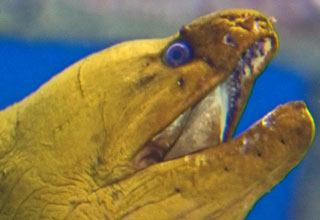
Correct Contrast: I employed Adjustment Layers to correct tones, hue and saturation, and sharpness for this portrait of a breathing moray eel.
MORE TIPS
You may wish to correct contrast. For color images, I borrow a tip from Katrin Eismann (New York School of Visual Arts Director). For a powerful tone adjustment, use Curves on an Adjustment Layer. To do this, open your Layers palette, and set the Blending Mode to Luminosity, a setting at the bottom of the Blending Mode list of settings that pop out when you click Blend Mode. This prevents shifts in saturation and color that happen when using a Normal Blend Mode as you change tones with your curves adjustment.
Copyright © Jim Austin
See Past the Noise: High ASA/ISO setting create noise. Get rid of it with noise reduction plug-in software link NIK Dfine or Noise Ninja.
SHADOW / HIGHLIGHT
Sometimes Photoshop’s Shadow/Highlight (Ctrl + H) tool can fix a high contrast image. Sliding the Shadows > Amount slider and the Highlights > Amount slider to the right can sometimes bring out a finer gradation of blacks and whites in an image.
REDUCE NOISE
At high ASA/ISO, use noise reduction software on all images. Skip this step, and you risk noise in your prints. Noise Ninja, NIK Dfine, or Neat Image Pro are all good programs that help cut down noise from the high ASA/ISO setting, and all have free trial downloads for Mac and Windows.
WHY YOUR VISIT COUNTS:
IT HELPS SUPPORT AQUARIUM SPECIES
A visit to your aquarium helps. For instance, admission fees at the South Carolina Aquarium helps to support its 5000 species. Your aquarium contribution helps educate the next generation. For instance, a structured online curriculum for grades K-12 is built into each trip that school children make to the South Carolina Aquarium. Lesson plans on the SCA website gives school teachers resources for specific interactive activities; their students are immersed in entire ecosystems. For example, when students conduct water tests – and learn about salinity, pH and temperature – this helps them learn how to reduce watershed pollution. Your visit and contribution helps our kids learn about marine science.
Copyright © Jim Austin
Copyright © Andy Long
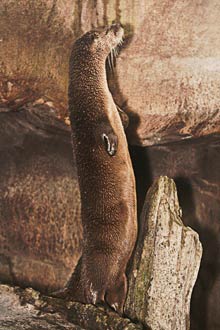
Aquarium Animal?: River otters are popular in large aquariums. Instead of trying to get one underwater, I waited until the otter smelled its dinner, at feeding time. North American River otters, swimming under ice for long periods, can even use trapped air bubbles to get oxygen.
by Jim Austin, M.A., A.C.E.
Leave a Reply