
UPDATED INFORMATION FOR PHOTOSHOP CS6 / CLOUD CAN BE FOUND HERE:
![]()
![]() Photoshop CS6 / CC: The Master File and Workflow
Photoshop CS6 / CC: The Master File and Workflow
Learn what it is and when and why you should create it. Learn about using TIFF or PSD photo files
By John Watts
![]()
![]() RAW Fundamentals in Photoshop, Part 1
RAW Fundamentals in Photoshop, Part 1
Learn why to use Camera RAW files format and how to work with the Adobe Camera RAW plug-in for Photoshop.
By John Watts
![]()
![]() RAW Fundamentals in Photoshop, Part 2
RAW Fundamentals in Photoshop, Part 2
Learn how to access the ACR Plug-in and the tools and techniques used for working in the ACR Workspace.
By John Watts
Creating a Master File is the “best way” to prep your important images for a multitude of uses, including printing.
Before you can fully understand the concept of creating a Master File, you should understand the difference between shooting in RAW file format versus JPG file format.
A RAW File is Different from a JPG File in Two Major Respects
1. There’s much more information in a 16 bit RAW file versus a JPG’s 8 bit file.
It really all boils down to “digital information” – the more you’re able to capture when you shoot, the more information you have to effectively create your image. A 16 bit RAW file is 65,000+ values of each color, whereas a n 8 bit JPG is only 255 values of each color. That’s a BIG difference! Simple – – more information equals better final output.
2. There’s automatic “file compression & processing” built into the creation of a JPG, whether you want it or not. The camera’s computer chip, essentially, is telling you what it thinks your image should look like.
Because of the effects of Tonal Compression (the inevitable reduction and degradation of the original scene from your eyes to the print), poor results will show up first in “gradients”, or “continuous-tone” areas where the tonal qualities change subtly.
Let’s say, for example, that our eyes see 100 shades of red. The camera, shot in RAW (16 bit), may see only 70 shades. Then Photoshop may only see 50 shades of red and the printer may only print 40 shades of the original 100 shades available.
If, however, you shoot in JPG (8 bit), Tonal Compression will limit you to only 10 or 15 printable shades of red – not good!
EXAMPLE: Most sunset images shot in 8 bit have “banding”, posterization, and digital noise. They just look fake as the “gradient” changes, due to the effects of Tonal Compression. That same sunset, shot in 16 bit, won’t have near as many problems. In addition, if you need to punch up the sky by increasing the “blue” saturation, chances are that you can do so in 16 bit without major problems – it just won’t happen effectively in 8 bit.
In addition, JPG has other limitations: Every time that you open, work on, and save a JPG, there is degradation because the JPG compression scheme is not “lossless” – it dumps pixels, whether you want it to or not. You cannot save a JPG in 16 Bit and you cannot save a JPG with Layers (critical in Photoshop).
Why do you need all of this information?
You’ll have a better chance of reproducing your original scene more accurately, because you’re capturing a greater range of colors and luminance.
The MASTER FILE
What is a “Master File”?
It’s a 16-Bit, un-sharpened, un-cropped, un-resized, un-flattened file (designated as such in its file name), and saved as a “lossless” TIFF.
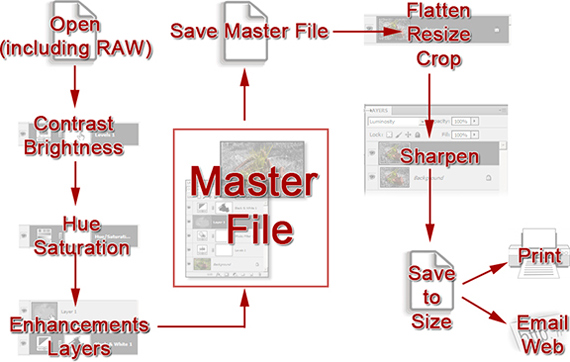
The chart shown above is a visual representation of a proper Photoshop workflow for your important images. Notice that everything is centered around the Master File.
Creating a Master File is NOT for every image. It’s for those images with which you want to spend the time doing all that’s necessary to make your image “pretty”. Here’s where you pour your artistic “blood, sweat and tears” into your image, using Photoshop as your “brush”.
Why create a Master File?
1. Its multipurpose and consistent. From your Master File, you’re able to create files for a specific print size or printer, for the Web, for magazine output, and so on.
2. Its easily correctable for color, contrast, cropping, enhancements, etc. non-destructively, due to the use of Layer Masks.
3. Sharpening is applied according to your print size.
Let’s say that your Master File is created from a RAW file that is around 11×16.5 inches. If you sharpen for this size and reduce the file to prep for a 4×6 inch print, it will be over-sharpened.
I strongly suggest that you work in RAW and create a Master File for all of your important images.
Until the next time, have fun and stay well!
by John Watts, Watts Digital Imaging
All text & photos / screen shots: © 2013 John Watts, Watts Digital Imaging. All rights reserved.
Leave a Reply