
In the days before digital imaging, Steichenlab in Toronto had a wizard who could actually dodge and burn slides. Before he left to pursue a music career in Montreal, he achieved “market quality” on a number of my shots, and I mourned his passing. Today, any photographer with a modern computer and printer can easily do this and more in the basement to produce prints that rival the best labs. You can sharpen your photos or employ selective focus, change colors and color balance, and play with brightness and contrast. You can create a collage of images, add text to your pictures, or copy parts of an image to another or to itself. You can print your images in high resolution or save them for later transfer back to slide film.
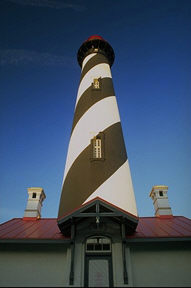
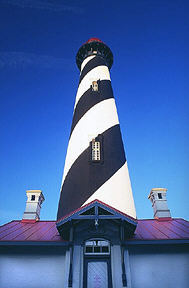
For example, in the two images shown here of the St. Augustine Light, the original image (shown on the left) was underexposed, and the light on it was not the best. I increased the exposure and contrast overall and selectively lightened the colors of the bottom. The final image (shown on the right) is a marketable photograph. (NOTE: The following discussion assumes you can already find and select the various tools and functions of Photoshop. These ideas are only a starting point, focusing on techniques photographers will find useful. You should use a good instruction manual to hone your skills.)
While I’ve used Photoshop 4, both earlier and later versions will provide most of the same capabilities. Finally, the effect of any of these operations is infinitely adjustable and can easily be undone, if you wish to start again. I’ve been using a PC, but I’m given to understand the Mac version of Photoshop is very similar.
HOW DO I GET MY SLIDES INTO THE COMPUTER?
You have various options for digitizing your photographs. If you’re using a digital camera, it will output files that can be downloaded directly. You can have your slides or prints scanned, and those files can be downloaded. To achieve the best resolution, however, you should have your pictures digitized on a Kodak Photo CD, and Photoshop can then download the files from the CD ROM. Download them as a TIFF file. You can compress them later, if you wish. You can store about ninety slides, each an eighteen megabyte file, on a CD ROM, depending on how many times you “open” the ROM for digitizing. The more slides you digitize at a time, the more you can fit, and the less it will cost you.
If you wish to produce a new slide, or print in large format, you’ll have to work with 18Mb files. This means your computer should have at least 64 Mb of RAM memory. If you’re going to end up with new images on film, you’ll need some kind of ZIP drive to transport those large files.
HOW DO I SAVE MY WORK AFTER I’M DONE?
You must save your new image as a file after you’ve finished working on it. You can save it in any folder or sub-folder and as any filename you wish.
It’s a good idea to save your file from time to time as you’re working on it, just in case of disaster. To save your file …
FILE –> SAVE AS … (FILENAME)
(Specify the folder, if it’s not the default that is shown.)
CONTROLLING YOUR DISPLAY WINDOW
1. To hide the toolbox, status bar, and any open palettes (brushes, color, layers, info), press <TAB>. Press <TAB> again to re-display them.
2. To hide the palettes but retain the toolbox and status bar, press <SHIFT> + <TAB>.
3. The palettes may be displayed, as needed, by using these function keys:
BRUSHES <F5>
COLORS <F6>
LAYERS <F7>
INFO <F8>
4. The toolbox may be viewed several ways, as follows:
a.. To cycle through the hidden tools (tools showing small triangles), press <ALT>, and click on the tool icon.
b. Press and hold the left mouse button on the tool icon, and DRAG across the tool’s flyout menu.
5. Most tools have a sub-menu, which you use to alter the tool’s effect in various ways. You can display this menu by pressing <ENTER>, at any time after
choosing the tool. This displayed sub-menu will change automatically, as you choose each new tool.
6. It’s often useful to be able to see how large a brush you have, when using a brush tool. To display a brush as a cursor:
FILE –> PREFERENCES –> GENERAL –> DISPLAY & CURSORS –> BRUSH SIZE
7. To show a crosshair cursor when using a painting or editing tool: Press <CAPS LOCK> while using the tool.
HOW DO I GET STARTED?
Whenever I begin work on a new image, I start with the following procedures:
1. I check to see if the image SHARPNESS can be improved. FILTER –> SHARPEN –> UNSHARP MASK
Start with a RADIUS OF 0.5, increasing it toward 2, maximum.
Set the THRESHOLD TO 0.
Start with an AMOUNT of 100%, but check the appearance of the entire image before you go ahead. Several applications of a slight amount of sharpening is better than one big application. If you don’t like the result, go back to the original by using: EDIT –> UNDO.
You can UNDO the very last application of every function and tool. In Photoshop 5, you can UNDO as far back as you wish.
2. I check to see if the BRIGHTNESS can be improved. IMAGE –> ADJUST –> BRIGHTNESS/CONTRAST
Experiment with the two sliders until you have the desired effect. You’ll often find you can make no improvement to the original.
3. I adjust the contrast and color correction. IMAGE –> ADJUST –> AUTO LEVELS
IMAGE –> ADJUST –> LEVELS
Vary the position of the middle arrow to adjust contrast. IMAGE –> ADJUST –> VARIATIONS
Increase saturation by pushing SATURATION. Adjust color cast by pushing MIDTONES.
4. Now, I clean up dust and imperfections. I prefer using the RUBBER STAMP tool, rather than the “dust and scratches” filter.
a) Choose the RUBBER STAMP tool.
(b) Place the mouse cursor close to the area you wish to clean up, press <ALT>, and click on this area. This is the area from which you will “clone” information.
(c) Move the mouse cursor over the area to be cleaned, and click on it. Paint the area if necessary. If the effect is too intense or too widespread, change the
brush you are using, or vary the opacity, inside the RUBBER STAMP sub-menu.
5. Finally, I crop the image as necessary.
a) Choose the CROP tool.
(b) Drag a “crop box” inside your image.
(c) Push the “adjust boxes” to extend the box as desired.
(d) Press <ENTER> to effect the cropping.
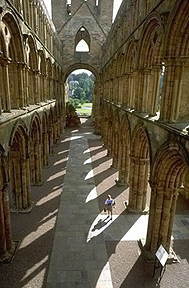
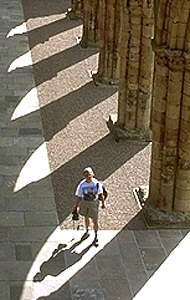
To see the benefits of cropping, look at these two shots made at Jedburgh Abbey in Scotland. On the left is the original shot, showing the entire Abbey floor as I made it from a high viewpoint with a 24mm lens. There are actually three or more good shots within this frame, of which this is only one. Another good one is shown at the right, where I’ve eliminated most of the Abbey floor, leaving only the wonderful shadows and the figure.
HOW DO I TELL THE PROGRAM WHAT TO MODIFY?
The tools and functions that Photoshop provides may be applied to the entire image or to only selected sections of that image. You’ll find that making precise selections takes practice, but the effort will result in images that nobody will know you have “‘massaged.” There are a number of different methods available to select different parts of your photograph, starting with “fast and easy” and ending with “extremely precise.” Note that, once you’ve created a selection outline, you can modify it by choosing: SELECT –> MODIFY … and choosing the option that suits you.
You should have the areas you wish to select on-screen magnified as much as possible before you begin. Use the NAVIGATOR window to change your magnification, and then to center the magnified section of the image:
1. Zoom at any ratio by moving the slider bar.
2. Zoom a specified section of the image, by clicking on it, after choosing the ZOOM TOOL.
3. Zoom in/out at specific ratios by clicking the “mountain buttons”, beside the slider bar.
a. To outline a selection shaped like a square, circle, or line, choose the MARQUEE tools. Simply DRAG the shape you require to select.
b. To outline a multishaped selection, using the LASSO tool: (Holding the mouse button down allows you to draw freehand. Releasing the mouse button and clicking from point to point allows you to choose points connected by straight lines.)
1.) Choose the LASSO tool.
2.) Draw freehand around the shape, without releasing the mouse button, until you’ve “closed” the shape of your selection.
c. To ADD straight-line sections to a partially selected shape:
1.) Press and hold the <ALT> key.
2.) Click on the first point of a straight line.
3.) Move the mouse to the second point.
4.) Click on the second point, then move to the third, and so forth. Maintain pressure on the <ALT> key, to prevent selection from self-completing.
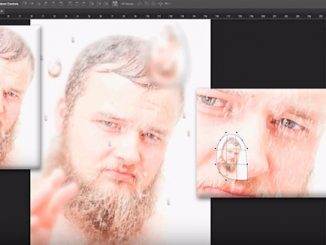
You can return to freehand drawing at any time, by holding down the mouse button. When you’ve completed your selection, the selection outline will be shown as contained by “marching ants”, similar to the picture shown to the right. The effect is exaggerated in this example, but you get the idea.
5.) You can de-select your shape at any time by pressing <CTRL> + D.
4. To select areas of similar color, use the MAGIC WAND tool.
(Note: If you press the <SHIFT> key, you can add to previously-selected areas, even after changing tools.)
a. Choose the MAGIC WAND tool.
b. Click on the area to select.
c. Adjust the TOLERANCE level in the sub-menu, to vary the effect and coverage of the tool.
5. To select areas of similar color automatically:
a. SELECT –> COLOR RANGE
b.Click on SAMPLED COLORS (EYEDROPPER).
c. In the image, click on the color to sample from the image, or select a color from the displayed chart.
d. Click on OK in the dialogue box. (Note: You can adjust the FUZZINESS in the sub-menu, for the selectivity control you need.)
6. To select all pixels of similar color in the image, even if they are not close to one another:
a. Choose the MARQUEE tool. Select the color area in the image you wish to work on by drawing a small sample rectangle in the image area.
b. Double-click the MAGIC WAND tool, and set the TOLERANCE to a low value. Be sure that ANTI-ALIASED is selected.
c. SELECT –> SIMILAR (If too much is selected, reduce the TOLERANCE setting.)
d. To select all ADJACENT similar pixels to your original selection: SELECT –> GROW
7. The most precise, and precisely modified selections, may be made by using the PATHS functions. The beauty of this function is that not only can you can make or modify your selection, pixel by pixel, you can change the NAVIGATOR settings for magnification at any time while you’re doing it!
a.. Choose the PEN tool.
b. Draw a path around your selection, one point at a time. Use as many points as you can, as they’re harder to add later.
c. To adjust your path, choose the CONVERT ANCHOR POINT TOOL (ARROWHEAD), in the PEN tool flyout menu. Each path point may be moved
independently, and the connecting lines may be bent or twisted. (This takes practice!)
d. If you need extra adjustment points, choose the PEN+ tool, then click the area in your path where you need an extra point.
e. To convert the path to a selection, activate the PATHS PALETTE.
1) Click on the “right triangle” in the PATHS PALETTE.
2) Click on MAKE SELECTION.
3) Click on TURN OFF PATH.
by Michael Goldstein

Leave a Reply