
Layer Masks can be one of the tougher concepts of Photoshop to wrap your brain around, but once you understand the basics, anything is possible! This will take more than one Photoshop tutorial, so we’ll break this up into multiple articles over the next several months. Read on, and discover one of the most powerful Photoshop editing features.
What’s a Layer Mask and why do I need it?
Layer Masks give you the ability to make adjustments to your image locally, not just globally, by hiding or revealing portions of your adjustment.
What adjustments can you localize? Virtually anything you can do in Photoshop, such as contrast, color, sharpness, brightness, etc.
You work with Layer Masks through Adjustment Layers, such as the Levels or Hue Saturation Adjustment layers. Think of Adjustment Layers as “clear plastic overlays” sandwiched over your original image, with each layer giving you the global ability to control an adjustment (contrast, color, etc.) to your final image. In addition to “global” control, you can define what areas to “localize” by shaping your Layer Mask (part of an adjustment layer) using Selections.
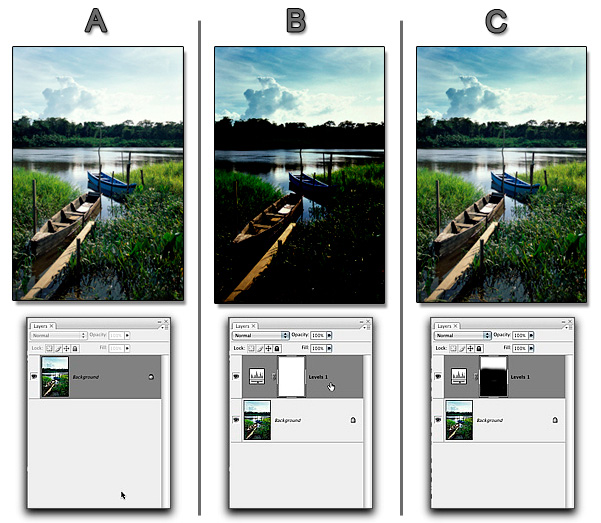
Quick Example – How This Works:
In Image “A”, I have a nice image, but the sky is washed out.
In Image “B”, I create a Levels Adjustment Layer, and then make a “Global” Levels adjustment for contrast to punch up the sky – but obviously the foreground is too dark.
In Image “C”, I “Mask Out” the areas that I don’t want affected by the Levels layer via the Layer Mask. These changes show up as black in the Layer Mask Thumbnail.
© 2011 John Watts. All Rights Reserved.
Adjustment Layers
The purpose of Adjustment Layers is to allow you to make adjustments to your image, both globally and locally, in a non-destructive manner. This is one of the more powerful features in Photoshop. By the way, “destructive” is defined as causing pixelization and posterization to your digital image, resulting in loss of critical information..
© 2011 John Watts. All Rights Reserved.
What’s in an adjustment layer?
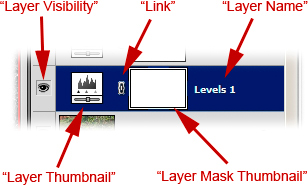
Layer Visibility
Layer thumbnail Link (leave this alone)
Layer Mask Thumbnail
Layer Name (double click to change)
Where to Find:
You work with adjustment layers in the Layers Panel. If you set your workspace up as suggested, then your layers panel will be near the bottom right-hand corner of your screen.
To Create an Adjustment Layer – A Few Different Ways:
In all versions (including Elements), you can click on the “New Adjustment Layer” button in the “Layers Panel” (the Yin-Yang” button), and choose the desired tool from the drop-down list. You can also go to the “Layers” menu -> “New Adjustment Layer” and choose your desired tool from that menu.
In CS4 and later (full version), click on the desired tool icon in the “Adjustment Panel”. The name of the Tool will show up in the Tab.
To Edit an Existing Layer: Click on the Adjustment Layer’s Layer Thumbnail to make it active. Once you do, the Dialog Box for that particular tool shows up in the Adjustment Panel.
Until the next time, have fun and stay well!
Here are the links to each:
The Power of Layer Masks in Photoshop: Part 2 – Layers Panel
The Power of Layer Masks in Photoshop: Part 3 – Tools and Techniques
The Power of Layer Masks in Photoshop: Part 4 – The Magic Wand Tool
The Power of Layer Masks in Photoshop: Part 5 – The Brush and Lasso Tools
by John Watts, Watts Digital Imaging
Leave a Reply