
Layer Masks can be one of the tougher concepts of Photoshop to wrap your brain around, but once you understand the basics, anything is possible! This will take more than one Photoshop technique article, so we’ll break this up into multiple articles over the next several months.
Here are the links to each:
The Power of Layer Masks in Photoshop: Part 1 – Layer Masks and Adjustment Layers
The Power of Layer Masks in Photoshop: Part 3 – Tools and Techniques
The Power of Layer Masks in Photoshop: Part 4 – The Magic Wand Tool
The Power of Layer Masks in Photoshop: Part 5 – The Brush and Lasso Tools
Read on, and discover one of the most powerful photo editing features.
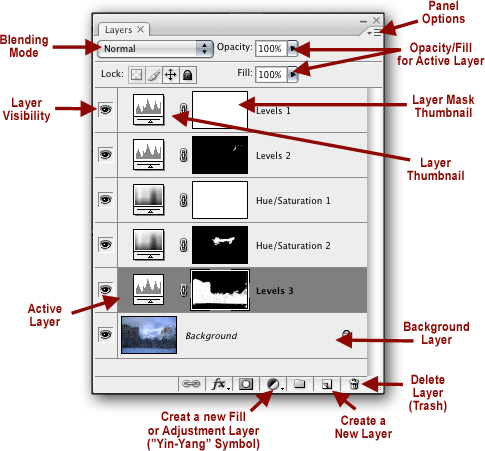
The Layers Panel
The Layers Panel is simply where you’ll manage all of your Layers, including Adjustment Layers.
Here’s what you need to know:
© 2011 John Watts. All Rights Reserved.
* A Background Layer is the image you bring into Photoshop. This layer should generally be left alone, and most of the time, no work should be done to it.
* The Active Layer is the layer that you are working on, and is highlighted in a darker color.
* You can control your
Layer Visibility by toggling the “eye” on and off. This will help you see the effects of a particular layer on your image.
*To access the Layers Panel Options, just click on the button shown in the diagram above. Here you can quickly delete a layer, duplicate a layer, flatten you image, and so on. If you go to “Panel Options” at the bottom, you can change the size of the thumbnails displayed in the panel (a personal favorite, as my eyes are getting older!). By the way, each Panel (not just this one) has a different set of options.
* If your Layers Panel is fairly empty of Layers and there is any empty gray space, you can “right-mouse click” and quickly choose your thumbnail size.
* You can control the opacity of a particular layer by moving the Opacity Slider. 0% Opacity means that none of the effects of that layer will show through. 100% Opacity means that all of the effects of that layer show through.
* You can Delete a Layer by dragging it to the Trash Icon.
Layer Mask Basics
* A Layer Mask is shaped in conjunction with the Layer Mask Thumbnail, one of the five parts of an Adjustment Layer.
* If you need to activate the Layer Mask, click in the Layer Mask Thumbnail and a thin line will highlight it to show that the Layer Mask is active.
* Activating your Layer Mask allows you to use the appropriate selection tools in your image (NOT in the Thumbnail) to “paint” or “draw” the areas that you want to hide and/or reveal.
As you shape with Selection Tools (discussed in future articles), your results will not only show up in your image, but in the Layer Mask Thumbnail as Black and White.
Key Point: Black “Hides”& White “Reveals”
the effects of your Layer Mask …
* If you’d like to see your Layer Mask super-imposed over your image, hold down the “Alt” key (“Option” on a Mac), then click once with your left Mouse button in your Layer Mask Thumbnail. To remove it, simply do the same thing again. Oh, and you can work on your super-imposed mask with selection tools, too – no need to go back to the image.
* To fill your Layer Mask with Black (to hide) rather than the default of White (to reveal), click on the Layer Mask Thumbnail so it is active, use the speed key “Ctrl” (“Command” on a Mac) + I, or go to “Edit” -> “Fill” -> and choose “Black” from the “Contents” drop-down menu.
* If you’d like to use your “drawing” tools AFTER a Layer Mask has been created, you can “fill” your selection with the appropriate color by going to “Edit” -> “Fill” -> and choose your desired color from the “Contents” drop-down menu.
Until the next time, have fun and stay well!
by John Watts, Watts Digital Imaging
Leave a Reply