
Layer Masks can be one of the tougher concepts of Photoshop to wrap your brain around,
but once you understand the basics, anything is possible! This will take more than one Photoshop technique article, so we’ll break this up into multiple articles over the next several months.
Here are the links to each:
The Power of Layer Masks in Photoshop: Part 1 – Layer Masks and Adjustment Layers
The Power of Layer Masks in Photoshop: Part 2 – Layers Panel
The Power of Layer Masks in Photoshop: Part 4 – The Magic Wand Tool
The Power of Layer Masks in Photoshop: Part 5 – The Brush and Lasso Tools
Read on, and discover one of the most powerful photo editing features.
Selections: Tools and Techniques
Selection tools and techniques give you the ability to make corrections, such as contrast or color correction “Locally” (a portion of the overall image) versus “Globally” (the whole image). You will either “paint” (with the Brush Tool) or “draw” (with the Lasso Tool or Magic Wand Tool) to “shape” and “localize” your Layer Mask.
Where to Find:
There are over a dozen ways to make selections. To keep things simple, we will only be spending time with three tools: the Magic Wand Tool, the Lasso Tool, and the Brush Tool. These three tools will meet most of your selection needs.
How It Works:
Simply put, there are two different strategies or a combination of both.
Strategy 1:
* Make a selection. If you make a selection BEFORE you
create an Adjustment Layer, Photoshop automatically
“reveals” the area you’ve chosen in your Layer Mask.
* Create an Adjustment Layer to work on your selection.
Strategy 2:
* Create an Adjustment Layer.
* Work on your layer masks with selection tools. Start
with a “clean slate” (White or Black).
© 2011 John Watts. All Rights Reserved.
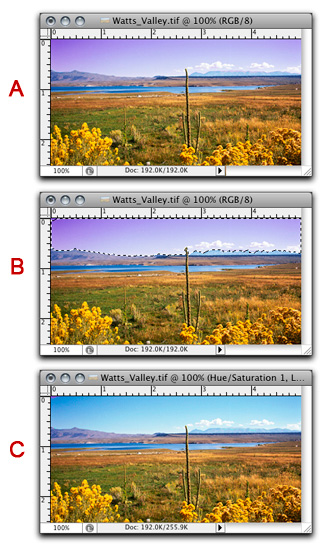
The three examples on the right will illustrate how the first strategy works.
* The sky in Image “A” has a strong magenta cast, while the rest of the image’s color cast looks fine.
* In Image “B”, a combination of the Lasso Tool and Magic Wand Tool were used to select the area to be changed. The moving dashed line is called the Selection Border. However, it’s more commonly known in the Photoshop community as “Marching Ants”.
*After making the selection, Image “C” shows the results of using a Hue-Saturation adjustment layer to correct the selected area, which was used to bring the sky to a more realistic blue color. You’ll notice that the rest of the image’s color cast wasn’t changed.
An Explanation of Some of the Features:
Each Selection Tool will have its own Options Bar. The Options Bar shows up below the Menu Bar near the top of your workspace. The options available will change depending on the tool selected.
When you make a Selection, and then open an adjustment layer, the “Marching Ants” will disappear, allowing you to see the results of your adjustment unobstructed.
You can use a combination of Selection tools. Each Selection tool works best in a specific situation, but you can use a combination of tools to create the same selection. For instance, you start with the Magic Wand Tool, but finish with the Lasso Tool, creating one selection. This is what was done in Image “B” above.
The edges of your selection can be “blurred” slightly to help it blend in with the overall image, and keep your selection from looking fake. The three main tools to achieve this are Feathering, Gaussian Blur and Refine Mask.
You may desire to Reselect a Selection for further correction: For instance, you may have corrected for contrast with a Selection, and have decided that you need to correct the color in the same selection.
There are 3 ways to Reselect:
* Go to the “Select” menu -> “Reselect”.
* You can also right click with your mouse on the Layer Mask Thumbnail (the box on the right) in the Layer with the existing selection and choosing “Add Layer Mask to Selection”.
* You can also press “Command” (“Control” on a PC) then clickon the Layer Mask Thumbnail that you want to reselect with your mouse.
If you desire to Invert a Selection, go to the “Select” menu -> “Inverse”. This is an especially helpful technique if you have a high-contrast original image, and adjusting contrast globally will wash out highlights and/or not allow you to open up shadows enough.
You would:
* Select the highlight area as a selection, and choose a tool to correct the contrast.
* Reselect, then invert your selection.
* Choose a tool to correct the contrast of the newly chosen area.
This technique works equally well for color correction, or any other correction that you desire to make.
That’s all for now; next month, we’ll talk about the individual Selection Tools (Magic Wand, Lasso Tool and Brush Tool). Until the next column, have fun and stay well!
Until the next time, have fun and stay well!
by John Watts, Watts Digital Imaging
Leave a Reply