
Layer Masks can be one of the tougher concepts of Photoshop to wrap your brain around,
but once you understand the basics, anything is possible! This will take more than one Photoshop technique article, so we’ll break this up into multiple articles over the next several months.
Here are the links to each:
The Power of Layer Masks in Photoshop: Part 1 – Layer Masks and Adjustment Layers
The Power of Layer Masks in Photoshop: Part 2 – Layers Panel
The Power of Layer Masks in Photoshop: Part 3 – Tools and Techniques
The Power of Layer Masks in Photoshop: Part 4 – The Magic Wand Tool
Read on, and discover one of the most powerful photo editing features.
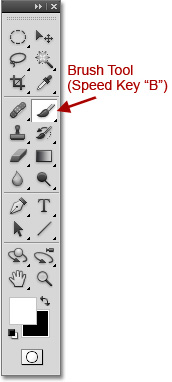
The Brush Tool
Why the Brush Tool?
The Brush Tool is essential to using Layer Masks and for Dodging and Burning. There are an unlimited number of brush uses, combinations, shapes, blending modes and textures available. We are going to concentrate on just a few uses associated with Layer Masks.
Purpose:
The Brush Tool “paints” the Foreground Color onto your image, or for our purposes, your Layer Mask.
Where to Find:
You can find the Brush Tool in the Tools Panel.
How It Works:
1. Choose the Brush Tool from the Tools Panel, or by using the Speed Key“B”.
2. Choose your desired options in the Options Bar (or right-mouse click in your image).
3. Choose the Layer Mask Thumbnail to “paint” OR Create a New Layer.
4. Click in the desired area of your image to be “painted” and hold down your left mouse button to start painting. Paint the desired area.
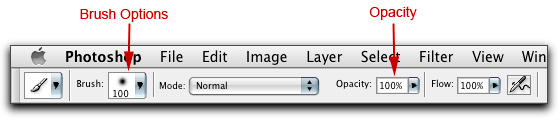
What’s in the Options Bar?
Brush Options
When you click on the Brush Options drop-down menu triangle, the dialog box shown to the right opens up. In addition, you can access this same dialog box by right-mouse-clicking in your image when the Brush Tool is selected.
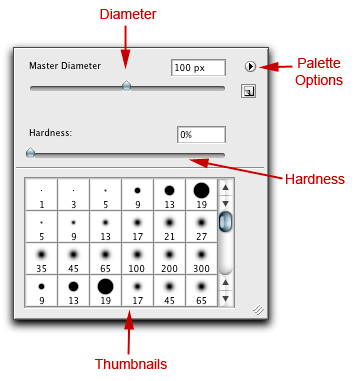
Here’s what you can change:
Diameter – This defines the size of your brush in pixels.
Panel Options – Click on the Triangle, and, among other options, you can choose the way the dialog box displays the brush presets provided by Photoshop.

Thumbnails – These are visual representations of the presets, plus any custom brushes that you may create.
Hardness – Here you can control the amount of softness applied to the edge of your brush. The chart to the right shows the effect of different hardness levels at the same brush diameter. Most of the time, I’m at 0% Hardness, and rarely go above 25%.
Opacity
You can control the Opacity of your brush by changing the value in the Option Bar. Clicking on the drop down-menu triangle will show a slider, or you can enter the values numerically.
0% Opacity means that none of the effects of your painting will show through.
100% Opacity means that all of the effects of your brush show through.
Speed Keys for Size and Opacity, and Other Tips:
You can quickly change the Brush Size by using the Square Bracket Keys. The “[”key will decrease the brush size by 10 pixels and the “]”key will increase the size by 10 pixels.
You can quickly change the Opacity by pressing the Numeric Keys on your keyboard. The Opacity will change as a percentage, with the “9” key being 90% opacity, the “7”key being 70% opacity, and so on.
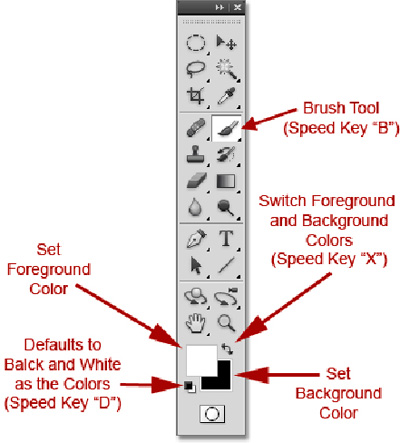
You can switch between a black and a white brush color using the “switch” feature in the Tools Panel, or use the speed key “X”. Remember, the foreground color is the active brush color. I find it handy to keep my left finger on the “X”key and toggle the brush color back and forth as needed, such as if I made a mistake and “hid” too much.
You can automatically choose black and white as the Foreground and Background colors by pressing the appropriate button in the Toolbox (see the diagram), or use the speed key “D”.
You aren’t limited to black-and-white brush colors for hiding or revealing. You can vary the brush transparency by using different shades of gray. Click on either the Foreground or the Background color in the Toolbox and the “Color Picker” will pop open. Choose different values of gray as desired.
The Lasso Tool
Purpose:
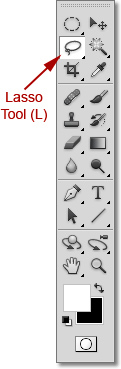
The Lasso Tool is used to make a selection. It works best when large areas need to be selected, or when a freeform portion needs to be selected.
Where to Find:
You can find the Lasso Tool in the Tools Panel, or by pressing its Speed Key, which is “L”.
How it Works:
1. Choose the Lasso Tool from the Tools Panel, or by using the Speed Key “L”.
2. Choose your desired options in the Option Bar.
3. Click in the desired area to be selected and hold down your left mouse button at the start of your selection. Draw or outline the desired area to be selected. When finished, let go of the mouse button, and the Lasso tool will automatically draw a straight line between where you started and where you finished. The “Marching Ants” will define the area that was selected.
4. Select more than one area if necessary (with the “Add to Existing Selection” or the “Subtract from Existing Selection”button toggled on, described in the last chapter) to fine-tune your selection.
5. Choose the desired Adjustment Layer(s) to make your correction(s). The “Marching Ants” will disappear so that you can see the effects of your adjustments unimpeded.
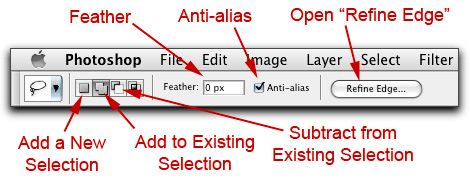
What’s in the Options Bar?
All of the options available in the Options Bar work the same way as they do for the Magic Wand Tool except for the Feather function.
“Feathering”:Feathering softens and blurs the edges of your selection, giving your selection a more natural look. If you decide to use this, be careful not to set this value too high, as there can be some loss
of detail at the edge of your selection. I rarely use this, and prefer to use the “Refine Edge” tool instead, where you can “Feather” after the fact, and much more.
Until the next time, have fun and stay well!
by John Watts, Watts Digital Imaging
Categories: Image Editing, Photoshop Techniques
Leave a Reply