
Excerpted from Travel Photography: A Guide to Taking Better Pictures
(Reprinted with permission)
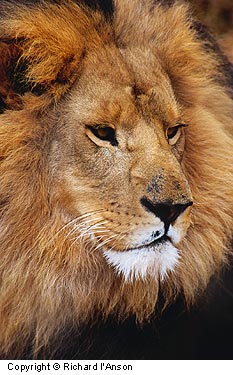
Lion,
Moremi Wildlife Reserve,
Botswana
After six weeks and sixteen game parks in Southern Africa, it became clear that just seeing the animals could be a challenge. It wasn’t until the twelfth park that I finally got to photograph lions, and then they were everywhere – well, all within 500m of where I had to get out of my vehicle to dig it out of the deep sand it had got stuck in.
Photographing animals requires an abundance of patience, time and luck. Animals aren’t renowned for their cooperation and you’ll have to work hard to build a collection of recognizable, interesting and varied photos. Seeing animals in the wild is pretty special, but it’s no excuse for forgetting everything you’ve learned about good photography. The first challenge is to get close enough. You might know it’s an elephant, but if you have to tell the person looking at the photo what it is, consider the image a failure. It’s also important to select a viewpoint that considers the direction of the light and the background, just as with any subject. Always focus on the eyes, everything else can be out of focus but if the eyes are not sharp the photograph will fail. Because the focusing screen is in the center of the frame, consider recomposing after focusing on the eyes to avoid the central, and often static, placement of the subject in all your pictures.
Some wildlife photography is possible with compact cameras with zoom lenses (38mm-9omm) or SLRs with standard zooms (28mm-105mm). In many national parks, particularly around camp grounds, some animals are quite used to human presence and will allow you to get close enough. In the wild the limitations of the equipment can make for a frustrating experience. The eye will zoom in on distant animals and exaggerate their size, but they will be insignificant on film. To avoid disappointment concentrate your efforts on animals that you can get close to and compositions that show the animal in its habitat.
For wild animals a focal length of 300mm is generally considered essential. The magnification is strong enough to satisfactorily photograph the majority of animals and will allow frame filling portraits of those you can get close to. If wildlife photography is a part of your travel plans and your longest lens (fixed or zoom) is less than 300mm, consider purchasing a teleconverter, which will give you many more opportunities without the expense and weight of another lens. If you have a 300mm already, a teleconverter will open up a whole new range of opportunities (see Teleconverters in the Equipment chapter). The game parks of Africa are the most famous destinations for animal encounters. If an African safari is on your itinerary take extra film: most people use a lot more than they expect. Most game viewing is experienced in national parks from vehicles, which you’re prohibited to leave. Be constantly aware of the direction of the light so that you can position the vehicle quickly or give directions as to where you want to shoot from. You’ll soon learn how close you can get to a particular animal before it moves off and this will allow you to select the right lens, or set your zoom at the appropriate focal length, before you approach the animal. With long lenses fast shutter speeds are required to prevent camera shake, and they also stop blurring if the animal moves.
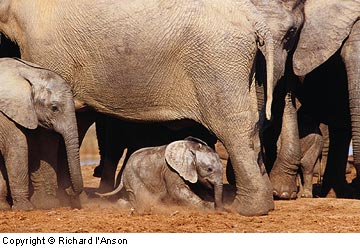
Baby Elephant,
Addo National Park, South Africa
Elephants are great because they’re so big and allow you to get so close. Even a standard lens will let you fill the frame. Then again, you may not want to get quite so close. Baby elephants on the other hand are little, so it’s back to the big lens. This one was having some trouble keeping its feet. The rangers can give you a good idea when and where you’ll see the herds of elephants in national parks.
The game parks of Africa are the most famous destinations for animal encounters. If an African safari is on your itinerary take extra film: most people use a lot more than they expect. Most game viewing is experienced in national parks from vehicles, which you’re prohibited to leave. Be constantly aware of the direction of the light so that you can position the vehicle quickly or give directions as to where you want to shoot from. You’ll soon learn how close you can get to a particular animal before it moves off and this will allow you to select the right lens, or set your zoom at the appropriate focal length, before you approach the animal. With long lenses fast shutter speeds are required to prevent camera shake, and they also stop blurring if the animal moves.
You’ll find yourself holding the camera to your eye for much longer periods than normal as you observe the animals and wait for the perfect moment. This can be very tiring. The vehicle window makes an excellent support and can be moved up and down to suit your height. In vehicles with pop-up tops, rest your camera on the roof while following the action. Use a piece of clothing or camera bag to rest the camera on and turn the engine off to stop unnecessary vibrations.
Animals are at their most active early in the morning and late in the day. If you’re using zoom lenses at their maximum focal length (210mm, 300mm) you’ll need to use the appropriate fast shutter speeds (1/250, 1/500 second) and your maximum aperture will be around f5.6 to f8. Be prepared to use 400 ISO film at these times and switch to your standard film as soon as it’s bright enough.

Lilac breasted roller
Hwange National Park, Zimbabwe
Unless you’re very well equipped and dedicated, photographing birds can be very frustrating. At least the lilac breasted roller gives you a chance to get close – but that’s with a super telephoto lens.
Zoos and wildlife sanctuaries are interesting subjects in their own right but are also great places to practice and prepare forphotographing animals in the wild. Spend a day at your local zoo or wildlife park before headingoff on safari and you’ll discover the limitations of your equipment and how close you need to get to animals large and small to make strong pictures.
Eliminating cage wire is possible by placing your lens against the cage, and selecting thewidest aperture available (f2.8 or f4). This technique works best with a telephoto lens and if the animal is at least 2m from the cage. With compact cameras remember that what you see through the viewfinder is not what the lens sees. Place the lens through an opening in the cage wire, and then look through the viewfinder, even if you see wire it won’t be recorded on film.
Birds are even harder to photograph than animals. They’re mostly small, rest high up in trees, fly off at the slightest disturbance and rarely sit still for very long. A 300mm lens is adequate for larger birds, but to have any hope of filling the frame you really need a focal length of 500mm or 600mm.
A quick introduction to the trials and tribulations of bird photography is available in you’re own garden or at local parks.
by Richard I’Anson
Leave a Reply