
NOTE: This article is for older versions of Photoshop
(prior to CS6/CC), but the fundamentals still apply.
In the last column, I discussed general tools and techniques used in making selections, and why it is important to know how to use them to get the most out of your images. Now let’s look in detail at two of the easiest and most versatile tools available to make selections.
THE MAGIC WAND TOOL AND HOW TO USE IT FOR OPTIMUM IMPACT
Purpose:
The Magic Wand Tool is used to make a selection. It works best when the colors in the selection area are fairly similar and consistent, such as a blue sky or a yellow flower.
Where to find:
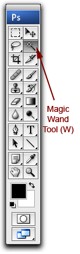
You can find the Magic Wand Tool in the Tools Palette, or by pressing its Speed Key, which is “W”.
How It Works:
1. Choose the Magic Wand Tool from the Tools Palette, or by using the Speed Key“W”.
2. Choose your desired options in the Options Bar.
3. Click in the desired area to be selected, more than once if necessary (with the “Add to Existing Selection” button toggled on), until the “Marching Ants” define the area that you want to select.
4. Choose the desired Adjustment Layer(s) to make your correction(s). The “Marching Ants” will disappear so that you can see the effects of your adjustments unimpeded.
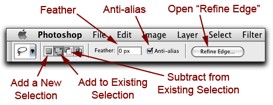
What’s in the Options Bar?:
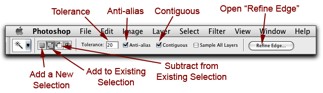
“Tolerance”: A Low Tolerance Value will select pixels similar to the ones you click. A High Tolerance Value will select pixels with a larger range of colors. Enter the value in pixels, ranging from zero to 255. Once a value is entered, change the value by using the arrow keys. A suggested starting value is 20 to 30.
“Anti-Alias”: This will help create a smoother edge to your selection. It is best to leave this checked.
“Contiguous”: If this box is checked, only adjacent pixels within the tolerance range are selected (locally). If this box is unchecked, all pixels in the tolerance range are selected throughout your image (globally).
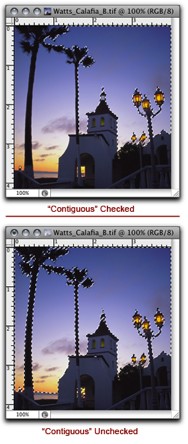
This can be confusing, but here’s a good visual example.
The top image shows the effects of using the Magic Wand with “Contiguous” checked. Think “Local Selection”: By clicking a few times in the sky area to the right of the palm tree (with the tolerance set at 30), all pixels in the blue color range are selected, except the ones to the left of the palm tree, because the palm tree does not fit within the tolerance selected (it is too black and dark) and blocks the selection from going any further.
The bottom image shows the effects of using the Magic Wand with “Contiguous” unchecked. Think “Global Selection”: By again clicking a few times in the sky area to the right, all pixels in the blue color range are selected, including the ones to the left of both palm trees, as well as the small areas in the detail of the palm trees and the building arch. All of this was accomplished by a few clicks in the right-hand sky area only, and a few clicks in the reddish area of the sunset, saving yourself quite a bit of time and frustration.
“Add a New Selection”/“Add to Existing Selection”/“Subtract from Existing Selection”: It would be a rare situation to be able to make a selection by clicking in your desired area just once, so an understanding of these buttons is very important. You’ll find the same buttons and choices in most Selection Tools.
By the way, I rarely use “Add a New Selection”.
I use“Add to Existing Selection” and “Add to Existing Selection””Subtract from Existing Selection” almost exclusively.
1. With “Add a New Selection”, every time that you click in your desired area, it will choose a new selection, deleting the previous selection that you chose. This can get very frustrating, which is why I rarely use this button.
2“Add to Existing Selection”. With “Add to Existing Selection”, every time that you click in your desired area, it will add to the existing selection, without deleting the previous selection that you chose. I use this button quite a bit more than the other ones.
3“Add to Existing Selection”. With “Subtract from Existing Selection”, every time that you click in your desired area, it will subtract from the existing selection, without deleting the previous selection that you chose. This comes in handy when you “over-select” and need to “back up”.
Open “Refine Edge”: This function will be discussed in detail in the next column. This is one of the ways to “smooth” the edge of your selection to keep it looking natural.
THE LASSO TOOL
Purpose:
The Lasso Tool is used to make a selection. It works best when large areas need to be selected or when a freeform portion needs to be selected.
Where to find:
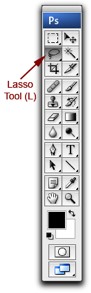
You can find the Lasso Tool in the Tools Palette, or by pressing its Speed Key, which is “L”.
How It Works:
1. Choose the Lasso Tool from the Tools Palette, or by using the Speed Key“L”.
2. Choose your desired options in the Options Bar.
.
3. Click in the desired area to be selected and hold down your left mouse button at the start of your selection. Draw or outline the desired area to be selected. When finished, let go of the mouse button, and the Lasso tool will automatically draw a straight line between where you started and where you finished. The “Marching Ants” will define the area that selected. .
4. Select more than one area if necessary (with the “Add to Existing Selection” or the “Subtract from Existing Selection” button toggled on) to fine-tune your selection. .
5. Choose the desired Adjustment Layer(s) to make your correction(s). The “Marching Ants” will disappear so that you can see the effects of your adjustments unimpeded.
What’s in the Options Bar?:
All of the options available in the Options Bar work the same way as they do for the Magic Wand Tool (see Chapter 19) except for the Feather function.
“Feathering”: Feathering softens and blurs the edges of your selection, giving your selection a more natural look. If you decide to use this, be careful not to set this value too high, as there can be some loss of detail at the edge of your selection. I rarely use this, and prefer to use the “Refine Edge” tool instead, where you can “Feather” and much more.
The “Refine Edge” tool will be discussed in greater detail in the next column.
Until the next time, have fun and stay well!
by John Watts, Watts Digital Imaging
Leave a Reply