
In the first article, we talked about some of the reasons to get involved with aerial photography. At the top of the list is simply to have fun, followed closely by engaging in a style of photography that provides a unique perspective on our world that ground-based observers seldom see (except in photographs!).

Much of the material for these articles comes from my experience as an aerial photography instructor and reconnaissance photographer for Civil Air Patrol (CAP), auxiliary of the U.S. Air Force. For CAP, we generally fly missions with specific objectives – such as damage assessment after a disaster, using techniques specific to reconnaissance photography.
But these principles apply to any kind of aerial photography where your primary desire is to achieve good results, whether by airplane, helicopter, hot air balloon – or even by hang glider!
Camera Equipment
Many different kinds of cameras can be used for aerial photography – film, digital, even videocams. It really doesn’t matter what kind of camera you use, as long as you know the camera intimately and how to use it. Your job is to concentrate on planning, framing and taking photos that meet your desired objectives.
It’s not a good idea to fiddle with camera controls while flying, especially if by airplanes and helicopters, as aviation gasoline and pilot patience are expensive commodities.
Whether you use film or digital, the basic principles are the same. Since most of us use digital these days, the techniques I will discuss here are directed toward the digital realm – mainly because there are special considerations (like white balance and optical versus digital zoom) that don’t apply to film.
You can use a simple point-and-shoot and achieve impressive results, as long as you know what you are doing. I prefer to use a digital SLR (DSLR) because of the added flexibility and creative control it provides.
It is nearly always advisable to use a camera that has some sort of zoom capability. This is because as you’re flying (or floating) along and you want to create a specific landscape photo or composition, it is much easier to use the zoom feature than it is to re-position the aircraft.

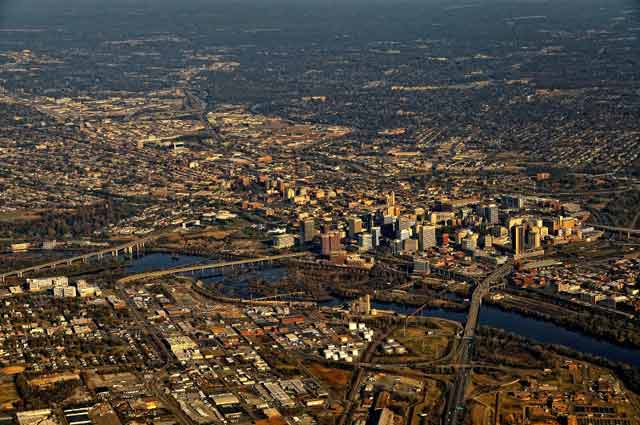
From the Good Earth series – New Jersey
If you are using a point-and-shoot, you should know the difference between optical zoom and digital zoom (the difference doesn’t apply to DSLR’s). Optical zoom is the range of focal lengths that the camera lens will move, from wide-angle to telephoto.
Digital zoom means that the camera’s electronics provide a larger image than can be captured optically. Since digital zoom simply crops a center portion of the captured image, resolution of the final image suffers proportionally by the amount of digital zoom applied. For most aerial photography, digital zoom should be avoided.
While the type of camera may not be an important factor in achieving good results, the quality of the lens certainly is. Always strive to use the highest quality optics you can find to avoid issues like chromatic aberration and barrel distortion.
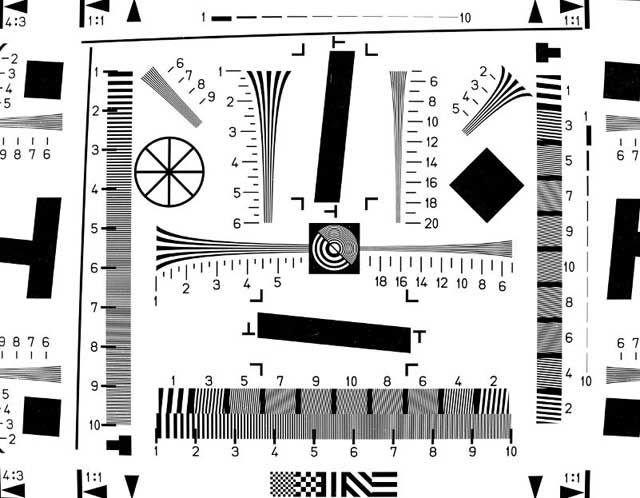
And you should know which f-stop (aperture) provides the maximum sharpness for your particular lens. As a rule of thumb for most lenses, maximum sharpness is generally two stops down from the maximum (widest) setting.
For example, an f/2.8 lens will normally realize maximum sharpness at around f/8. Ground-based tests using resolution charts such as seen here can provide you with good information on where your lens’ “sweet spot” is:
So, what focal lengths should your zoom lens range? It depends on your camera, its sensor-size and the types of photography you want to do. For panoramic landscapes, you should use a reasonably wide-angle setting.
For a “normal” DSLR, the widest setting you should expect to use is about 35-40 mm. Any wider than that and you run the risk of getting parts of the aircraft (wheels, wing, struts, helicopter blades) in the image. On the telephoto side, anything longer than 135-150 mm becomes difficult to hold steady, even with optical stabilization (more about that later) turned on.
Rule of thumb about spares: always carry extra memory cards and batteries. An otherwise pleasant flight can be ruined if one of your consumables fails.
A word about flash: forget about it. You’re not going to need it, and an inadvertent firing of the flash can ruin your result. Disable it.
Planning Your Adventure
While you may jump into your car and run down to the corner grocery store, you can’t do that while airborne. Proper planning is essential – make sure you have all your equipment in order and packed before you leave the ground or you could miss some great opportunities.
Unless you know someone with a hang glider or a hot air balloon, more than likely, the area that you will be photographing will be pre-planned for you for a specific amount of time.
To do aerial photography from planes and helicopters, it’s not necessary to be a pilot or understand the nuances of operating an aircraft. But helping your pilot to plan your photo adventure is a great way to facilitate cockpit communication and maybe learn some of the finer points of aviation.
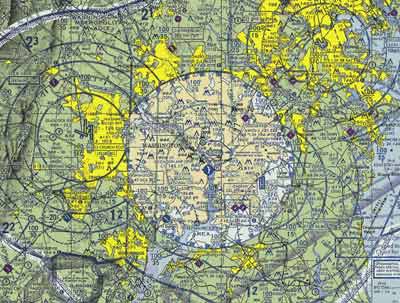
For aerial photography, you will likely be flying under Visual Flight Rules (VFR), meaning you have to be able to see in order to fly – sort of intuitive if you want to photograph what you can see. You may even get to help the pilot plan the flight to your desired photographic location, and he or she will probably show you what is called a sectional chart like the one seen below.
Don’t let it overwhelm you – your pilot will be more than happy to explain how this chart works so you have a basic understanding of how to read it. It can really be quite fun being involved in this planning stage of your photo journey.
Before you depart, you and your pilot will do what’s called a pre-flight briefing. He or she will discuss if other planes will be in the area (and how to look for them), how to communicate while in flight and the weather conditions.
Note: weather is an important topic that requires special attention – not only because it can affect the success of your photo adventure, it can also impact the safety of all onboard. Know that your fun may have to wait for another day if the weather conditions aren’t conducive to flying.
Before boarding, your pilot will do a pre-flight inspection of the aircraft. This is always done before leaving the ground because safety comes first! If your pilot agrees, you might accompany him or her during this check-out. This is a good way to get familiar with the aircraft and learn about how airplanes are controlled in flight.
Another often-overlooked planning item – make sure you are biologically comfortable before leaving the ground. Pulling into the nearest rest stop to relieve oneself is not an option while flying with the birds.
by Allen Moore
found this article of great benefit!!
Very informative article.