
I’ll admit I’m not a first-class bird photographer—in spite of my name. However, I was a hunter when I was in school, and some of the attributes of hunting apply to photographing birds. My father taught me to hunt and fish, and for a while, I loved to do both. Hunting taught me stealth and patience. Patience was the most difficult lesson to learn, and to this day I have a problem with it. But for both hunting and photography, you need a backpack full. I used my experience stalking and shooting animals to help me photograph. Have you heard of panning a camera? That’s what you do when you have a moving subject and you move the camera along with it. As a result, the subject in the photo appears sharp and the background is blurred, giving a feeling of speed or movement. I first learned the art of panning when I had to lead a duck to shoot it in flight
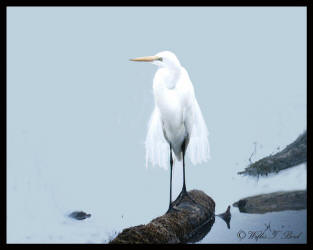
 You can’t usually go bounding up to a wild bird to take its photo. In my area, there are many wading birds–herons, egrets, etc. Like a hunter, a photographer should study his “prey” as well as he can to understand their habits. For instance, I’ve found that great egrets are more tolerant of people than are great blue herons. So, you have to approach a great blue much more cautiously than you would an egret. However, moving close to either requires patience and care. If you move slowly at an angle to them–avoiding looking them in the eye, you have a better chance. Stop often and don’t keep pressing toward them constantly.
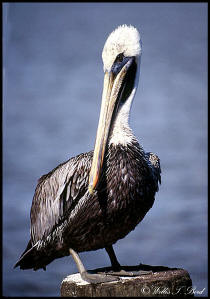
If you want to get really close to a bird and you live near the coast, try a pelican. Sometimes these photographic hams will nearly come to pick your pocket. You can approach them, and they usually pose nicely for you. Their feather detail is really good, too. They are my favorite birds to photograph.
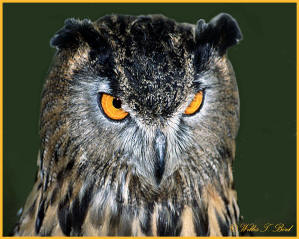
 At home, you can capture excellent shots by setting up feeders and/or birdbaths near a window. Or, you can make yourself a blind to bring yourself really close to the action. (Using a flash is a good way to obtain fill-in light and stop the action of a bird that moves a lot.) Another good place to catch shots of special birds is to go to a wildlife festival where birds in rehabilitation are displayed. Rehabilitation centers also have some residents that can’t be rehabilitated and are kept for instructional and educational purposes. Often, even unusual birds (such as the eagle and owl shown in this article) are available for close-up shots.
I’d suggest that when you go on your first outing to a place where you expect to take bird photos, don’t take a camera. Yes, that’s what I said–no camera. Take notes instead. Watch the birds and see what their habits are. Answer questions such as the following: “What scares them?” “What way to approach them was the most successful?” “Where could which species be found most readily?” “What were their feeding habits?” There are books in the library to help you and resource people such as local game wardens who can lead you to sites where interesting birds are common. Don’t forget about using the Internet as a resource, as well. You can locate sites for nearby National Wildlife Reserves and State Parks that can provide quantities of great information.
 When you think you’ve learned enough to go out to try your hand at bird photography, you need to check your equipment. In most cases, I’d suggest that you be equipped with no less than a 300mm lens. In some cases, you may get by with a 200mm. However, the ideal lens is a 400mm of the best quality you can afford. I would also suggest film of ISO 200 or above. Finally, even though it becomes cumbersome and at times you may want to throw it into a nearby pond, a sturdy tripod is a near must. When you’re dealing with lenses of the length I’m suggesting, any small jiggle–such as the shutter clicking–will cause blur. Birds are notorious for moving at the wrong time. Many will fly away at the first click of your shutter or whir of your motor drive.
So, be ready to take multiple shots.
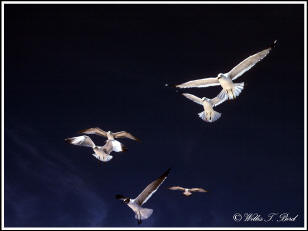
If you get the chance, look up. Practice following a bird in flight and think about snapping the shutter. Do this a number of times before you actually do it. It becomes easier with practice, and a good flight shot is something to be proud of. Bird photography is not as easy as it might seem. It takes patience and perseverance. You may have to go on many outings and make many attempts before you become good at it. Stalking a bird with a camera is every bit as exciting as hunting big game with a gun. Happily, however, when you have what you want, the bird is still there for the next photographer or even for you when you return to that spot. So, go out there and mingle with your fine-feathered friends.
by Willis T. Bird
Leave a Reply