
No matter if you are an early bird or a late day person, the sun has a gift for you! Probably the most photographed thing in the world are sunrises and sunsets. They are romantic, beautiful, colorful and often spectacular. They have that “Wow” factor!
From this point on I will refer to them all as sunsets because most are just that. But many folks who get up early will find that early morning sun performances are even more spectacular than are the sunsets. I believe, though, that more people get out and take the sunsets thus producing more sunset shots. As jaw-dropping as sunsets can be, they can become ho-hum if you are not careful. As beautiful as the colors can be, the overall shot can be boring if you do not introduce more meat into the photo. I will get into that shortly.
I have warned this before in an article here but it is worth repeating. Never look directly into the sun with a telephoto lens as it could do great harm to your eyes. The telephoto can cause the sun to look even more spectacular in the shot so do not hesitate to use it, but just make sure you do not look directly at it. If using a digital camera it would be best to use the view screen on the back when composing the shot. The sun can possibly damage your camera as well. I have read that it would be best to put the lens cap on your camera as soon as you have taken your shot. I am not sure exactly how that would help protect it from the sun, but I will pass it on. If using a cloth screen 35mm camera it is possible that the sun could burn a hole in the shutter screen if left pointed toward the sun for too long. I personally have damaged my eye by not taking this advise before I realized the danger.
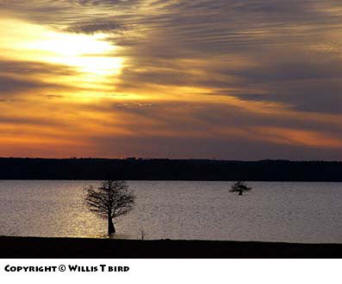
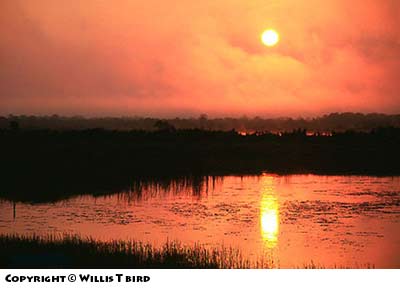
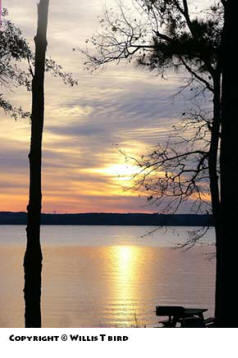
Some people love the rich dark colors of sunsets and some prefer the more mellow colors. As you will note from my examples, I am more inclined to take photos that result in deep rich colors. To do this you can use a faster shutter speed and or under expose your shot by a stop or two. This will, however, produce silhouettes of anything else in your photo. I like them but you may not. If you need to see the other subjects in the photo more clearly then you should use perhaps a slight over exposure making the sunset and other subjects lighter. Some experimenting here would be in order on your part. Try different exposures to find the type sunsets that you prefer.
As I mentioned earlier, you could have a bunch of colorful but boring photos if you are not careful. Make sure that your photo contains something in it besides water and the sun…or clouds and the sun. This may take some scouting on your part in advance so as to be ready when the sunset comes. Find where the sun goes down or comes up and then locate some object that would add to the photo if contained in the foreground. It adds to the interest. Great sunsets last only a short time so you must have these places scouted out well in advance so that you are ready. It would be a good idea to have a small notebook to jot down possible locations so you will not have to try to remember at the last moment. I have also found that great sunsets come just before or after rains or storms. They are better if clouds are in the sky in the area of the sunset. Often they are better in the winter due to atmospherics. If humidity is great or smoke is in the air it will enhance the sunset. The light show changes by the minute so take many photos as the sun goes down or comes up. The colors may change dramatically.
As always I suggest that you use a tripod. Other good accessories to use would be a polarizer or split neutral-density filter. Because of the brightness of the sun at normal exposures other items in the shot can be rendered dark and a split-density filter can tone down the sun and allow the rest of the photo to be seen better. Closing down the aperture on your camera will give you less light which creates the warm tones and also greater depth of field in your shots. That is usually needed in sunsets because of the distance between you and the horizon.
Speaking of the horizon, take care to line it up correctly (straight) across your field of view. Otherwise you will appear to be on a tilted piece of land or worse…sea. This can be corrected later in something like Photoshop but why not do it right at the time?
While you are at your scene why not try taking a few sample shots at 90 degrees to the sun? Also, try one or two facing directly away from the sun to see what that late sun can do for your photos. Late and early morning light is the absolute best for flowers and other subjects so do not neglect that possibility if you have a little time before the sun sinks below the horizon.
Another couple tips for you: Sunglasses can possibly affect what you see when you are trying to compose a photo with your digital camera. I would advise taking them off briefly while you compose your shot. Also, use your local newspaper to check for the sunrise and sunset times so that you make it to your destination on time.
It may take a little effort to get up early or to be at a specific spot at a specific time just to take a photo, but it can really pay off for you. Just do a little scouting in advance, have your equipment ready, and get there. If you don’t get there…you won’t get the shot. Except for cloudy days…you have two tries every day to get the shot of the year!
by Willis T Bird
Leave a Reply