
HOW DO I COPY ONE AREA OF AN IMAGE TO ANOTHER?
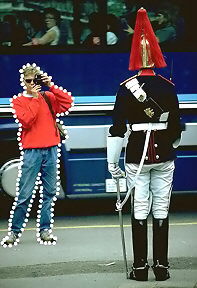
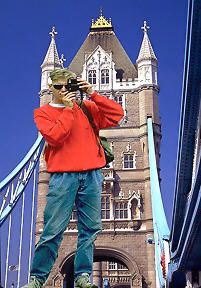
The next trick is great for adding moons to dark nights, subjects of interest along leading lines, people into great backgrounds, etc. Here is an example of copying from one image to another: On the left is an photograph, taken in London, of a tourist photographing one of the Horse Guards. In order to use the picture of the tourist, you can see that I’ve selected around her for copying. On the right is an image of the Tower of London with our tourist copied into the image as the main subject of interest…
1. Have both images displayed on your screen.
2. In the source image, select the area to be copied.
3. Choose the MOVE tool.
4. EDIT –> PASTE
5. Click and DRAG your selection.
6. To alter the size of the new selection, after inserting it into your target image: LAYER –> TRANSFORM –> SCALE
7. Alter the frame dimensions around your copied image, until it fits the target image to your satisfaction. When you are satisfied with the new size, press the
<ENTER> key to enable the new size. You can still move the copied image around inside the target image.
8. To “glue” the two images together: LAYER –> FLATTEN IMAGE
HOW DO I REPLACE PART OF AN IMAGE WITH ANOTHER PART, OR A PART FROM ANOTHER IMAGE?
The following is a good way to remove flash reflections, substitute light backgrounds with detail for dark backgrounds, get rid of flare, and so forth. This is also another use for the RUBBER STAMP tool, which you can think of as a “clone” tool. You’re going to clone one part of an image onto another. You can choose various brushes and control the effect of the tool. You can clone only the selected part of your image, or as much as you wish … and you can clone from parts of the same image, or from another image.
1. Choose the RUBBER STAMP tool.
2. Decide what you wish to clone, place the cursor over that area, and press the <ALT> key.
3. Move the cursor into the area you wish to clone upon. You’ll see a crosshair, back where you <ALT> + clicked, showing from where you’ll clone.
As you ‘paint’ or click in the area to be cloned, you’ll find the color and/or detail of the area from which you are cloning will appear. You have to be careful
that your crosshair will not stray into areas from which you don’t wish to clone. You can clone pixel by pixel, if you wish … again, this is a technique
that requires a lot of practice, but it’s a magical way to improve your images.
For an example of what can be done, look at the two examples shown here:
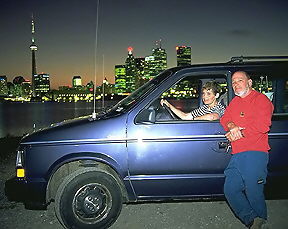
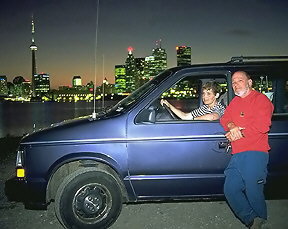
Above left is a combination flash/time exposure, taken on the Toronto waterfront. It was a good shot, but the side of the van is showing hot spots from the flash. On the right is the same image after the RUBBER STAMP tool has been employed to remove the reflections. It’s not perfect yet, but it’s a big improvement!
HOW DO I CREATE “RESOURCE” IMAGES FOR FUTURE COPYING?
(This is where you save those moons, tourists with cameras, cute kids, and so forth, for later insertion into other images).
1. Create a frame for the resource image, with a white background: FILE –> NEW
2. Scale the new frame to your desired dimensions, or to a standard dimension you will use in the future: IMAGE –> IMAGE SIZE
Change pixels to inches, and/or type in the new dimensions you require.
3. From your on-screen source image, select the area to be copied as a resource.
4. Copy the selected section of your image to the new frame.
5. Adjust the size of the copied image to fit the new frame.
HOW DO I COPY THESE RESOURCE IMAGES OVER, WITHOUT THE WHITE BACKGROUND?
1. Choose the MAGIC WAND tool.
2. Select all the white background sections.
3. SELECT –> INVERSE
4. Choose the MOVE tool, and relocate your resource image to the target photo.
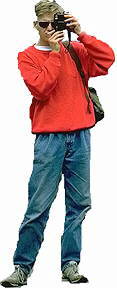
As an example of this, look again at my shot of the tourist in London. Above on the left, you can see I’ve selected only the tourist. On the right, you can see that I’ve inserted her into her own frame, ready for copying. That’s how I later placed her on the Tower of London!
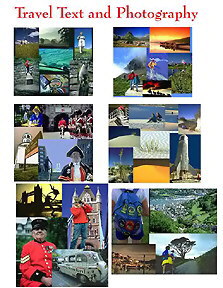
HOW DO I CREATE A COLLAGE?
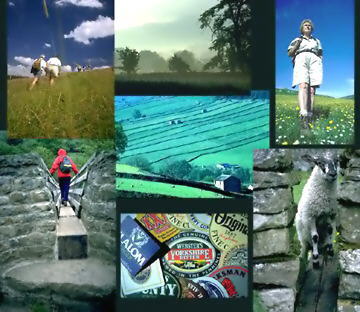
You can present a large print, which contains ALL your best images from your favorite trip! The sample shown here is a collection of my images from a hiking trip to Yorkshire.
1. Create a new frame with a white background: FILE –> NEW
2. Specify the IMAGE SIZE to be around 6 X 8 inches.
3. OPEN each of the images in turn, that are to be included in the collage.
4. Adjust the IMAGE SIZE of each to be around 300 pixels on the largest dimension.
5. Select the entire image: SELECT –> ALL
6. Choose the MOVE tool, and place the selected image into the collage frame. (You
can move it around inside the frame, as you wish.)
7. Resize the copied image inside the new frame, as necessary: LAYER –> TRANSFORM –> SCALE
Vary the displayed frame dimensions, as necessary.
8. “Glue” all the collage images together: LAYER –> FLATTEN IMAGE
9. When the collage is complete, choose the CROP tool, and crop the image as necessary.
HOW DO I DODGE AND BURN MY IMAGE?
(Here is where you correct all those exposure mistakes, and make up for the limited contrast range of slide film!).
Editing notes: The following techniques are used for ‘painting’ different effects on your image. You can reduce or eliminate these effects at any time. By choosing the ERASER tool and clicking in its sub-menu for ERASE TO SAVED, you can erase any new effects from the last SAVED version of your photograph. Like all effects, this too can be adjusted.
1. Choose the DODGE or BURN tool.
2. If necessary, choose a different brush from the BRUSHES palette, and perhaps change the cursor to show the brush size.
3. Choose HIGHLIGHTS or SHADOWS/MIDTONES
4. Adjust EXPOSURE for the desired amount of effect.
HOW DO I CHANGE THE DEGREE OF SATURATION IN MY IMAGE?
(This technique is better than using a warming filter!)
1. Choose the SPONGE tool.
2. Apply the ideas for dodging and burning.
HOW DO I CHANGE A SELECTED AREA TO A DIFFERENT COLOR?
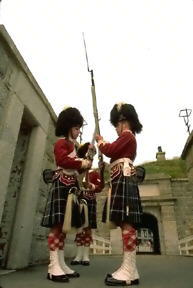
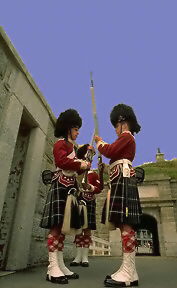
Now you can finally chase away all those “bald skies” with blue! Look at my shot on the left, showing the changing of the guard at the Halifax Citadel, in Nova Scotia. Good composition, great lines, fine exposure, but – that bald sky! On the right is the same photograph with the color of the sky corrected. Better shot!
1. Select the desired color in one of two ways:
a. Click on the FOREGROUND COLOR square, and select the color from the COLOR PICKER.
b. Choose the EYEDROPPER tool, and select the desired color from an area of your image.
2. Choose the PAINTBUCKET tool.
3. Click in the desired area to fill, or: EDIT –> FILL (a more accurate/complete technique when small areas are selected)
HOW DO I SAVE CAPTIONS WITH MY IMAGES?
1. FILE –> FILE INFO
2. Type your caption.
3. Fill in any other information
4. Click OK
5. FILE –> SAVE
HOW DO I PLACE TEXT ON MY IMAGE?
You need a title for that great collage, don’t you? Check out my sample, shown here:
1. Choose your foreground color, as this will be the text color.
2. Choose the TYPE tool, then click inside your image.
3. Edit by:
a. Clicking twice on a word.
b. Dragging over a selection of text with the cursor.
AFTER YOUR TEXT IS SUPERIMPOSED:
1. To make text transparent: <F7> Adjust the OPACITY slider.
2. To move ALL the text, or selected text, just superimposed: Choose the MOVE tool.
3. To “glue” the text to the image: LAYER –> FLATTEN IMAGE
HOW CAN I INTRODUCE SELECTIVE FOCUS?
Make those great subjects stand out from a soft background!
1. Select the area that should remain sharp (or blurry).
2. SELECT –> INVERSE to cause the REST of the image to be selected.
3. Choose the BLUR tool (or the SHARPEN tool).
4. In the sub-menu, adjust the PRESSURE for the desired amount.
5. Choose the desired brush size.
6. Paint in your de-focussing, or your sharpening.
(Note: The effect of the SHARPEN tool can be drastic!)
HOW CAN I PRINT IN HIGH RESOLUTION?
1. IMAGE –> IMAGE SIZE Type in the HEIGHT AND WIDTH of your print.
2. Set the RESOLUTION for 300 pixels/inch.
3. Proceed with your printing.
by Michael Goldstein
Leave a Reply