

Light is the most essential component in photography. How you as the photographer utilize that light is a creative choice that will make your nature images stand out from all others.
Learning to see how natural light falls on a subject takes some practice. Doing this simple exercise will help you understand a lot about the movement of the earth, about natural light and how that light changes throughout the day.
The Exercise:
1. Preferably before dawn or at first light, set up a still life with several objects on a table. The objects should have full sun for the entire day.
2. Put your camera on a tripod and keep it in that same position for each subsequent image.
3. Set a timer so that you take one photograph every hour.
Your goal at the end of the day is to see all of the photographs in progression. You’ll begin to see how natural light plays an important role in the outcome of your images and how the three components of photographic light (direction, quantity/quality, and color) make a difference in the outcome and impact of your images.
Let’s go over a few basics, so you can learn to observe the effects of natural light on your chosen subject.
The Direction of Light
Light coming from one side or another will enhance the form and texture of the subject.
Light coming from the front (the source is behind the photographer) lacks shadow and contrast and therefore makes the image appear flat.
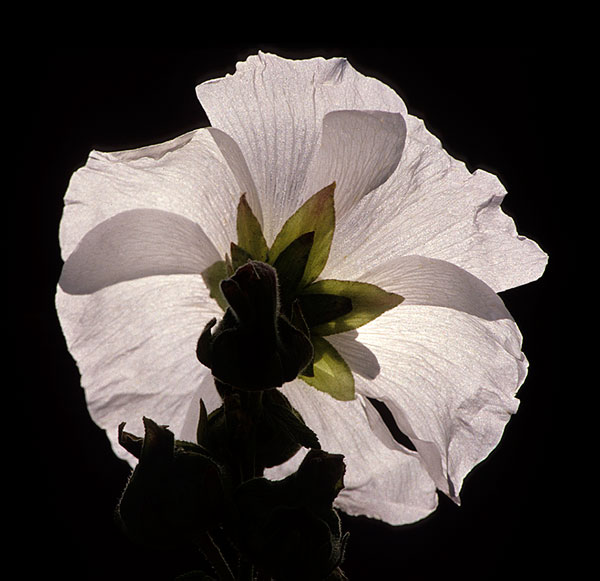
Light coming from behind the subject creates a full or partial silhouette. The texture of the object can often be seen right along the edges and it’s called “rim light.” Of all light, this is probably the most dramatic.

The direction of the light as it strikes the subject can have a substantial impact on the mood of the image.
The Quality of Light
Is it early in the morning or late in the afternoon? Are you photographing on a bright sunny day or when it is foggy or overcast? Are you out in the sun or under a tree in the shade? The amount of light shining on an object will make an immense difference in how the subject appears in your images.
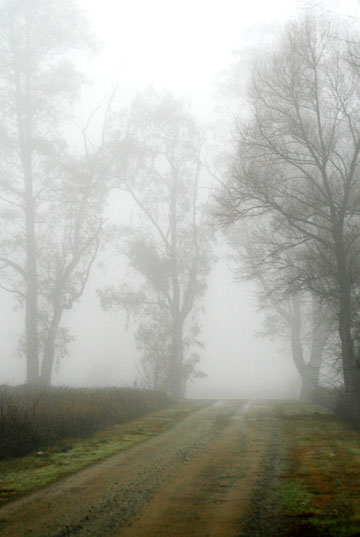
An overcast or cloudy day gives a non-directional diffused light. Shadows and highlights blend together. Without intense shadows or strong highlights, the color of the object seems more intense.
Contrast this to walking along the beach on a bright sunny day. You tend to squint because the light is hard and there is a great deal of glare bouncing off the sand and sea. This is called “specular highlight” or “specular reflection.” It’s basically a direct reflection of the light source on the surface of an object. Specular highlights cause the color of the object to appear less saturated. The use of a polarizing filter can soften or eliminate these highlights when you are in a bright light situation in the same way your polarized sunglasses do it.
The Color of Light
There is a world of difference in the color of the light, depending on what hour of the day you are photographing or whether or not is sunny or cloudy.
As with the experiment above, you probably noticed that when photographing during midday conditions, the light is non-directional on the subject. There will be a hard contrast between shadows and highlights, as well as non-saturated colors.


In contrast to hard light, the “magic” hours of sunrise and sunset have the light source near the horizon, low and at an angle. The light is passing through more of the atmosphere, which makes for those warm color tones. You’ll see anything from brilliant red, orange and yellow colors to soft, warm glowing pinks and lavenders. These times of day produce exceptional quality and color of the light.
So now that you have an idea of what you are looking for as you work to make creative light choices, here are 10 basic tips and ideas that will help you take advantage of natural light and make your photographs breathtaking.
1. Look for light and shadows. Diagonal light gives wonderful long shadows that show the elements of shape and form. Light coming from the side of the subject shows the details in surface features as well as the shape. Learn to use the play of light and shadow to create strong compositions.
2. Watch how light along the edges of objects changes the appearance of the object. Those special “ribbons of light” can lead the viewer around the image, highlight the subject and make the composition stronger.
3. Use light to set a mood. Think of yourself as a lighting director in the theater. How are you going to say romantic or dramatic with your light? Are you going to take advantage of the direction, amount or color of light and how are you going to do that in order to make your subject the most important thing in the photograph?
4. Look for subjects that are in the light but against a dark background and dark objects framed against a light background. This contrast of light and dark makes the subject stand out.
5. When photographing an object in bright sun, walk around the object to see the various angles of light on the subject. Side light and back light may just be your best options. Use a polarizing filter to help take the glare off of leaves or water in bright sunny conditions.
6. Use your flash out doors to fill in or soften the shadows of direct sunlight. This fill flash can really makes portraits or close-up images look terrific in natural light. The main light will come from the sun and the flash will lighten the dark shadows so you will be able to see the fine details in the shadow areas.
7. When a storm is coming or breaking up, look for shafts of light coming through breaks in the clouds or around the edges of the clouds. They are wonderful “spotlights” that make a landscape magic. And remember to always turn around to see how the light is affecting other parts of the scene. This is good advice for those sunsets and sunrises as well.

8. In overcast weather, look for color. Misty or cloudy days make the color of flowers intense. And after a rain shower the water drops (lead photo) and puddles act like little reflective and sparkling mirrors.
9. Go out before dawn and stay after sunset to get beautiful soft light and warm glows. Be sure to take the tripod because your exposures will be longer. It will be difficult to make a sharp image if you handhold the camera
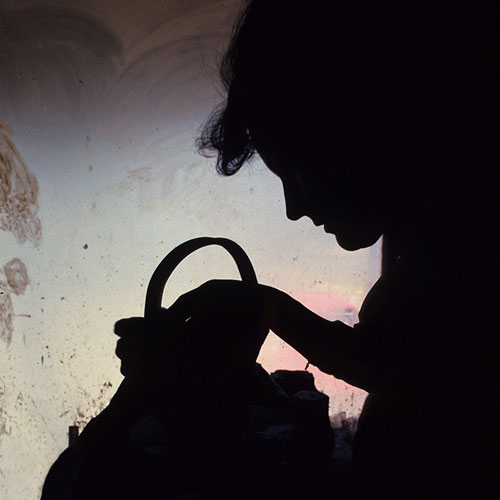
10. Stuck inside on a bad-weather day. Utilize the light coming through the window and observe its qualities. It can be soft and moody and light your subject beautifully or used to create a magical silhouette. Be sure to use your tripod and you’ll make an exceptional still life or portrait. Here, the dirty window adds interest to the image of a woman working in her clay pot studio.
When photographing anything “under the sun”, watch the light and use it in a dynamic way. Experiment with some of the tips above and see how your new awareness of natural light helps you make your images outstanding.
by Noella Ballenger
All text and photos: © 2012 Noella Ballenger. All Rights Reserved.
Leave a Reply