
AUTOMATICALLY BALANCING AMBIENT LIGHT WITH FLASH
Michael Huber, author of the Magic Lantern Guide to the Nikon SB-28 Flash, introduces the book saying, “…It became obvious that most users take advantage of only a fraction of the capabilities of modern microprocessor-controlled camera systems. This is even truer when using flash.” We’re going to change all that.
Let’s begin by examining the situations in which you can use a flash to augment your images. This time, we’ll concentrate on using the wonderful automatic features of modern cameras and flashes to achieve your imaging goals.
WHERE DO YOU USE FLASH?
1. As before, use flash as the primary lighting source when you’re photographing in a dark environment. The opportunities for using a flash under these circumstances are endless. However, employing manual techniques for doing this is a tedious process if you’re going to be sure your exposure will be correct. For example, the use of manual flash doesn’t take into account any filters that may be on your lens. How many of us keep a polarizer on each lens and often forget to remove it before doing manual flash photography? There is a 1-2 f-stop loss of light that must be accounted for if your flash exposure is to be correct. TTL (through-the-lens) automatic flash photography, where the flash intensity is measured at the film, is a great leap forward.
2. As before, use flash as the primary lighting source outdoors, together with ambient light where the flash lights up the people brightly, and the ambient light fills in the shadows and illuminates the background.
The advantage of using the “automatic fill flash” technique is that, if the ambient light level changes, I can continue to shoot as long as I please, making no further measurements or adjustments. The automatic feature of the flash will continue to provide me with one f-stop of light more than the ambient, whatever the ambient level, until I reach the limits of the flash capabilities.
Copyright 2007 Mike Goldstein
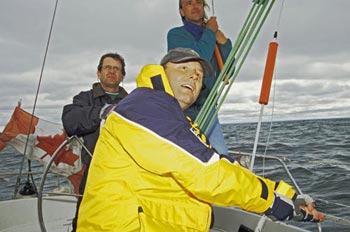
This photo was also made during a cruising course I took, some years ago.
It was a dark day, and I wanted to bring out the color of that yellow rain jacket.
The flash was set for “3D matrix balanced TTL automatic fill flash”, the mode I use most with the F100 camera and SB-28 flash.
This mode (available with selected Nikon lenses) takes full advantage of the 3D matrix metering in my F100 camera, to accurately balance ambient lighting against the flash, for both foreground and background.
I set the flash compensation to +1 fstop, to render the subject a little brighter than the subdued background.
Because I was exposing for ambient light on a dark day , my shutter speed was quite slow. I needed that slow shutter speed to properly expose the background lighting, so I set the flash sync mode (on the camera) to “slow sync”, and “dragged the shutter”. This prevented the flash from forcing the shutter speed to the much faster normal flash sync speed, which would have rendered my background black.
Note: If you set your aperture for a depth of field (f11) that’s too long, the flash will attempt to light it up! As the flash can’t illuminate a lake at the far horizon, you’ll get “tilt” messages from the system! The solution is to re-set your aperture for a smaller number, let the camera continue to automatically adjust the shutter speed for a properly exposed background, and let the flash do its job without complaining.
Incidentally, when “dragging the shutter”, you’ll want to use “normal sync” or “front curtain sync”, so that the flash fires at the start of the image-making process, and then the background ambient light “burns in” on the storage medium. (Later, we’ll look at using “rear curtain sync” for special effects.)
3. We use flash as the primary lighting source at night, or in a dark environment, using time-exposure techniques to allow ambient light to fill in the background (e.g. friends sitting around a campfire at night).
Copyright 2007 Mike Goldstein
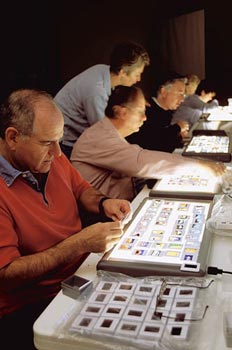
Here’s a group of photographers, checking their “take” after a day’s shooting, while enjoying one of the Santa Fe Workshops courses in San Miguel de Allende, Mexico.
The only ambient light in the room was provided by the light tables, used for checking slides (this image is sure dated!).
I didn’t want to overpower the ambient light, but simply “help” it, so I set my flash compensation to 0 f-stops, indicating that I wanted the flash to give me the same amount of light (on the average) as the ambient. The flash was set for “3D matrix balanced TTL automatic fill flash”, and the camera was set for “slow sync”.
I recall I was using a rather large reflecting bounce card, Velcro-taped to the flash head, to soften the effect of the flash. The flash head was directed up, and the bounce card surrounded it, throwing soft light forward. The automatic flash took this “loss” in the light path into consideration, in providing the correct flash lighting.
I had the camera adjusted for minimum aperture, as I was hand-holding, and you can see the rapid drop off in focus beyond the first person. It was interesting to see how the bright light tables overexposed just slightly, and how the flash balanced those light sources.
4. We use flash as a secondary lighting source, used indoors or outdoors, to fill in dark shadows caused by the ambient lighting (e.g. photographing people in bright sunlight, who are lit from the side or backlit).
Copyright 2007 Mike Goldstein
Copyright 2007 Mike Goldstein
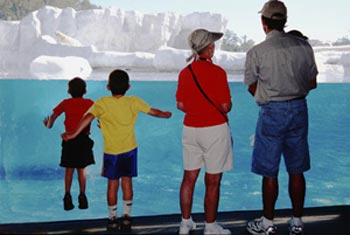
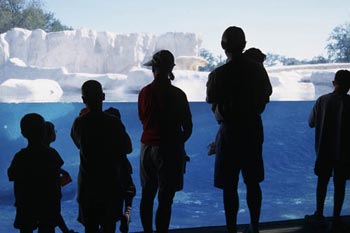
Well, here is an argument for fill flash! Both images were made at the Detroit, Michigan Zoo, in the polar bear exhibit, during a journalists’ “fam” trip sponsored by Detroit tourism.
They were made within minutes of each other, as you can see the bear at the left of the ‘glacier’ in the shot on the left, and his progress to the right side of the ice in the shot on the right.
The shot on the left was made using fill flash, with the same background exposure as the shot on the left. The flash was set to “3D matrix balanced TTL automatic fill flash” with -0.7 f-stops of compensation, to render the subjects just slightly darker than the frontal lighting. The camera flash mode, as usual, was set to “slow sync”, so that my shutter speed, which determined the background exposure, would not be influenced by the flash.
The shot on the right was made without fill flash, all the light coming from in front of the audience, who are shown in dark silhouette.
UNDERSTANDING THE RELATIONSHIP OF CAMERA SHUTTER SPEED IN FLASH PHOTOGRAPHY
Have you noticed that, in talking about flash meter settings or how to adjust the flash, there’s no indication of changes to the shutter speed? This is not an accidental omission. There are two basic situations in which flash is used:
1. The flash provides all available lighting, and the effects of ambient lighting are ignored. A typical situation would be photographing your friends outdoors at night, while you’re hand-holding the camera. In this case, the camera shutter speed does not influence the exposure, because the duration of the flash is so much faster than the shutter. The flash is so fast that you can literally stop a speeding bullet in its path, using flash for lighting. If you use a flash light meter to check exposure, you’ll see no indication of desired shutter speed but only aperture setting.
The only influence of shutter speed in this case is that the flash must be fired while the shutter is open. The shutter speed must be slow enough to “sync” with the flash action. Every camera has a shutter “sync” speed (my Nikon F100 uses 1 /250 second), and this is the shutter speed to which the camera system will default when using flash in Program mode. Note that, when using flash, the shutter speed must be equal or slower than the flash sync speed, but not faster, in most cases. To sum up, only the aperture setting influences exposure in straight flash photography. Shutter speed has no influence when the flash is the only lighting source.
2. The flash is used in conjunction with the ambient light, to produce a specific effect. If you’re photographing people outdoors on a clear sunny day, you’ll use the flash as an auxiliary lighting source, to “fill in” dark shadows. In this case, you have two separate exposure situations in the same image. The background or ambient light must be properly exposed, using a combination of shutter speed and aperture settings. The flash must expose the shadows properly, by supplying the proper amount of additional light to fill in, but not eliminate, the shadows.
The camera shutter speed does influence exposure, as you will first set the usual exposure for the ambient light. If that exposure requires an aperture of f8, you might then set the flash to deliver f5.6 of flash lighting to render the shadows slightly darker (but not black!) than the background lighting. Again, in this case, the shutter speed must be equal to, or slower than, the camera’s flash sync speed.
SPECIAL EFFECTS USING AUTOMATIC FLASH CAPABILITIES
The automatic capabilities of the modern flash unit (perfect flash fill, slow sync with rear curtain sync, perfect balance of flash and ambient light, accurate flash compensation, etc.) allow the photographer to be more creative in his imagery than ever before. Let’s look at a few situations where such creativity can be explored. I won’t cover all the various features and capabilities of the flash (I haven’t used them all yet myself!), but these are samples of what I have done on a regular basis with some success.
FLASH COMBINED WITH SEMI TIME-EXPOSURE
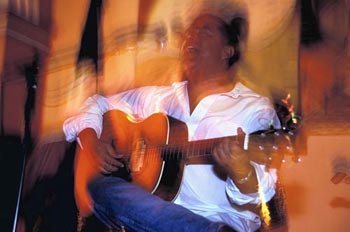
Here is Jesús Sanchez, singing up a storm in Finnigan’s Restaurant, on Zacateros Street in San Miguel de Allende, Mexico.
I visualized this image, to take advantage of both hand-held blur, and the “locked in place” image effect of a flashed subject. This is a relatively new technique that I am now using, and I’ll show you several samples.
I love the moody effect of this photograph, with the sharp image of the guitarist against a background of his own blurred image!
The camera was hand-held, with the ambient light requiring a shutter speed of about 4 seconds … hence a lot of blur in the background, even holding the camera as steady as I could. Of course, I had to drag the shutter, so the camera was adjusted for slow sync. In this case, I used rear-curtain slow sync.
The flash was set for 3D matrix balanced TTL automatic fill flash, with +0.7 f-stops of compensation, as I wanted that white shirt to pop out of the background. The background ambient light was first exposed with my “time exposure”, but when the flash went off (at the end of the time exposure, with the rear-curtain slow sync!), the flash overpowered any prior exposure in the shirt area, rendering it nicely white. Had I used normal slow sync, and the flash had gone off at the start of the exposure, the ensuing time exposure might have infringed on the white shirt area with a different lighting temperature.

Meet Clemente, head waiter at the El Campanario restaurant, a fantastic seafood establishment in San Miguel de Allende.
I wanted to photograph Clemente, a natural showman, with the background of the main dining room visible. I would have tried to “pose” him in such a situation, but in fact, as soon as he saw the camera, he “assumed the position”, and I had but to release the shutter.
The camera was hand-held, with the ambient light requiring a shutter speed of about 4 seconds … hence a lot of blur in the background, even holding the camera as steady as I could
The flash was set to “3D matrix balanced TTL automatic fill flash” with +0.7 f-stops of compensation, to render his white shirt just slightly brighter than the ambient lighting. The camera flash mode was set to “rear curtain sync”, so that my shutter speed, which determined the background exposure, would not be influenced by the flash.
Since both camera and flash are adjusted to provide automatic exposure of both background and foreground, you can simply pre-set the camera system, then walk around in an interesting area watching for photographic opportunities.
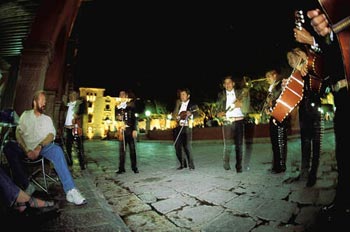
Copyright 2007 Mike Goldstein
I captured this mariachi band, serenading patrons of an open-air restaurant in El Jardine, the main plaza in downtown San Miguel de Allende, using my 15mm fisheye lens.
To make this image, I had to abandon the tripod I was using, and sit myself down next to the left foot of the musician at the right side of the frame. In fact, I was literally sitting on his foot!
The camera system was adjusted as above. Note that, because of flash dropoff, the bright building in the background overpowered the musicians at the left side of the frame, during the time exposure, giving them a ghostly appearance. This would have occurred using either normal slow sync, or rear-curtain slow sync.
USING FLASH TO LIGHTEN UP INTERIORS
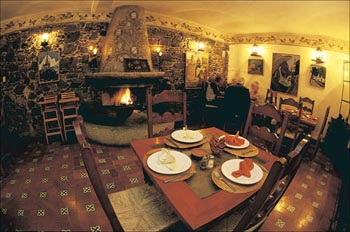
Copyright 2007 Mike Goldstein
Here is one of the dining rooms at the Casa Puyo restaurant, an Argentinian steak house on Zacateros Street in San Miguel de Allende.
During my first trip to San Miguel, I ate a number of meals here, so that I was “known”. On my last visit, I came prepared to make this photograph, and asked them to light the fire before I ate my dinner. I explained that I wanted to photograph their dining room after my meal, when the fire had built up a good bed of coals (all this in my fledgling Spanish, mind … I had checked some vocabulary beforehand!).
I used my 15mm fisheye lens to encompass most of the room, and had the camera on a tripod. As usual, I had them turn on every lamp in the room, as I like the warm effect of incandescent light on daylight slide film. I used the “foreground vee” composition, as I often do when photographing interiors. The camera was set for aperture priority auto – exposure, and slow sync flash, to drag the shutter.
The flash was set to to full output level. In this case, I didn’t care if I balanced the existing light, or even obtained a proper flash exposure, as I just wanted to augment the existing light, and fill in shadows. The flash head was aimed up, to bounce the flash light from the lightly colored (I had checked!) ceiling.
I made sure the shutter speed for the background exposure would be long enough to allow the fire to “burn in”, by setting an aperture of f11 or so.
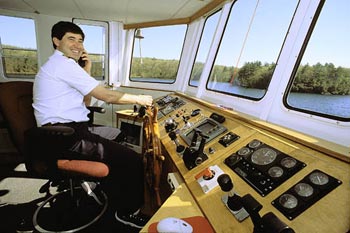
Copyright 2007 Mike Goldstein
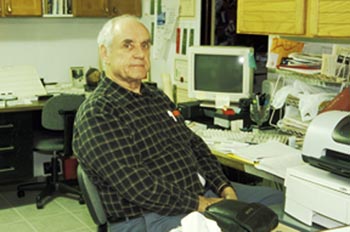
Here’s Captain Mark, part owner of the Kawartha Voyageur, a river boat that cruises the Rideau Waterway in southern Ontario.
One of my favorite photographic situations is shooting on the bridge of a boat, capturing the crew, their equipment, and the view seen through their windows. My technique was honed with my old Canon equipment, and my job only became easier with the newer Nikon system, and it’s wonderful automatic flash capabilities.
As usual, the basic camera exposure is set for the background view, as seen out the window. My camera is always set for normal slow sync flash, and it’s unusual that I change this, except when I prefer to use rear-curtain sync. Dragging the shutter is a way of life!
The flash was set for 3D matrix balanced TTL automatic fill flash (boy, that’s a “mouthful”), with no compensation. The flash head was aimed up, to bounce the flash from the white ceiling. Bounced light always gives a nice soft effect to the flash, and rarely results in subjects casting any shadows.
I was happy to note that all the windows were angled out, knowing I would get no flash reflection from them.
No space to set up a tripod here, but I wanted a sharp image, so I used my monopod. Don’t you love the leading line of that equipment panel, and the lines of windows?
SERIOUS PORTRAITURE USING FLASH
Copyright 2007 Mike Goldstein
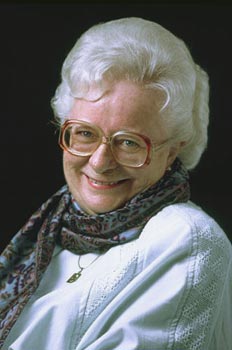
This is the first serious portrait I ever made, using my brand new flash meter, back in the days when I was doing my first mail-order photo course with the New York Institute of Photography.
Lovely Lily was the first wife of a good friend of mine. He was so taken with the photograph that he asked for a large print, to be displayed at Lily’s funeral, when she later succumbed to cancer.
This kind of photography is made easier with the automatic features of modern flashes, if you don’t own a flash meter.
However, if you have a meter, you can use any flash that will output a reasonable amount of light, as you will use the flash meter to ensure proper exposure.
For now, notice that her right side is brighter than the left. I had a simple flash mounted on a tripod, facing into a photographic umbrella, to soften and spread the light from the flash. This was my main light. The flash was set to manual, full output, and was installed slightly higher than the subject, and to one side. I simply measured the aperture I needed to expose properly for that light, using my flash meter, from in front of the subject, the meter aimed back at the camera, not the flash. That is the aperture I set on the camera lens.
Note that, with a flash meter, there is little to be gained from trying to use automatic techniques for this kind of portrait. Any simple flash, set for maximum output, is satisfactory. In this case, not trying to show detail in the background, the shutter speed of the camera can be set to the flash sync speed.
So that her left side would not be too dark, I installed a reflector on another support, and brought it close to her face until my flash meter, pointed at the reflector, indicated the reflector was throwing 1-2 f-stops less light than the flash. This was my fill light. The reflector I used was a sheet of cooking aluminum foil, mounted on a large piece of cardboard, and taped to it.
You don’t get a great portrait with one shot. Generally, your subject will be nervous, and have a forced smile that looks ghastly. I used two secret techniques to obtain this shot:
a) I did a whole series of shots without any film in the camera, chatting and joking, until Lily was relaxed and smiling naturally. Then I announced I had to change film, and actually loaded the camera.
b) I used an external battery pack on the flash, to ensure very fast recharge times, so that I could shoot as quickly as I wished. I didn’t want to see a fantastic expression on Lily’s face, while my flash was taking ten seconds to recharge!
I shot several rolls of film, and this was the best of the ‘take’.
#######

Copyright 2007 Mike Goldstein
Silvie Bernier, together with her husband Claude, will serve you a fantastic meal at their restaurant, La Grappe a Vin, in Mont Tremblent, Québec.
If you’ve noticed the “double foreground vee” in the composition, be assured that was not an accident!
The camera was set to expose the background properly, with slow sync flash, and the flash for automatic flash fill, with zero compensation.
The flash head was pointed up, to take advantage of bounced light from a white ceiling.
I wanted to create a little “sparkle”, on those bright reflecting surfaces – the tray, the bottle, and Silvie’s jewelry. To do this, I used a small “bounce card”, built into my flash, that threw a very small amount of flash light directly forward. For flash units that don’t have bounce cards, I use a small white cardboard card (a business card is fine), that is held to the flash head with an elastic band.
If you’re doing studio portraiture work, you can “go wild” with flash lighting, limited only by your creativity. For subjects with dark hair, you can employ a dark background. To avoid having dark hair blend with a dark background, you aim an auxiliary flash at the background, so that it creates a circle of light on the background. The subject’s head is then placed within this ring. The amount of light thrown by this flash can be set using a flash meter. Female subjects are often photographed with a “halo” of light outlining their hair. This is very effective and very easy to do. You simply use another auxiliary flash, used as a “hair light,” to perform this function. Another auxiliary flash can be used as the fill light, instead of a reflector.

Copyright 2007 Mike Goldstein
Here’s a rock artist I found in a small town in the Laurentian Mountains of Québec, some years ago. She finds “faces” in large rocks, then augments them by carving and painting them.
For this image, I wanted to use bounced flash, but the ceiling was painted black! However, there was a white wall to her right, so I swivelled the flash head to my left, bouncing the light from the wall. Notice that her right side is a little brighter than her left side.
I needed a “leading line”, to draw the eye into this photograph, so I asked her to extend one leg toward me. Photographers make images…
Professional studio flashes often have a built-in lamp, so you can see what the lighting effects will be before firing flashes. In the days of film capture only, photographers would use a “Polaroid back” on their cameras to instantly check exposures and compositions before making the final images with the desired film. With today’s digital capture, this becomes much easier.
Using all these auxiliary flash units can result in a real mess of cables if you try to fire them manually. However, there are other ways to do this:
1. Each auxiliary flash can be fired from its own “slave” unit, which can be as simple as a small light-activated switch, Velcro-taped to the side of each auxiliary flash. The main flash, when fired manually, activates the various slaves that control the auxiliary flashes. The light output of simple auxiliary flash units can be controlled by simply moving them backwards and forwards.
2. Modern flash units often have built-in slave capability, and wireless control capability, as well. These helpful functions allow modern flashes to be used in even more situations. In addition, the automatic features of modern flashes allow a controlled output of light when they’re used as auxiliary flash units, simply by dialing up the “f-stops of light” required for each application.
Copyright 2007 Mike Goldstein
Copyright 2007 Mike Goldstein
Here we have two images of my good friend, Bruce, a fellow photographer.
The left image (Unfiltered) was shot using flash to augment the natural light, which was fluorescent. The original image was shot on daylight-balanced slide film, and you can see the distinct green color cast caused by the fluorescent lighting.
The right-hand image (Filtered) was shot using flash light that was slightly stronger than the ambient. A strong magenta gel (plastic filter) was placed over the flash (rubbed the gel on a wool sweater, and let static electricity hold it in place), to warm up the lighting, and reduce the green color cast.
The effect of the filter can be controlled by placing it over the flash head to completely cover it, or by only covering part of the flash head. Different colors of filters can be used in various situations, including many that involve photographing nature outdoors at night. The late Galen Rowell, who suggested to me the trick of using static electricity to hold filter gels in place, describes in some detail his techniques for using colored flash outdoors at night in the video tape he made with Franz Lanting, “Creative Outdoor Photography”.
Now that you’re a maven in the art of using that flash unit of yours, recall the first law of flash technique: while you’re practicing “f8 and be there,” don’t leave home without it!
EXTRA READING
There are several books I’ve found useful in learning flash techniques. Both of the following publications have been on my shelf for several decades, at least. If you have trouble locating them, try a search on the Internet.
John Shaw’s Close-ups in Nature has a lot of useful information on using flash, calculating manual flash exposures, and thinking of flash lighting and distance in terms of f-stops.
Amphoto ISBN #0-8174-4052-6
Pro Techniques of People Photography discusses portrait techniques in great detail. Author Gary Bernstein reveals a multitude of ways in which you can use flash.
HPBooks ISBN #0-98586-269-7
by Michael Goldstein
Leave a Reply