
Stunning fashion images can be made using studio lighting, natural light, or a mix of artificial and natural lighting. Another really interesting technique involves painting models with light–typically by using a flashlight or an off-camera flash.
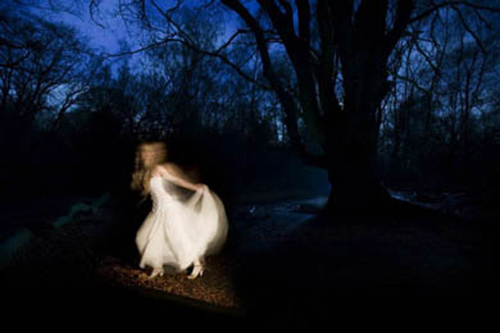
In fact, Paolo Roversi, an extremely successful and artistic fashion photographer, created an entire book by painting models with a small flashlight. His images are often ethereal and sometimes a bit spooky. He utilized very long exposures to allow the forms of the models to blur and play in the light, creating a very surreal but captivating effect.
Working with flashlights to paint with light has a number of exciting advantages:
1.) Flashlights and handheld flashes provide “on location” lighting extremely cheaply. Frequently, photographers will use the off-camera flash they already own OR buy a flashlight. In the past, I’ve used Maglites available at many hardware or home stores, but any flashlight with a strong enough output will work.
2.) With flashlights and strobes, adding gels is easy; therefore, you can get creative by mixing colors of lights or the color temperatures of the lights.
3.) This form of lighting is readily portable, so you can shoot in a location that has limited light without having to use a huge budget to purchase portable studio equipment.
4.) If you like artistic and blurred fashion images, painting with light allows you to use slow shutter speeds to capture blurred movement.
5.) You can shoot outside or indoors. Painting with light can be an artistic way of lighting in many environments.
THINGS TO CONSIDER
1.) Shutterspeed/Motion Blur: When you approach your shoot, you should know what type of effect you’re looking for. Do you want the background ambient light to show through? If yes, you’ll need a longer shutter speed. Do you want your model to blur or be still? You should pay attention to the relationship between shutter speed and aperture, because when you’re using flashlights, the shutter speed will make a huge difference in the sharpness of the model, the amount of ambient light showing through, and more.
2.) Ambient Light: Be aware of the ambient light around you. The longer your exposure, the more this ambient light is going to show. Make sure that if there is ambient light, the light doesn’t create distracting patterns or undesired hot spots in the images.
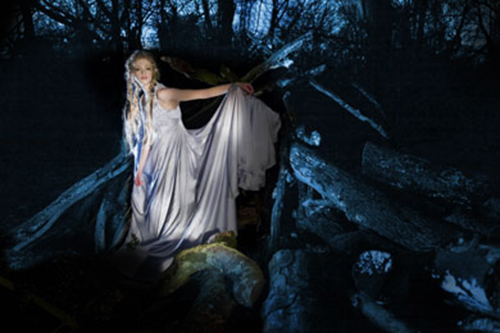
3.) Color Temperature/Gelled Lights: Each different light source you use will have a different color temperature. Even two different flashlights will be slightly different colors. The large flashlight I have has a VERY warm bulb, whereas my Maglite is just general tungsten. My strobe is daylight balanced. These lights will record different colors on film. This is a variation to be aware of and perhaps use to your advantage. For example, in this image I painted the model in the foreground with the very warm flashlight.
The model was backlit with a daylight-balanced strobe. I shot this image in raw, and so I set my color balance to match the warm/tungsten flashlight on the model. This, therefore, made the daylight flashlight go completely blue (as it was a cooler, bluer color temperature). You can also use gels of any color (red, blue, green) to add an additional dimension to the light.
4.) Flashlight vs. Strobe: Using a strobe will free the images/action. I often use strobes to create defined edges. (I use them as back light to help separate the model from the background). Flashlights will create much softer light and allow for movement and much more of a painting effect (you can concentrate the light in a particular place, etc.).
OTHER SUGGESTIONS
1.) Bring an assistant: Painting with light is very difficult to do by yourself. You need to operate the camera, and you don’t want to run around in the dark and risk bumping your equipment. Sometimes you need a light to come from a back angle that you wouldn’t be able to reach before the end of the exposure. Assistants are almost mandatory (almost).
2.) Be organized: Because you will be shooting in the dark, you want to have everything in an organized/established place. It will be very easy for you to lose or misplace things, especially if you’re shooting in the woods where you can easily set something down and lose it forever. Also, in more crowded areas, you want to keep your equipment near you so no one bumps or damages it.
3.) Tripod: You MUST use a tripod. Your exposures will be anywhere from one second to 30 seconds or longer. You need to have the camera steady or you’ll have no discernable form of a model (too much movement will obscure it). Some photographers will handhold shots with flash, so they can blur the background ambient light into the models. This is not really “painting” with light the way you will do it with a flashlight.
4.) Cable release: A cable release is helpful because it allows you a free hand to paint with the flashlight and also keeps the camera steadier when you’re shooting long exposures (less camera shake associated with the pressure your hand puts on the trigger).
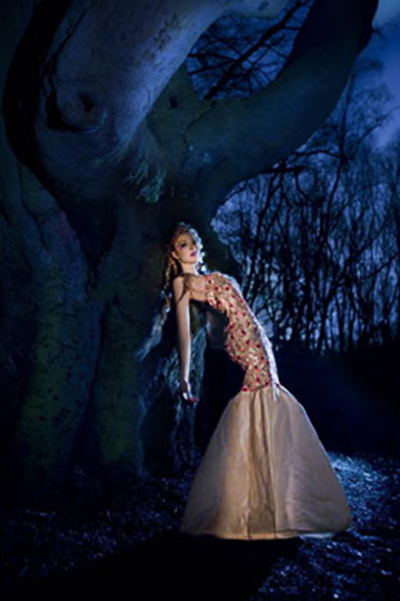
5.) Multiple Light sources: Consider bringing multiple flashlights at once (and maybe even more than one assistant). Frequently I’ll have one flashlight to light the background, another for the mode, and even another to give a little back/rim light for the model. In my most recent painting with light shoot, I had a large tungsten flashlight to illuminate the model, another flashlight for the trees in the background, and another light to give the model’s contours more definition.
6.) Practice Run: There are endless possibilities for lighting with flashlights and strobes. I suggest that you do a practice run with friends or family before you attempt the technique with a model. It will take you a while to figure out the many different variables–including shutter speed, aperture, distance of light to model, and more.
7.) Multiple exposures: Depending on how skilled you are in Photoshop, I recommend you try to make multiple exposures for lighting different parts of the image. You can make an image for the background lighting, the model, the mid-ground, and foreground. If you have Photoshop abilities, you can later combine the exposures into one photo, picking and choosing the best parts of the photos. For example, you can select the photo that has the best effect on the model’s face and combine it with the photo that lights up the background elements best, etc.
8.) Shoot in raw: When painting with light, it’s often easy to blow out highlights (if you leave the light lingering in one place too long) or to want to bring out more detail from darker areas. For this reason, I REALLY suggest shooting in raw because it will give you the most exposure latitude and flexibility for editing your images later.
These techniques not only give you a variety of wonderful lighting effects, but are great fun. Have a good time shooting and see what you can create.
by Lindsay Adler
Article and photos: © Lindsay Adler. All right reserved.
Leave a Reply