
Purpose
The Tools Panel and the Color Picker allow easy access to the some of the most commonly used tools and functions in Photoshop.
Note: By the way, even though the diagrams show the full version of Photoshop, this information also applies to Photoshop Elements.
© 2011 John Watts. All Rights Reserved.
Where to Find
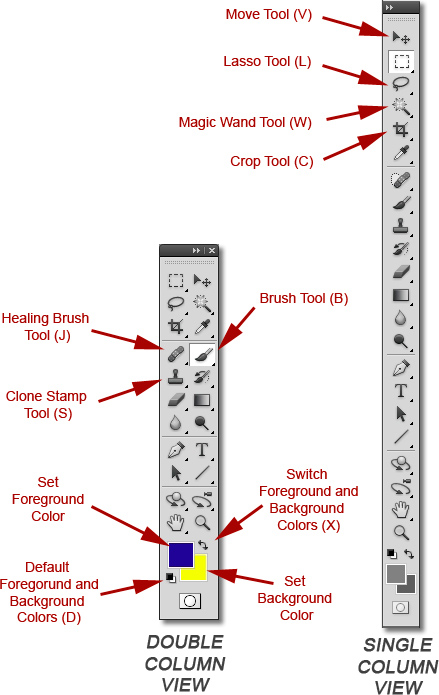
The Tools Panel is generally found on the left side of your screen. You have two view options: a single column view, and the “classic” double column view. To change the view, click on the double arrow at the very top of the tools panel.
The Color Picker can be accessed throughout the program. The most common way to access the Color Picker is to click on the foreground or background color in the Tools Panel: the Color Picker will then pop up. You also have access to the Color Picker in many other functions, such as the Text Tool, the Line Tool, and so on. Generally speaking, any time that you see a square or rectangular box with a color in it, you can click on the box and access the Color Picker.
The Tools Panel
There are dozens of tools contained in the Tools Panel. Not only are there around 20+ tools showing “on top”, but wherever there is a triangle in the bottom right-hand corner of the tool, there are more tools underneath the tool on top. Don’t be overwhelmed: You’ll only need a handful of these on a regular basis. (covered in Digital Photography and future Apogee articles.)
Working with the Tools Panel
© 2011 John Watts. All Rights Reserved.
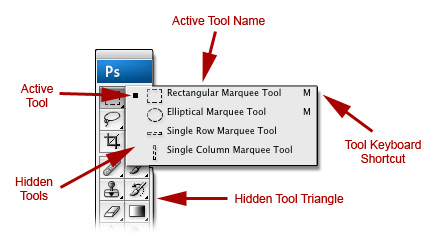
The diagram to the right shows an example of tools “hidden” underneath the top tool once you “expand” them by clicking on the triangle.
Beside most tools in the diagram on the previous page is a keystroke in parentheses — this is the tools’ speed key. All single-digit Speed Keys in Photoshop are reserved for the Tools Panel for ease of use.
When you place your mouse cursor over a tool, the name of that tool appears below your cursor as a tool tip, along with that tools’ speed key.
Notice that for each tool you select, a new “Options Bar” will show up. The Options Bar is a menu of options at the top of the Workspace, and is unique to the tool selected. For example, the Options Bar shown appears when your Crop Tool is selected.

The Color Picker
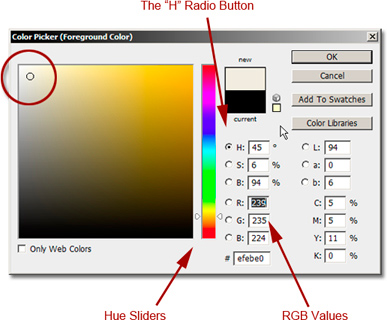
The color picker is easiest to use for a Photographer’s purpose when the “H” radio button is selected.
© 2011 John Watts. All Rights Reserved.
Working with the Color Picker
To change the color – 3 ways:
1. Click in the Color Palette and/or drag the “Circle” cursor to change the Brightness and Saturation.
2. Move the Sliders in the vertical rainbow-colored bar to change your Hue.
3. Enter the RGB values directly into the boxes to the right of the letters R, G, and B.
If your RGB values are 0/0/0, then your color is black.
If your RGB values are 255/255/255, then your color is white.
If your RGB values are all of equal value, such as 127/127/127, then your color is a shade of grey.
Until the next time, have fun and stay well!
by John Watts, Watts Digital Imaging
Leave a Reply