
Learn some photo techniques to improve your shots of waterfalls and fast moving water.
Copyright © Andy Long
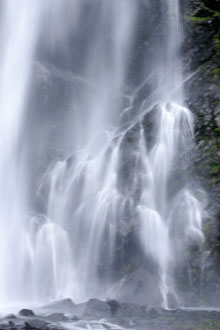
By getting close and tight on a section of a waterfall, more detail can be seen. Getting layers also gives it depth. (Alaska)
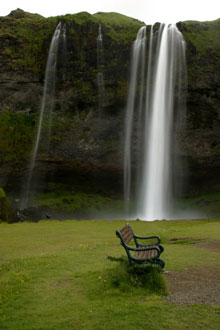
COVER PHOTO: An exposure of 1 second creates a silky feel to the flowing water. (Iceland)
With water covering nearly seventy percent of our globe, it’s no wonder there are countless images of water hanging on walls all over the country and many more waiting in the files of those who took them. Whenever photographers find a nice setting in which water is one of the key ingredients, they hurry to set up their tripods. You can never have enough photos of water-in-motion.
The ethereal atmosphere of silky-smooth running water seems to be the most popular scene with viewers. Probably no one knows the reason behind that choice, but one thing is certain: there are many ways to capture the flow of running water. Every photographer has his or her own technique for taking a perfect picture. Just like every sunrise or sunset is different, every shot of a waterfall, stream, or lake is different. However, all water photographers want to evoke some kind of emotion in the person who views the image.
Smooth and silky, or turbulently active—these are the main options photographers have when they shoot running water. Whether one particular approach is superior to another is a debate that will go on forever. The answer is certainly subjective. The preference of the individual photographer is the determining factor. Many seek out the silky look of a waterfall, for example, while others work to freeze the action and show the power. The same photographer who likes a smooth waterfall might also enjoy capturing the impact of a spray of ocean water striking a large rock just offshore as the tide comes in.
My preference for waterfalls and streams is to have that nice, silky appearance. To me, it creates a feeling of calm or serenity that makes me want to sit, look at the photo, and relax. In my mind, I hear again the sound that was present when I was taking the multitude of images. The easiest and best way to get this smooth effect is to shoot during an overcast day to allow for longer shutter speeds–the cloudier the better, as this will produce a darker sky. The next thing to do is to stop down as far as the lens allows, which serves two purposes: One, it gives maximum depth-of-field, and two, a longer shutter speed ensues. When you’re creating the smooth effect, try to have a shutter speed of at least ¼ second or longer. A bit of bracketing lets you find the shot you like best when you’re reviewing the shots later on the computer.
Copyright © Andy Long
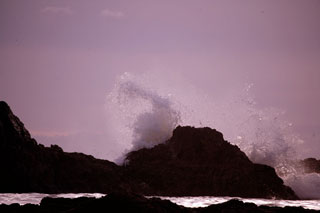
A fast shutter speed can show the power of a wave crashing against a rock on the ocean. (Oregon Coast)
Another way to help make an exposure longer is to use filters. A two-stop neutral density filter is one I always have in my bag, reserved specifically for making longer exposures of water. A polarizer used at its maximum effect will also work.
When you’re using really long exposures to smooth out water, try to take as many shots as possible at numerous exposure bracket settings, shooting on both the plus and minus sides. Depending on how much water is flowing, a shot at one spot for a given shutter speed can look completely different from the same shutter speed of another waterfall or cascade. When you use exposure compensation and numerous settings, there’s sure to be a resulting image that suits you.
Some may consider this experimentation to be the easy way out, a symptom of not knowing what f/stop/shutter speed combination to use. “Go for the proper exposure, so the histogram has that nice bell curve to it,” they might say. While they might be right in many instances, their advice more-than-likely isn’t the best choice for your setting. The eye will say what’s correct. Research has shown that the eye/brain calculates what you see at about 1/50th of a second. Any picture taken at another shutter speed will not show you what your eye actually comprehended. With longer shutter speeds needed to smooth out running water, you have no idea what will result. Thus, you need to take lots of images to find the one that works best for what we want the image to portray.
Copyright © Andy Long
A good foreground subject can add perspective to the setting. (Iceland)
When the sun is out and you find yourself at a waterfall you probably won’t have an opportunity to see again, there are a couple of moves you can make to help save what might otherwise be a lost scenario. One is to isolate on a small portion of the waterfall/cascade to minimize the amount of glare that’s being produced. A polarizer can help a bit, as well, but it will also darken the non-glaring parts of the water. The main problem to avoid is having areas with lots of glare in addition to dark spots. There will be too much contrast to work with, and one or the other will be completely lost.
Your physical position in relation to a waterfall can be important. If possible, try to get as close as possible, because your proximity will let you bring out subtle details in the ribbons of water as they pass over the rocks. The farther away from a subject you are–whether it be a waterfall, landscape or animal, the less detail will come out in your photograph.
Some waterfalls don’t allow you to get close to them due to their location. Another factor in where you can stand is how much spray is being given off. If you do find yourself near a waterfall with lots of spray, bring a lens cleaning cloth with you to continually wipe away the water droplets that are sure to appear on your lens. You might not see them while you’re focusing–since your focus is in the distance, but when you see your images on the computer, the spots will show up–mainly as very out-of-focus areas.
A feature to look for when you’re shooting waterfalls is something nice you can include in the foreground. Lots of subjects lend themselves to being a strong lead element. A small patch of flowers can add nice color to an otherwise monochromatic shot–unless you’re in an area where the water is falling from a glacier and the base pool is filled with stunning blue water. While a pool might not seem to be a typical foreground subject, the vast contrast in color can add significantly to the power of the shot.

Copyright © Andy Long
Notice the lack of detail in the waterfall due to the distance away from it. The glowers in the foreground help offset this. (Iceland)
Look at your subject from a variety of angles. Yes, there are tried-and-true shots of every popular waterfall, as evidenced by holes in the ground where every other photographer’s tripod has been situated. However, by doing a little exploring, you might be able to find an angle that can add depth as the water flows out and over the rocks. A view from on top of the fall looking down and over is one not many people attempt. If you want to be one of the few, be careful and aware of your limits when you move into position, because all of the ground surfaces in the area are going to be wet and slippery.
Finally, some places are better than others to explore for less common but still great waterfall opportunities. Wherever there are mountains, there are sure to be waterfalls. In the USA, Transylvania County in North Carolina has more waterfalls than any other county in the country. The Columbia River Gorge in Oregon also hosts enough falls to keep any photographer busy. Colorado and Alaska boast their fair share, but you must take the time to search them out. Beyond the boundaries of the USA, Iceland is a waterfall lover’s dream come true. A tour of the country offers so many waterfalls that you can spend an entire trip just shooting them–without considering any other photographic possibilities. Thus, since no two pictures of any waterfall are going to be absolutely the same, find a waterfall you like and explore all there is to it–whether it has a five-foot drop or a fall of several hundred feet or more.
by Andy Long
Leave a Reply