
Adobe Bridge is a stand-alone program that comes with Photoshop and other Adobe Creative Suite programs. It allows you to organize, browse, locate, and edit your image files.
There is more flexibility in Bridge than I can cover here. If you desire to know more, use the Bridge Photoshop Help section. In keeping with the spirit of K.I.S.S. (“Keep It Super Simple”), I am going to cover the most useful features for a photographer.
Copyright © John Watts 2010
Where to Find Bridge photoshop
There are three ways to access Bridge:

1. You can access Bridge by clicking on the “Bridge” icon on the Menu Bar.
2. You can also go to “File” -> “Browse (or Browse in Bridge)…” in Photoshop, and Bridge will open.
3. A third option is to have Bridge open automatically when you open Photoshop. Just click “Automatically Launch Bridge” in the “General” or “Advanced” section of Photoshop “Preferences”.
To access:
Menu:“Photoshop” -> “Preferences…” on a Mac, “Edit” -> “Preferences…” on a PC.
Or Speed Keys: “Command + K” on a Mac, “Control + K” on a PC.
Bridge Preferences
To access (with Bridge open):
Menu:“Bridge” -> “Preferences…” on a Mac,
“Edit” -> “Preferences…” on a PC.
Or Speed Keys:“Command + K” on a Mac,
“Control + K” on a PC.
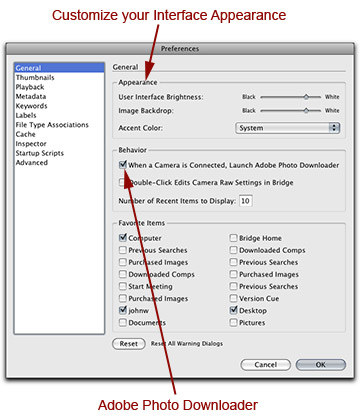
Under “General”:
Under “Appearance”, you can customize how your interface looks by choosing your background and accent colors.
You have the option of using Adobe’s Photo Downloader by checking the appropriate box.
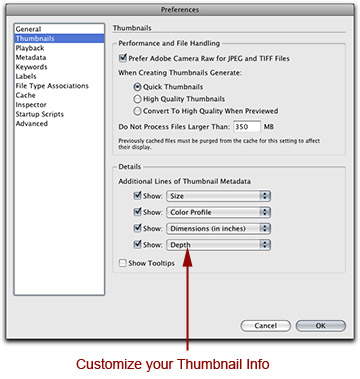
Under “Thumbnails”:
You can choose up to 4 lines of information to appear under the image Thumbnails, such as Image Size, Color Profile, Dimensions, Bit Depth, Date Created, and more.
An Explanation of Some of the Features
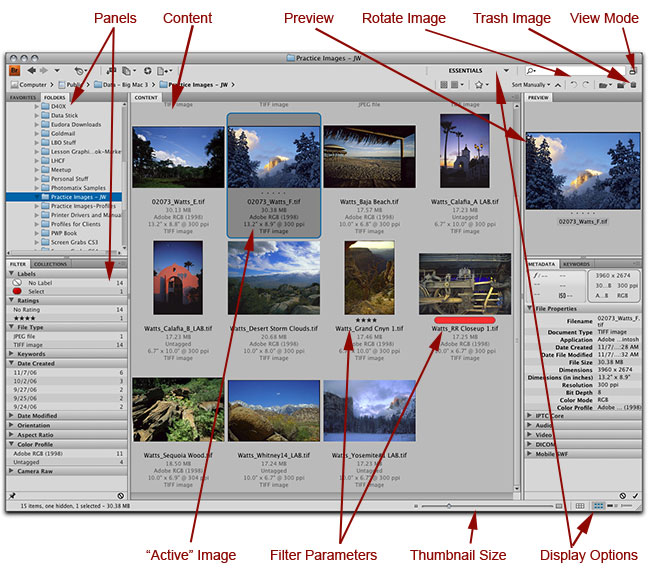
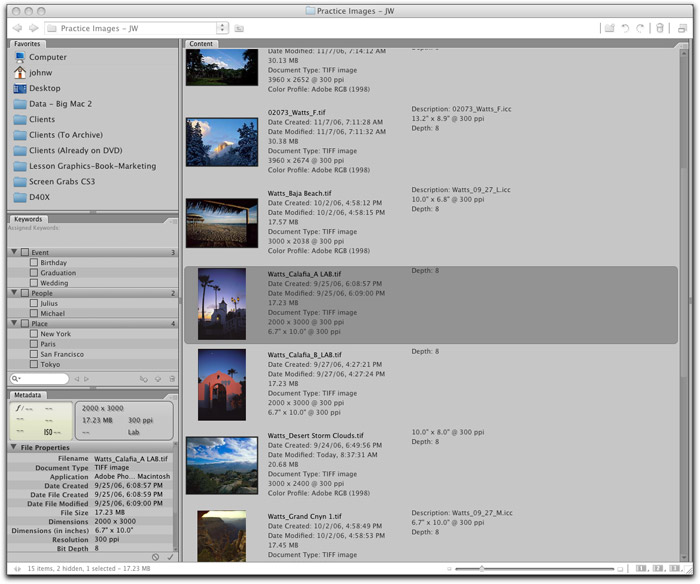
1. Panels – Each Panel gives you different information. You can choose which Panels you want showing by going to the “Window” menu in Bridge. Those that are showing will have a checkmark beside them. In addition, you can save your Workspace the same way you did for Photoshop in this previous Apogee Article. The view shown in the above example is similar to the “Default” workspace.
2. Content Panel – Here you can view the content of your computer/folders. You can change the wayBridge sorts your images by going to the “View” menu -> “Sort”. I have mine sorted in “Ascending Order” by “Filename”.
3. Resize Workspace – By dragging these vertical dividers, you can change the size of your workspace. Simply click on the area shown and drag.
4. Preview – This shows a preview of your active image. By the way, if you choose more than one image to be active (“Shift” + mouse click), more than one preview will show up.
5. Rotate Image – This gives you the ability to rotate the active image(s).
6. Trash image – This gives you the ability to permanently trash the active image(s) as you are editing.
7. View Mode – Click on this to switch between “Compact Mode” and “Full Mode”. This is a great way to move Bridge out of the way quickly.
8. Show / Hide Panels – Toggling this will leave only the “Content” Panel showing.
9. “Active” Image – The Active Image (or images) will be outlined in a different shade of gray than your Image Backdrop. In the example above, the Active image is darker than the inactive image.
10. Filter Parameters – As you are editing, this gives you a way to separate your good images from your great images. There are two parameters that you can use to identify and separate your images:
Horizontal Filmstrip
Metadata Focus
Rate with Stars – You will notice 5 dots underneath your active image(s). By clicking on these, you can add or subtract “stars” to rate your images.
Rate with Colored Labels – By right-mouse clicking on the active image, you’ll see lots of options: to change the color of your label, choose “Label”.
By the way, by going to the “Label” menu in Bridge, you will see various speed keys to organize your editing quickly.
11. Thumbnail Size – By moving this slider, you can change the size of your previews in your Content Panel.
12. Display Options – This is one of the most useful features of Bridge.
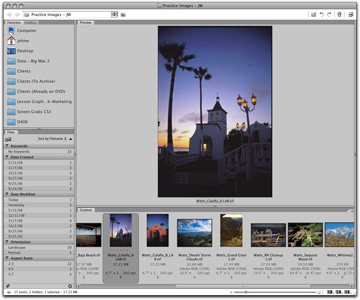
By clicking on the buttons at the bottom right, you can choose how you view, edit and preview your images. The example above is the “Default” view, while the examples to the right are the “Horizontal Filmstrip” and “Metadata Focus” views. You can customize these and choose other views, including your Default Workspace, by clicking and holding down the left mouse button until a menu pops up with the available options.
By the way, if you use the “Filmstrip” view. It is very handy to use the “Arrow” keys on your keyboard to move from one image to another.
Other Useful Features
Another neat feature is the “Slideshow”: Go to “View” -> Slideshow” in the Bridge menu, and your images will show up maximized on your screen, with no distractions.
And renaming your images as a batch is easy with the “Batch Rename” feature. Go to “Tools” -> “Batch Rename…” to explore this.
Hope you enjoyed the bridge photoshop tutorial
by John Watts, Watts Digital Imaging
On Bridge when reviewing my images, the Camera Data (Exif) Exposure Mode is showing as AUTO but I set my camera on M (manual) Why?