
When I don’t see any photographic opportunities at a location, I often shoot a few frames experimenting with various techniques to give my creativity a jump-start. This article explains four multiple exposure photography techniques you can try. We’ll discuss the techniques first and provide information about how to set your exposure for multiple images on the same frame later.
The first three techniques work best when the camera is on a tripod. This is difficult to do when you’re handholding the camera. I have accomplished these three techniques hand-held on an auto focus camera with an image stabilization lens.
However, it’s best to use a tripod. In contrast, the fourth technique works best when you’re handholding the camera.
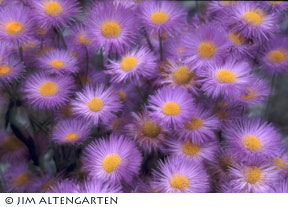
Soft Focus
There are many ways to produce a soft focus effect. Soft focus filters are the most common method and are relatively inexpensive. Soft focus lenses are more expensive but produce a higher quality image. Canon created a soft focus setting on their EOS Rebel II (an SII) that automatically performs the manual procedure described below.
Less expensive methods include putting Vaseline on a filter or stretching a nylon stocking across the lens.
Technique #1: You don’t have to purchase new equipment. You probably have everything you need: a camera, lens, and the ability to shoot multiple exposures. (In case you own a manual camera without a multiple exposure function,
I’ll explain a procedure at the end of the article that will enable multiple exposures on most manual cameras.) This technique creates two exposures on the same frame.
Use a wide aperture to minimize depth-of-field in both shots. For the first exposure, focus precisely on the subject, so that it is tack sharp. For the second exposure, manually throw the subject out of focus. (You’ll need to switch your autofocus lens to the manual position to shoot an out-of-focus subject, if you don’t have a lens with full-time manual focusing.)
You can alter the “halo” around the subject in the final image by increasing or decreasing the degree that the subject is out of focus in the second exposure.
After using this multiple exposure photography technique for a while, you’ll develop a sense of how far out of focus you like to have your subject in the second exposure.
Soft Focus
How you throw the subject out of focus is important. If there’s something in the background close to the subject, then focus in front of the subject for the second exposure. Otherwise, the background element may be in focus in the final image.
Focus behind the subject if there’s something in the foreground close to the subject.
This multiple exposure photography technique works well with landscapes, flowers, and people. When shooting a portrait, however, minimize the extent of the out-of-focus exposure to keep the person relatively sharp. Creativity requires experimentation, so also try some extreme out-of-focus portraits.
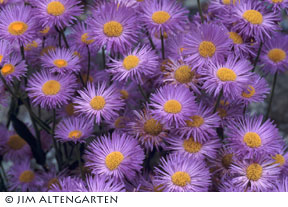
Near-Far Soft Focus
Technique #2 is an unusual one that often has the viewer perplexed as to how the photographer created the image. This technique requires at least three objects at different distances from the camera. The minimum distances between the objects will vary depending upon the lens and f-stop you use.
You can determine if the distances are appropriate by focusing separately on the nearest and farthest element from the camera. If you focus on one of them and all the other elements are out of focus, then the distance between the elements is fine.

This technique also uses two exposures on the same frame. Use a wide aperture for both exposures. For the first shot, focus sharply on the closest element, so that all of the other elements are out of focus. For the second exposure, focus sharply on the element the farthest from the camera.
Again, all the other elements should be out of focus.
The resulting image will appear similar to the photo on the right. The nearest and farthest elements will be in soft focus. This is true because they were photographed using the same procedure you used in the first technique–one exposure in focus and one exposure out of focus.
The elements between the closest and farthest elements will be out of focus, since they weren’t in focus for either exposure.
You can have many elements in the scene. The only criterion is having only one element in focus for each of the two exposures. This technique generates a lot of viewer attention.
The viewer can’t initially determine how the closest and farthest object can be in soft focus without having the middle object(s) in soft focus.
Soft Focus Zoom
This third technique allows you to shoot any number of exposures on the same frame. Generally, I restrict myself to four to five exposures, but that’s just my personal taste. Again, set your f-stop to allow for a wide aperture to minimize depth-of-field. Select a zoom lens to photograph the subject.
For this example, let’s use a 70-200 zoom lens and shoot five exposures on the same frame.
For the first exposure, set your focal length to 70mm. Take the second exposure at 105mm. Take the remaining exposures at 135mm, 170mm, and 200mm. The resulting image will show the subject in expanding soft focus layers.
The final image will be exactly the same whether you start with the longest or shortest focal length. To have a symmetrical layering effect, use evenly spaced focal lengths for your shots (as demonstrated in the example).
You may want to experiment with unequal spacing to get some different views of the scene. All types of subjects work with this technique. Let your mind start imagining how subjects will appear with this technique, and the creative process will start to generate other ways of looking at your scene.
Multiple, Multiple Exposure Photography
This fourth technique evokes strong viewer reaction. Either people like the technique or they don’t; there’s usually no middle ground. The final image consists of many exposures of the same subject that are out of register. The resulting image looks similar to some impressionistic paintings.
Many viewers reject this technique because it’s so different from the “rules” of photography that require the scene to be in relatively sharp focus.
You can shoot as many exposures as you desire. My favorite shots generally include eight exposures on the same frame. Since everything is out of register, it doesn’t matter what f-stop you use. I tend to use this technique most for landscapes, so I usually employ a small f-stop.
It’s also best if there aren’t too many elements in the scene.
As mentioned at the beginning of this multiple exposure photography article, this final technique works well if you’re handholding the camera. Try to hold the camera as steady as possible, and shoot eight exposures of the same subject. It’s very difficult to do with any lens longer than 50mm.
The slight movement that occurs between exposures creates the final result. If you use a tripod, as I do, keep the head fluid, and move the camera ever so slightly after each exposure. The more you move the camera, the greater the overlap of the final image. It’s okay to experiment.


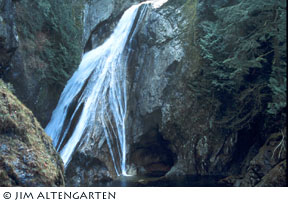
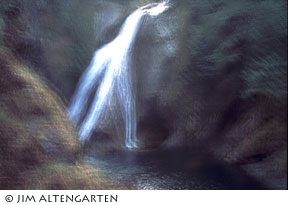
This technique is interesting to use when shooting water. Typically, water is shot either at a fast shutter speed to freeze the drops, or at a slow shutter speed to blend the drops together. You now have a third method of depicting how water will appear in the final image.
For best results, avoid scenes that have a large expanse of white water without detail. Check the two waterfall images to see how a waterfall with eight overlapping shots records on film
Another interesting way to use this technique with water is to shoot a fountain when there’s a good breeze.
Use a tripod for this technique, and keep your tripod head tightened. When you shoot the multiple shots on the same frame, everything will be in register for each shot.
The entire scene won’t be overlapping as with other shots using this technique. What will change is the water. With the wind blowing, the water will spray in different directions. The multiple shots will capture the droplets in a different location for each exposure.
The resulting image will have everything sharp, except the water will look different than in any other technique you may have previously used.
What if you have an older manual camera that doesn’t have multiple exposure capability? You can still join the fun of multiple exposures—except it will be a little more work. Here is a technique for enabling many manual cameras to shoot multiple exposures: Test it with an old roll of film or the last couple of frames on a roll. (Some manual cameras won’t allow you to “advance” the film while the film rewind button is depressed. Try it on your camera to see if you can do it.)
- 1) Take the first image.
- 2) Take up any film slack by turning the rewind handle.
- 3) Depress the rewind button on the bottom of the camera.
- 4) Set the shutter button for the next exposure by cranking the shutter lever. The film shouldn’t advance when the rewind button is depressed.
- 5) Take the second exposure and return to step #2 –5 for more exposures on the same frame.
Getting the Right Exposure
Now that you know some techniques for making multiple exposure photography, it’s necessary to ensure that you get the right exposure. Your camera will provide the exposure values for getting the standard exposure for one frame of film. You need to adjust those values so that you can expose the single frame multiple times.
When more than one exposure is made on a frame, the final image will be overexposed unless we make an adjustment. Therefore, we need to underexpose each exposure so that the total amount of light in all of the exposures reaches the correct level.
The easiest way to set the exposure is to adjust the film speed to underexpose each shot. Multiply the number of exposures that you want to shoot on a frame by the film ISO. Manually set your camera’s film speed to the result of that computation.
For example, if I use 100 ISO film and want to take 8 exposures on the same frame, I would set my camera’s film speed to 800 (100 x 8). I would set my film speed to 200 (100 x 2), if I shot only two exposures on the same frame.
After adjusting the film ISO, you can use the exposure values provided by your camera (as you meter the scene) to shoot each shot. It’s okay to do so because the camera believes you’re using faster film than you’re actually using.
The camera believes it’s making the standard exposure, when–in fact—it’s actually underexposing according to the formula you set with the film ISO.
Please remember to return your camera’s film speed to the proper setting after using multiple exposure photography. Otherwise, the remaining shots on your roll of film will be underexposed. If you’re shooting just two exposures on the same frame, you can use the exposure compensation dial on the camera to adjust the exposure settings (dial in –1 for two exposures on the same frame).
Once the camera’s film speed has been correctly set, you can meter the scene normally, and take your shots.
Multiple exposures can create some interesting images to add to your collection. They can also start you thinking creatively when you’re “stuck.” Experimenting is the key to all creativity, so try some of the techniques suggested above.
After you’ve used them for a while, you may think of some modification that will take you in a new direction. Don’t be afraid of making mistakes with multiple exposures photography. Photography, and all of life, is a gamble. You can’t steal home with your foot on third base.
by Jim Altengarten, exposure36 Photography
Leave a Reply