
When you transfer pictures from your camera, did you know you can automatically add your copyright? As your photo circles the globe, your copyright can go with it. People who see your photography online or in an email can read this information to find out who created it. While you can transfer pictures to your computer in other ways, using Adobe Bridge is efficient and powerful, because you can add copyright seamlessly, once you have set up the right template.
1. START: You will need to have Adobe Photoshop CS4 or higher installed.
Open Adobe Photoshop.
Click File > Browse in Bridge (or open Bridge from your Desktop or, if you are a Mac User, from the Dock).
When Adobe Bridge opens, find the Metadata tab, next to the Essentials Tab ( Mac CMD + F3. Win Ctrl + F3) . It looks like this:
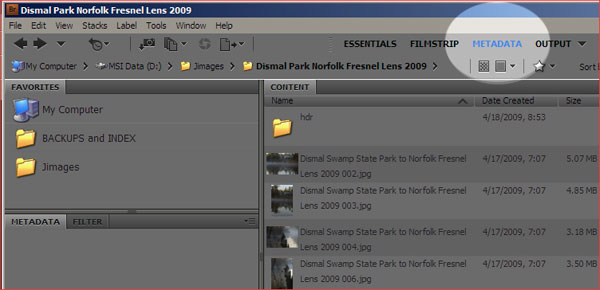
In Bridge, when you Click that Metadata tab, it will open up a workspace, which is a list of information in the lower left of the Bridge window. Do so now. Keep this workspace in mind, because with it you’ll see all information that is embedded in your pictures. Next we’ll create a template.
To create your first template, click Tools, which is just to the right of File in Bridge’s top menu. Find ‘Create Metadata Template’ from the pop-out menu. A dialog will open. Now, we want to give your template a unique name. I called mine Jimages Copyright 2009. I recommend you type in your name or a logo name, so you can add caption and copyright to your images.
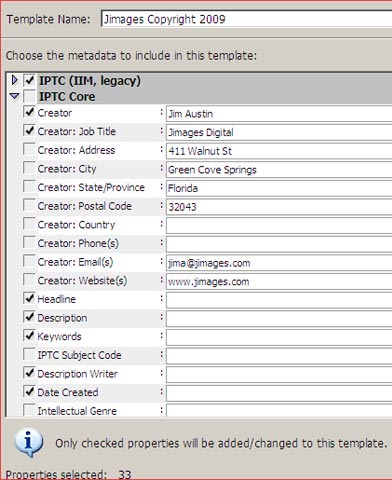
Next, Click the grey, right pointing angled triangle to show the IPTC core.
(IPTC stands for International Press Telecommunications Council.)
Locate the “Creator” field and put a check in the box. A blinking line will direct you to enter information. Likewise, check the fields for Creator City, State, Country, Website, Copyright, Rights Usage etc., and enter all your data.
Of course you can choose any fields you want, but these are good ones to get started. After you have put in all your data, click Save. You can make any changes you want later, by going back to Bridge, and clicking on Edit Metadata Template in the Tools menu.
Any photograph you transfer from your camera will now be labeled with all the information you just saved. It’s simple. We’ll launch Photo Downloader manually and use the template you just created to label your pictures as you transfer them to your computer with Photo Downloader.
Still in Adobe Bridge, we find Photo Downloader by clicking File > Get Photos from Camera. Adobe Bridge – Photo Downloader opens. Before we can add your metadata and copyright, we’ll set up information that the Photo Downloader dialog needs.
2. PHOTO DOWNLOADER
Photo Downloader looks like this:
Copyright © James Austin
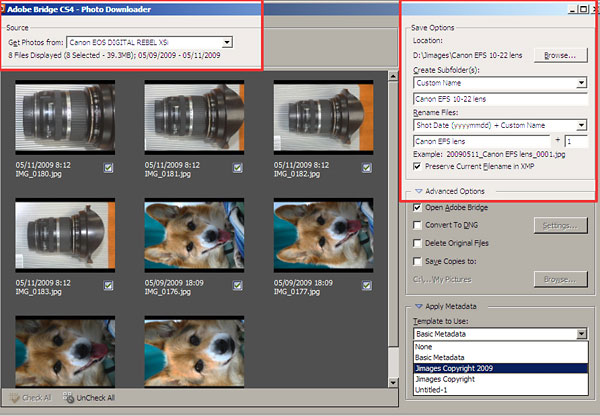
Next, in the Photo Downloader dialog box, look at the bottom left of the box and find the button for Advanced Dialog. I use Advanced Dialog because it includes thumbnails, which the basic downloader skips. Here is an example of Advanced Dialog, and it shows the next step, so lets look at them in detail:
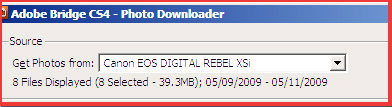
At the top of the Photoshop Photo Downloader is a box called ‘Source > Get Photos from.’ In that box, click the option for your own camera, which should appear as a source.
If your camera does not show up as a Source, click “Refresh List.” You can even wait to attach your camera and USB cable to your computer until this point, as the Photo Downloader is a hot swappable plug-and-play software. Don’t worry if the preview window has rotated pictures, as Bridge will automatically rotate them correctly when we view them in the Filmstrip later.
SAVE OPTIONS
Choose a location to save your photos. I always ignore the folder called “My Pictures” and instead create my own folder on the hard drive. That way, I can search that single folder and back it up easily to an external hard drive.

When you Save, change the location to a new folder.
Give the subfolder a custom name.
Rename the files to “Shot Date and Custom” if you like, or rename them later in a batch operation in Bridge.
Click “Preserve Current Filename in XMP”, so you always have a backup of the original picture name if you need it.
CREATE SUBFOLDERS
On the Create Subfolders option, Downloader lets you choose None, Custom Name, Shot Date, and other options. I check use a unique Custom Name, as this excellent option helps me find images later. In this example, I’ve named the subfolder Canon EFS 10-22 lens, as you can see in the thumbnails of the Advanced Dialog above. You will chose names that fit your work. For commercial work, I’d like to recommend that you use your client’s name for the subfolder.
FILE RENAMING
The next choice Downloader gives you is File Renaming. In the “Rename Files” feature, you can choose not to rename your files. But since the names that cameras give to images ( DSCN1373.jpg for instance) are not effective ways to search for them, I like to add a descriptive unique name to the shot date. This combination is a great way to find and organize images chronologically and by subject. Again, use what works for your specific workflow when it comes to file renaming.
ADVANCED OPTIONS
You can make automatic backup copies of the photos you are downloading here in the advanced options section. Just click “Save Copies To” and “Browse” and select a folder or drive to make backup copies.
PRESERVE CURRENT FILENAME
If you like, Check the ‘Preserve Current File Name in XMP’ option. You can see the original filename this way in Bridge under File Properties > Preserved File Name. XMP is metadata that is stored in the file header for jpg files.
GET PHOTOS
By now you may be wondering, “When are we going to use that Metadata template I made earlier?” It’s in Photo Downloader, at the bottom right.
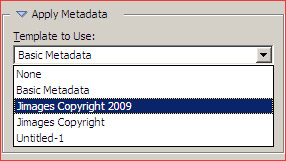
In the Apply Metadata > Template to Use, Check on the Metadata template you made earlier.
Now find the Get Photos button. Your patience is rewarded when, with your camera turned on and connected, you Click Get Photos and Adobe Downloader automatically places your digital images, now joined to your copyright and identifying information, safely into your files.
Adobe Bridge then opens and lets you see the thumbnails of your new pictures. To confirm your success, make sure the Metadata workspace tab is highlighted, then Click any one of your pictures. Bridge will highlight the picture and draw a line around it, and your newly created personal metadata will appear at the lower left in the Metadata file properties.
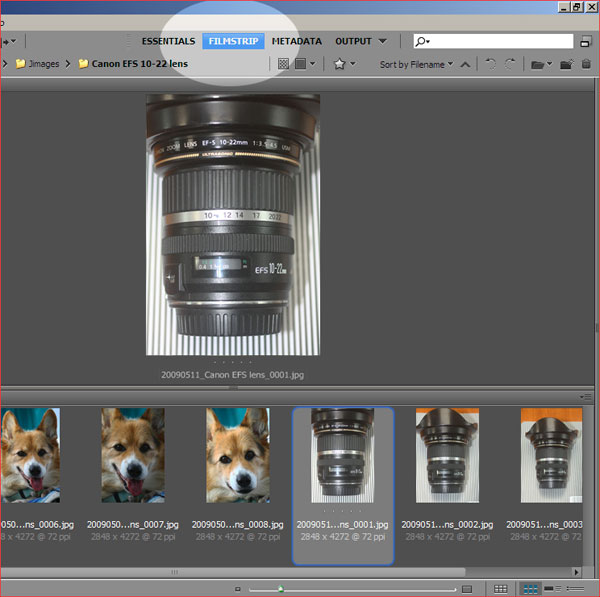
3. FINISH: FILMSTRIP for the BEST VIEW
Copyright © James Austin
One last tip: to view your images so you can start editing, use the filmstrip. Click Filmstrip, in between the Metadata and Essentials tabs at the top center of the Bridge work area. Now you’ll see a strip of your shots and a large preview of one of them. This gives a cleaner viewing area without the metadata information which you don’t need when scanning a large group of images. Using the filmstrip viewer, you can easily see the larger sizes of your photographs in the preview window, and be set to begin your photo editing.
In the next Master Class column, we’ll look at editing.
by Jim Austin, M.A., A.C.E.
Jim Austin wields Adobe Bridge to share a powerful, effective way to Copyright your photos while you download them from your camera.
Leave a Reply