
So, what makes a good color print, and how do you use the basics of Photoshop to achieve your desired results?
In other words, for what are you aiming?
This is Part 2 of a 3 part series. We’re going to concentrate on further defining Contrast and Color. Be sure to get caught up and read: Photoshop CS6 / CC: What Makes a Good Color Print? Part 1
Contrast:
One of the basic elements of a good print (discussed in Part 1) is proper Contrast. Again, the definition of contrast is the difference in brightness between the light and dark areas of an image.
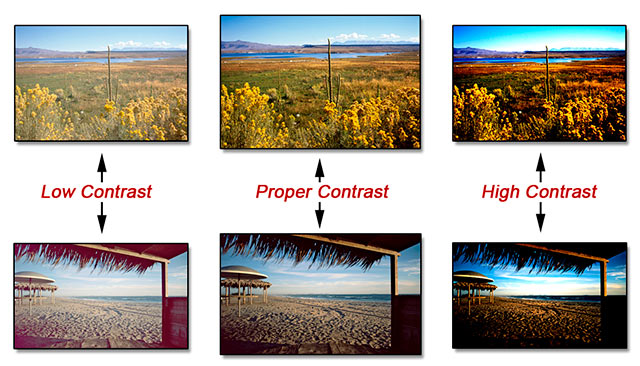
High Contrast: A high contrast image has a harsh look. It typically has a lot of dark areas and a lot of light areas and very little in the way of mid-tones. Your highlights will be washed out and your shadows will be blocked up — in other words, no detail in your highlights and shadows.
Low Contrast: A low contrast image is flat and lifeless. It is mostly mid-tones with very few dark areas and light areas. Your shadows are washed out and your highlights are dull.
Proper Contrast: With proper contrast, your image has “snap” and “life” and is pleasing to the eye. Your shadows are not blocked up, has an appropriate amount of detail, and your blacks are “black”. Your highlights are not washed out.
Here are some “Real Life” examples.
Before we go any further, let’s review our definition of Color from Part 1:
The 3 main attributes/components of Color are: Hue, Saturation, and Luminance (Brightness).
Brightness (Luminance):
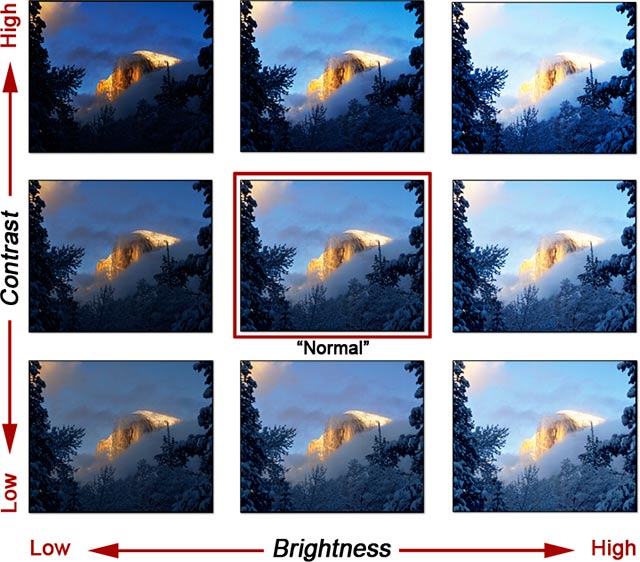
Another basic element of a good color print is Luminance, or Brightness. Again, luminance is the amount of perceived brightness of a color. The color black has no luminance, whereas the color white has the highest luminance. Generally, if you set your Contrast correctly with Levels (discussed next month in Part 3), it will usually take care of your overall Brightness.
Check out the chart below to see the relationship between Contrast and Brightness.
Hue and Saturation
To help you visualize various color casts (hues) and saturation in your image, follow the chart below.
• As you’ll find out next month in Part 3, judge your color balance / bias by looking for “neutrals”. In this image, the “neutral” is the gray of the mountains and the white of the snow – note the effects that various hues have on the overall effect of the image.
• You can also see the effect that over- and under-saturation has on the image. The under-saturated image is almost black and white; the over-saturated image produces colors that are unrealistic and goofy.
• This chart is laid out in the same circular orientation as the Color Wheel, which we’ll discuss next month in Part 3, so you can can achieve a color corrected/natural look to your images.

Next month, in Part 3, we’ll tie this all together, and I’ll show you how to properly adjust your Contrast, Hue, Saturation, and Luminance using Levels and Hue-Saturation Adjustment Layers, with more “real-world” examples.
Until the next column, have fun and stay well!
by John Watts, Watts Digital Imaging
All text & photos / screen shots: © 2014 John Watts, Watts Digital Imaging. All rights reserved.
Leave a Reply