

Do you have a photo that needs cropping? Want to straighten a horizon? Open Photoshop and grab your crop tool.
CROP, FRAME & TRIM
First, we’ll cover a basic “how to” method for cropping. Second, we’ll make a matt border for a photo. Finally, we’ll learn how to trim unwanted stuff from around an image and explore an advanced transform command to complete a photograph.
1. BASIC CROPPING
Time: 3-5 minutes
Level: Easy, beginner.
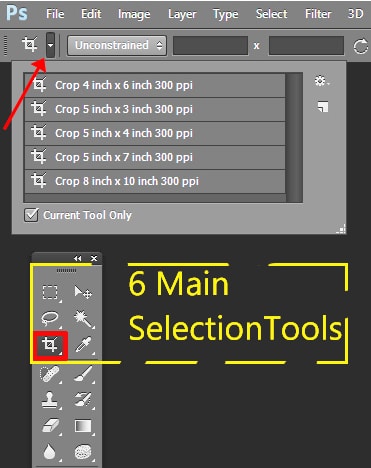
Step 1: Open your photograph in Photoshop. Find the Tools Palette (Window > Show Tools) and click the Crop Tool, the third tool down on the left side.
Step 2: Look at the corners of your image, and you’ll see the four symbols at the corners of the crop tool bounding box. Position your cursor (with your mouse or Wacom tablet cursor or touch screen) on one corner box and drag in inward to crop the picture.

Picture 3: Setting a custom color for the area outside the cropped area, which Adobe calls the crop shield.
Step 3: Notice that when you drag inward, the area outside the crop, the crop shield, turns color and becomes shaded. You can change this color just by clicking the Circular Gear (see above Picture 3) and choosing Enable Crop Shield > Custom Color. Then pick your color from the color picker.
[Tip: At any time, if we get stuck, we can type the “esc” key on the keyboard to cancel and exit from a crop. The “enter/return” key on the keyboard applies the crop tool to an image. ]
Step 4: Click the Enter or Return Key to apply your crop.
Success! Great job, you’ve cropped your photograph. Those are the crop tool basics and now, let’s straighten…
2. STRAIGHTEN A PHOTOGRAPH WITH YOUR CROP TOOL
Time: 2 minutes.
Level: Easy, beginner.

Picture 4: This shows the bounding box with its 6 symbols, one in each corner and 2 in the center, that you click on and drag to crop horizontally and vertically. Type “Enter” to apply your crop. All photos and text copyright www.jimages.com
Step 1: Straighten. Open a photograph in Photoshop. Click the Crop Tool. Position your cursor outside the image area. You’ll see a small curved symbol with two arrows at 90 degrees. Put your cursor outside the bounding box, close in to one of the 4 corners and then drag to rotate this symbol clock wise or counterclockwise to straighten your photograph. For example, this is useful to straighten a photograph with a crooked horizon.
Step 2: Click Enter or Return to apply your rotation.
3. MAKE A MATTE BORDER WITH THE CROP TOOL
Here is an easy way to expand the border around your photograph and create a digital matte border with the crop tool to present your image in a more creative way.
Time: 2-5 minutes
Level: Intermediate
Step 1: First, Type “D” on your keyboard letters to reset the foreground and background colors in the tool box to black (foreground) and white (background color square, located at the bottom of the tool box).
Step 2: Click and drag the upper left corner of the bounding box up and to the left.
Step 3: Now, position your cursor over the lower right corner square of the crop tool bounding box. Click on it and drag it down and to the right so it moves the same distance away from the corner as in Step 2.
Step 4: Type the Enter Key. You will see a border appear with the same color as the background color square in your tool box, which in this case is the color white, as we set that color in Step 1. To make the crop tool bounding box disappear, click any other tool in the tool box.
4. GET RID OF IRREGULAR EDGES ON A PHOTOGRAPH
The goal is to use the crop tool, combined with a Photoshop menu command, to get rid of unwanted edges so the image fills the entire picture area.
Time: 5-10 minutes.
Level: Intermediate.
![]()
Picture 5: The Edit > Transform command lets you clean up blank areas around a photo, straighten skewed edges, and warp corners to get rid of unwanted image areas.
Step 1: With your photo open in Photoshop, click on the crop tool. You will see the bounding box.
Step 2: To eliminate unwanted areas around the outside of the image, look up to the top left of the Photoshop top menu. Find “Edit” between File and Image. Click Edit. A drop-down menu appears. Look halfway down this menu to find the word transform.
Step 3: Click Edit > Transform.
Step 4: Choose Edit > Transform > Skew or the menu sequence Edit > Transform > Warp.
Step 5: With your cursor, pull the corners of the bounding box out from the image window. The image will move. By skewing or distorting the image, pulling with the corner symbol, you can fill in unwanted or blank areas within the picture itself. Make your picture fill the image window so no more irregular area can be seen. Sometimes the Edit > Transform > Warp command sequence works better to get rid of thin or irregular areas.
Advanced Tip: With Edit Transform, you can also scale your photo, rotate it 90 degrees or flip it horizontally and vertically.

Jim Austin Jimages new book is Sublight: Seasons in Slow Photography, 2019, at www.jimages.com


Leave a Reply