
When your subject averages 50 wing-beats per second, hummingbird photography can get a bit frustrating! But with these five basic guidelines for creating beautiful hummingbird images at your own home studio, you should find the process less challenging and much more enjoyable.
BASIC #1: Start with a Single Feeder
Because hummingbirds respond well to feeders, it makes photographing them a lot easier. So that’s where we start with our basics.
Don’t purchase anything fancy, but do make sure yours has bee-guards. While hummingbirds act aggressively toward one another, they don’t usually take on wasps dominating feeders.
Ruby Throats—a common North American species—weigh a mere 2-6 grams (putting that in perspective: one pound equals about 454 grams!). If you weighed far, far less than one pound you’d probably let wasps eat your dinner, too!
To find out when hummingbirds migrate through your region, you can ask someone at your local Audubon Society or search the internet for the information. Hang your feeder two to three weeks prior to the targeted arrival date. There are always “scouts” —early birds—and you want your feeder ready for them.
Be patient. Let the birds get used to the feeder and your presence long before you plan your first photo session. After you notice regular activity, it’s time to plan how you will photograph them.
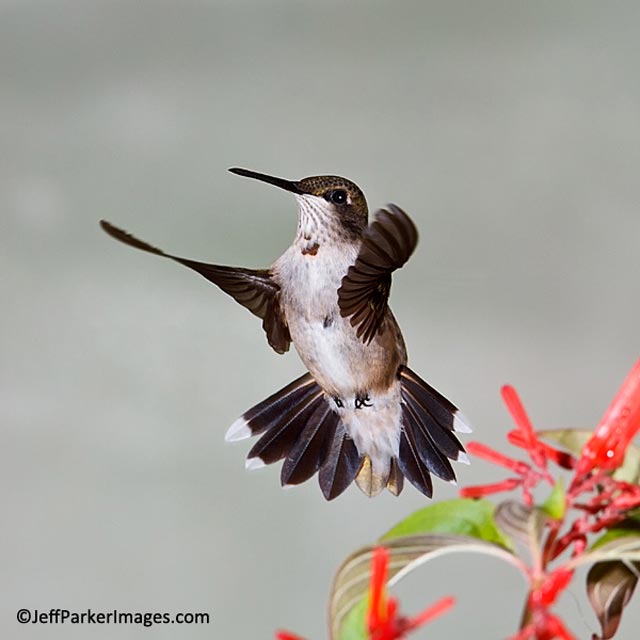
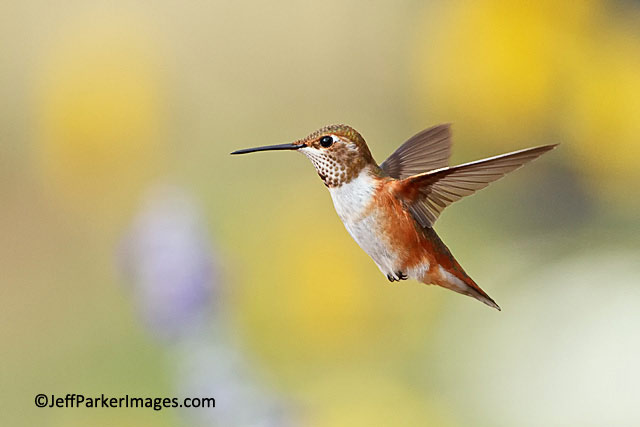
Multiple Flash Units Used – Male Juvenile Ruby-throated Hummingbird
BASIC #2: Create Your Background
A cardinal rule in bird photography is eliminating background distractions. Typically, you don’t get to control the background, but with at home hummingbird photography you’ll have the opportunity to create your own.
Decide what color and material you want for your artificial background. A sheet, matte or poster board, or piece of fabric (not too thin – that creates problems with light) all work great.
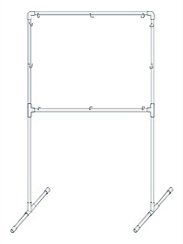
Create a simple PVC pipe stand. All of the supplies can be purchased at your local hardware store. You’ll need straight pieces, 90 degree elbow fittings and tee fittings (1/2” diameter pipe should suffice).
It’s easy to cut the desired lengths with a hacksaw and then join the pieces together with PVC primer and solvent cement. Once your stand is build, drill holes in the PVC pipes and loop loose-leaf binder rings through the holes. Make holes in your artificial background pieces and hang them from your stand.
The standard poster board size of 22” x 28” can mark your stand’s starting dimensions. The height will be determined by the height of your feeder and tripod.
Place your background 3-4 feet back from the feeder. You may need to tweak that after taking a few test shots, but you don’t want to crowd the bird.
BASIC #3: Create Your Set-up For Hummingbird Photography
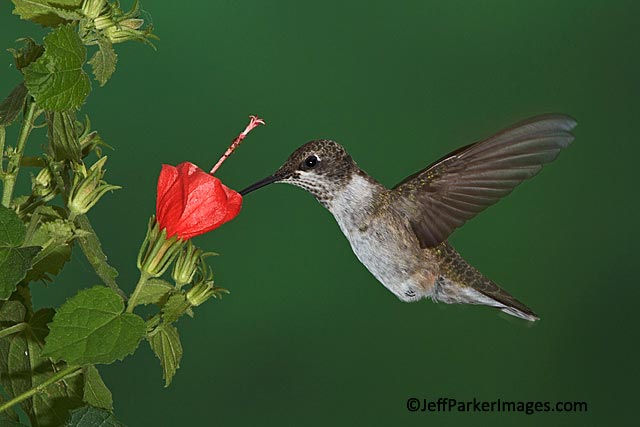
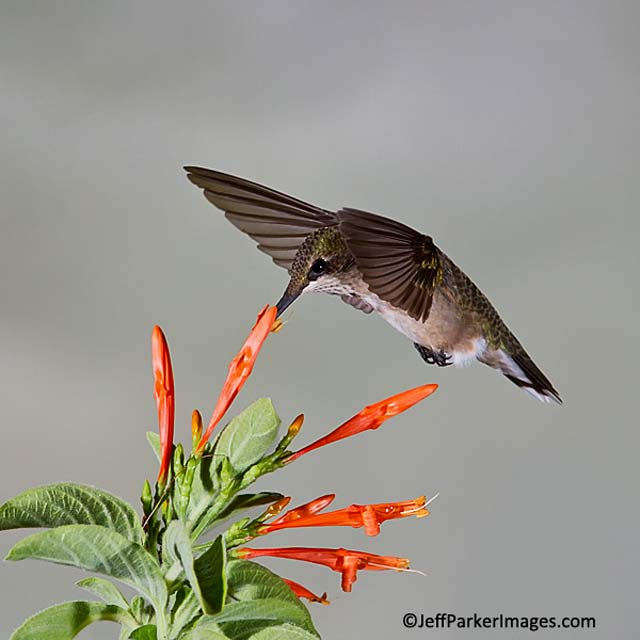
Creating hummingbird photography set-ups can get involved, but a basic set-up is simple. You’ll need favorite “hummer” flowers or plants (look for red or orange, trumpet-shaped flowers), tape, binder clips, and the background stand you created.
I suggest using native plants that hummingbirds visit naturally because part of a wildlife photographer’s job is to tell an animal’s “story” correctly. If you don’t use natives, you run the risk of including plants hummingbirds never visit in nature (e.g. I’ve seen many images include flowers from which hummers couldn’t even anatomically eat).
Sure, you’re manipulating your photo sessions with these tiny helicopters, but you don’t want your photograph screaming that!
To get hummers to visit a flower on your feeder, tape off the feeder holes and then attach a flower in such a way that you will be able to photograph it without seeing the feeder. Large binder clips work well for this purpose.
Fill the flower with 1:4 ratio sugar water using a syringe (the sort feed stores sell for vaccinations). Inject a small amount of the liquid down deep into the flower – where they’d would naturally find real nectar to lick (yes, they lick, not suck nectar).
If you can’t get the flower to stay in position, you can put the “sweetened” flower in a vase near the feeder. Once they start using the flower to obtain the liquid treat, you can remove the feeder and they will be happy with the substitute.
If you want to get more elaborate in your set up, you can also purchase a potted native plant (or several), set it near the feeder and inject each flower with the sugar water. Over time, the bird will go to the plant/s to feed.
BASIC #4: Equipment
Lenses: If you’re working with a 300–400mm lens, you will be approximately 6-10 feet away from the subject. If you have a 600mm lens you can create photos from 16-20 feet away.
Reflectors: Increase light to a naturally lit scene with white or gold reflectors. Even white foam core or poster board will work just fine.
Multiple Flash Units (see more below): Though flash units add to your equipment list, these units will certainly be beneficial to making great images.
Tripod: A tripod is critical when using multiple-flashes. The position of the camera relative to the set-up is an essential part of the puzzle. Move the camera and you will probably need to move the flashes and /or change your exposure.
BASIC #5: Lighting Decisions
When creating images of hummingbirds, you have two lighting choices: natural and multiple-flash–set-ups. Both have advantages and disadvantages.
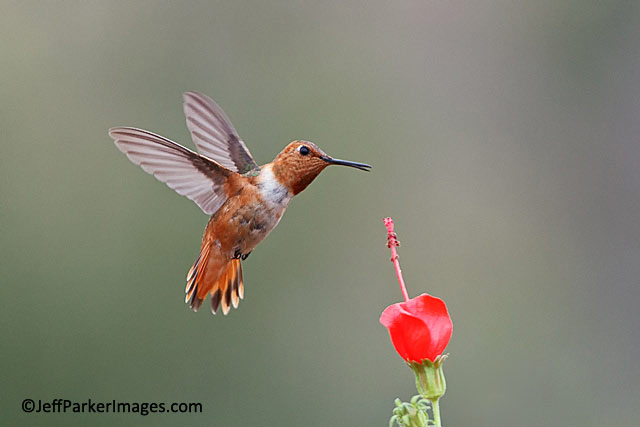
Natural Lighting
Using natural lighting to photograph hummingbirds is much simpler and—since you have no equipment to purchase—obviously less expensive. It can also deliver a rich golden tone, which artificial light can’t duplicate.
Since these birds move so fast, photographing hummingbirds in natural light works best when the light is really strong. Use those reflectors and point them to the area of the flowers. With strong natural light or by using reflectors, you can now use high shutter speeds (1/1600-1/3200 sec.).
However, no matter how high your shutter speed, stopping the wing motion remains a challenge. Be sure to bump up the ISO to accommodate for the faster shutter speeds (800-1600).
But even with wings-in-motion, great shots can still be yours; they’re just different types of shots. Blurred wings tell a story of their own, such as how Ruby Throats can reach speeds of up to 50 mph!
With all this talk of wing movement you might think these tiny creatures never stop. They do and natural light lends itself perfectly to hummer portraits. Hummingbirds also love frolicking in the rain and natural light works well for this situation.
Multiple-flash Set-ups
Not only does high-speed flash allow us to freeze wing motion, but it also allows us to highlight hummingbird iridescence, especially the gorget of species such as Ruby Throats.
I could write 30-pages on multiple-flash set-ups alone, but start with the basics and you won’t get overwhelmed. To do “basic” multiple-flash hummingbird photography you need a minimum of three flashes. Five works even better. You’ll want no less than two flashes aimed at the bird (but usually three or more) and one at the background.
Put your set-up in a shady area—out of direct sunlight—and your background as indicated above. Aim a dedicated flash at the background or you’ll end up with an image that has a black background, making it appear as if you took your photo at night.
You might run into something called “ghosting” when using multiple-flash set-ups. Ghosting can get complicated, but the basic rundown is this: if a strange shadow appears on your images, the first thing to do is adjust your background. It may be too close.
Where specifically do you aim the flashes at the bird and what durations do you choose? This requires experimenting. Take test shots of the flower you’ve attached to the feeder. However, you won’t really know what works until you photograph the bird. And, don’t worry; while that first flash makes the bird a bit shy, he/she quickly grows accustomed to it.
Have a great time setting up your stage for the hummingbirds. Then create some beautiful images and share them with Apogee Photo Magazine on their Facebook page
by Jeff Parker
All text & photos: © 2013 Jeff Parker Images. All rights reserved.
Leave a Reply