
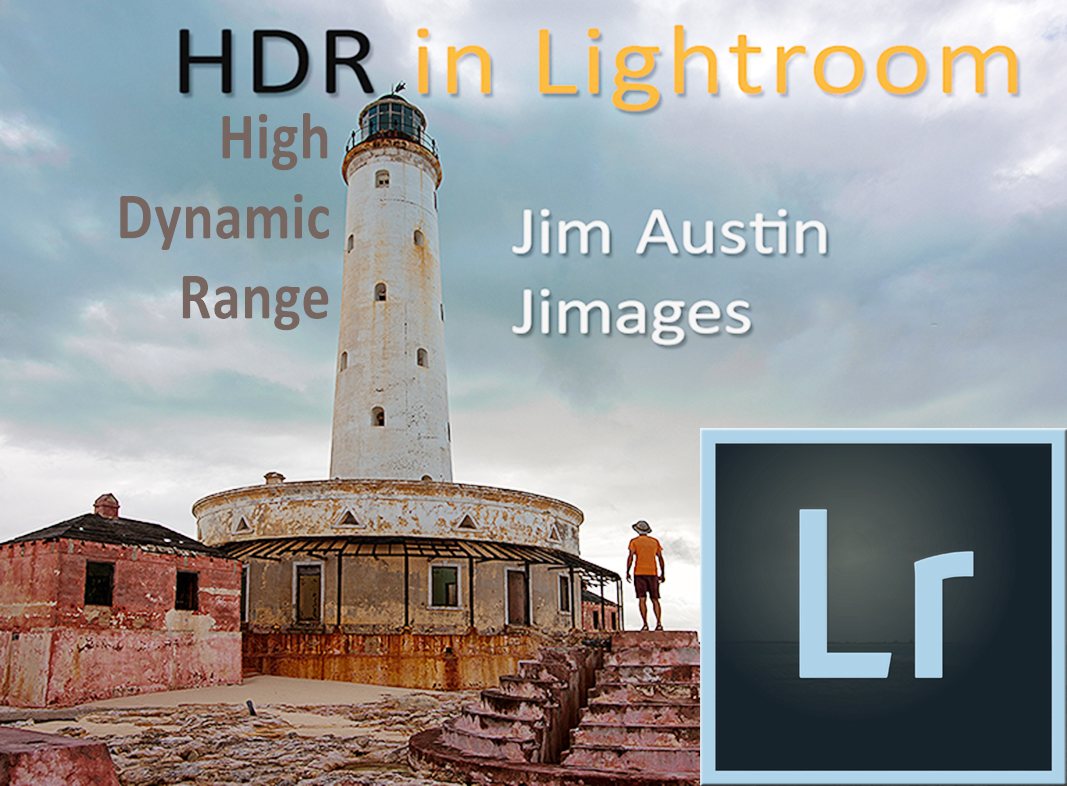
Explore an abandoned Bahamas lighthouse and see a step-by-step process for the best HDR in Lightroom results, as Jim Austin Jimages answers your questions about High Dynamic Range.
WHY HDR IN LIGHTROOM?
Apogee Photo Magazine readers ask about Lightroom HDR, so my goal is to offer you a workflow for processing high dynamic range (HDR) photographs.
Carefully done, HDR capture is a fun process that makes us more aware of light and exposure as we improve our imagery.

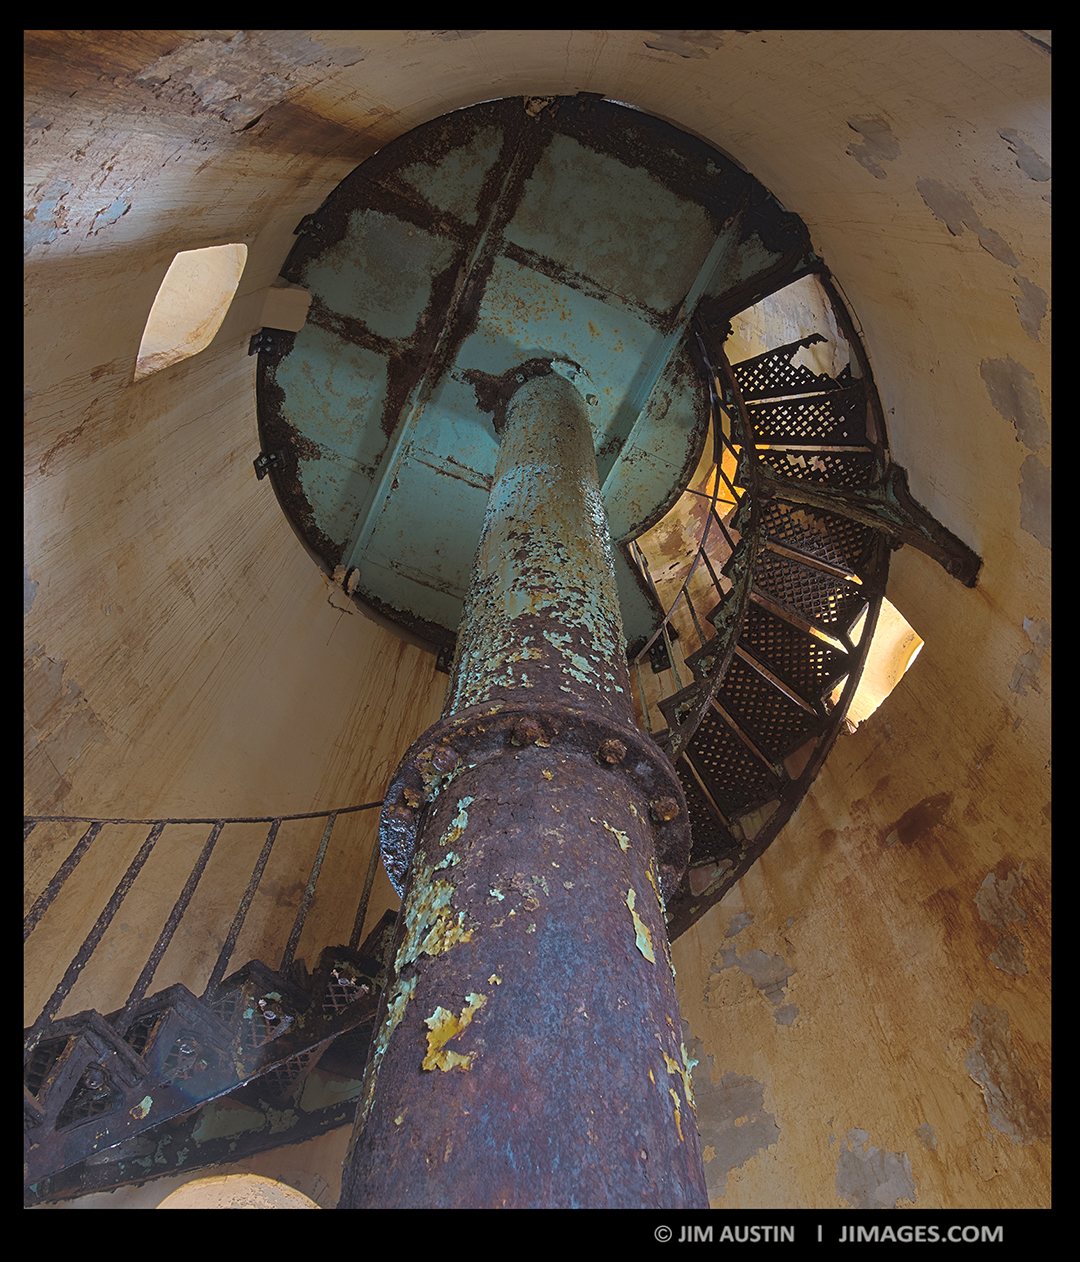
THE LIGHTHOUSE STORY : For decades, the Crooked Island lighthouse has guided ships safely through a shallow passage. I sailed south of the ship-crunching shallow reefs through an ocean with a billion shades of blue.
It was a unique setting for adventure photography.
WHAT IS HDR?
HDR, high dynamic range, is a method of combining and tone mapping exposures, to maximize contrast control, detail and color. With it, we can preserve highlight and shadow detail and output natural, photo-realistic images. An HDR software program merges multiple shots into a single image to make the exposure range vastly greater, closer to what we see with our eyes and brain.
WHAT IS YOUR WORK FLOW?
Here is a simplified nine step how to for HDR.
1. Shoot RAW images in a bracketed series.
2. Transfer them to your drive and backup.
3. Convert the RAW images to TIFF files with Adobe Camera RAW.
4. Reduce Chromatic aberration.
5. Check to ensure all the images are the exact same dimensions.
6. Import the bracketed frames into Lightroom.
7. Highlight the 3, 5 or 7 images and merge in Photoshop.
8. Global edit the tonality, color, noise reduction and sharpness.
9. Save.
HOW DO I BEGIN?
Set the camera exposure mode to Aperture Priority. Look in your camera menu for exposure bracketing. Ideally, you want to select motionless subject matter. Mount your camera on a tripod, using a remote or cable release to ensure registered frames. Registered frames, without any motion between individual frames, line up in LR and this prevents ghosting to allow the sharpest results in print.
DO I REALLY NEED A TRIPOD?
No. You can hand hold the camera and take registered frames. Most HDR post- processing programs have an automatic frame merging feature. Use a method called burst bracketing, taking a rapid series while hand holding. Bracketing is capturing a series of registered frames, spaced at 1, 1 1/2 , 2 or 3 stops apart.
WHAT ABOUT CAMERA SETTINGS? RAW, ISO, and BRACKETING
RAW
For my Bahamas Lighthouse adventure, I took RAW captures with a Nikon DSLR, prime lens, and a Lexar CF memory card. You can use JPG files, but RAW is more flexible and has much better quality. Use a memory card with a fast write speed to make burst bracketing more effective for hand-held captures.
ISO
I set the tripod-mounted camera to the lowest ISO possible, because dynamic range is greater for lower ISO’s. I use a Standard or Flat picture style and white balance the scene. This turns off the in-camera saturation and sharpening, since all color and editing adjustments were done in post.
FOCUS
For focus, AF was changed to manual focusing which avoids having the camera shift or hunt auto-focus. Exposures are done by metering, then bracketing around a central reading.
BRACKETING
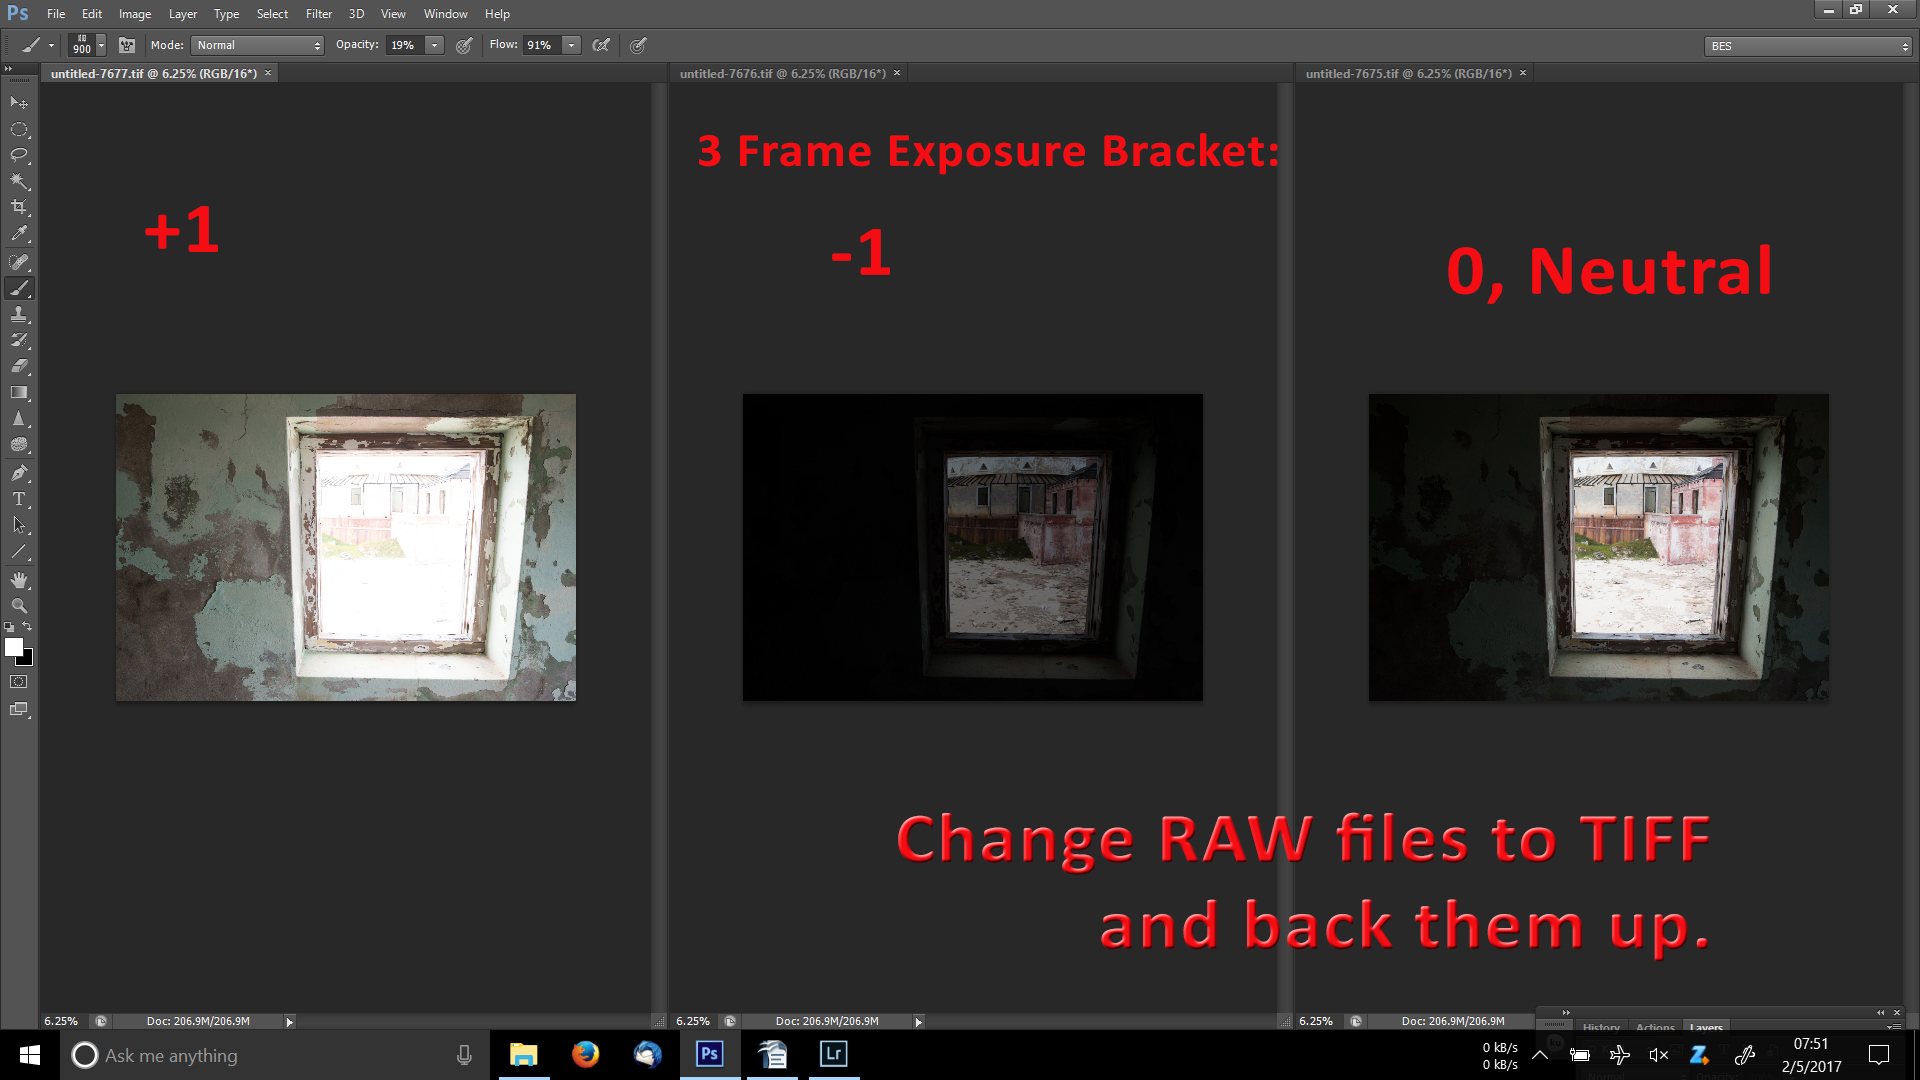
Bracketing is combining multiple photos of the same scene taken at different exposure values. For example, my 3-shot brackets were made of a photo taken at +1 stop of exposure, 0, and -1 stop of exposure — one lighter, one neutral, and one darker, or one stop underexposed.
Look in your camera menu in the Shooting section to find your bracketing control. Set bracketing for +1 to +2 stops. Remember, keep your lens aperture constant and let exposure times (shutter speeds) vary.
In bright, high contrast conditions, shoot a bracketed series of 3, 5, or 7 frames. The key is to take the series quickly, without subject or camera movement.
EXAMPLE 1: On an overcast, cloudy day, I set the aperture and focused manually. My Nikon had a dedicated bracketing button, so I set it on auto-bracketing and took 3 frames. One frame was underexposed two stops, the next exposure was as metered, and the third was overexposed 2 stops (-2, 0, +2).
This 3-stop, 3 frame exposure range worked for combining cloudy images into a merged HDR output.
EXAMPLE 2: I also made bracketed exposures of 5 and 7 frames. For instance, seven frames are exposed at a range of 7 stops (-3,-2,-1, 0,+1,+2,+3) where zero is the neutral middle reading the camera meter takes, and +3 is three stops more exposure above that reading.
If your camera does not have automatic bracketing, change the shutter speed, leaving the aperture constant at F/5.6, F/7.1, F/8 or what suits your lighting conditions. You can do this manually, just be careful not to move the camera. For shutter speeds, when you double the shutter duration, that equals one stop (1/500th of a second is 1 stop away from 1/250th of a second).
WHAT PROGRAM SHOULD I USE on WIN or MAC?
The latest version of Adobe Photoshop Lightroom CC can be downloaded as a free trial from the Apple App Store. Other editors that work well are Photomatix, HDR Efex PRO, and Photoshop. In my five years of using all of them, they all offer effective HDR processing, although they have different learning curves. More Download links are at the end of this article.
Each program tries to maximize detail and give you control over exposure, preserving detail in higher contrast scenes. The goal is to find a software program that appeals to you, learn to combine your frames without movement artifacts, and to eliminate distortion, chromatic aberration and to maximize natural detail.
This will take some practice; I did not get it right until I’d been through it more than a few times.
All of the programs offer ways to do tone mapping and exposure blending so your final image looks natural. Find a workflow that fits your style.
Mac Users, while I used a Windows platform in Lightroom 5.7, with conversion in Photoshop HDR Pro, you may be a Mac user with your own workflow and a helpful workflow is AURORA HDR Pro developed by MacPhun and Trey Ratcliff.
The first thing I do is save my RAW files to TIFF files and back them up, as I find this gives me a flexible approach. You don’t have to use Adobe Camera RAW to do this, as your platform will be different.
HOW DO I PROCESS MY SHOTS?
There are two main processes used by HDR software programs. First, there is tone mapping. The second main method is exposure blending.
Tone mapping is a way to expand or compress the tones beyond the range of a single exposure. The goal is to show an enhanced range of tones for monitor display.
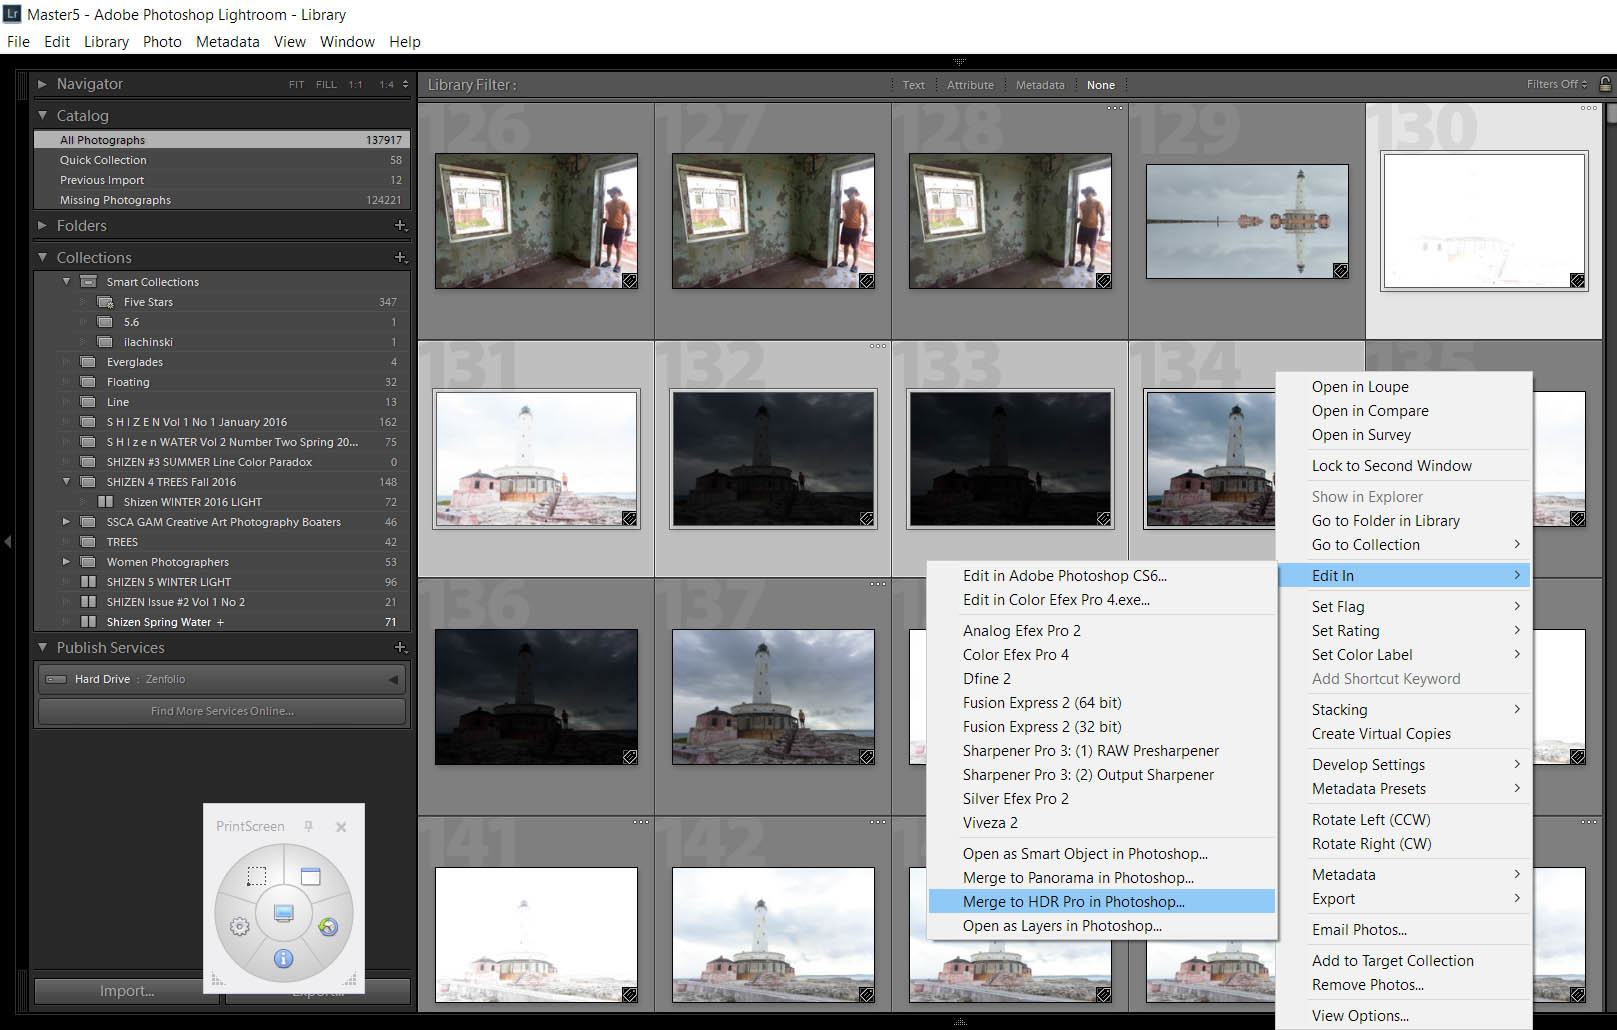
Exposure blending uses layers to select and combine the best parts of many registered frames and put them together. Your first step is to Import your images into Lightroom (“Shift+CTRL+I” on Win).
PROCESSING STEPS LIGHTROOM to PHOTOSHOP
Import and back up your bracketed TIFF file images. Here is a 3 frame bracket series, converted to TIFF files, in CS 6 (version 13.0.1) Photoshop:
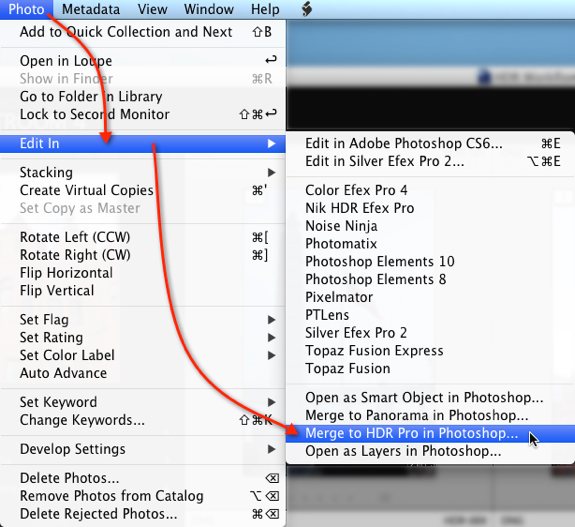
In Lightroom, Highlight your bracket series. Right Click or Tap Edit In > Merge to HDR Pro in Photoshop.
EDITING
Let’s review the HDR in lightroom process so far – You have imported into Lightroom and highlighted 3, 5 or 7 image previews. With all highlighted, tap or right click them and choose Edit In > Merge to HDR Pro in Photoshop. Great.
The next step is to convert them, which uses a process called tone mapping. I mention this because HDR should have been called
Tone Mapping (https://en.wikipedia.org/wiki/Tone_mapping).
An ideal way to describe an image is to say it was tone mapped from 9 exposures, or tone mapped from 3 exposures.
HDR Pro IN PHOTOSHOP: CONVERTING YOUR CAPTURES
The first time through, the conversion settings may seem daunting, but they are not hard to learn. Learning the settings in your app, plug-in or software gets easier the more you run through it.
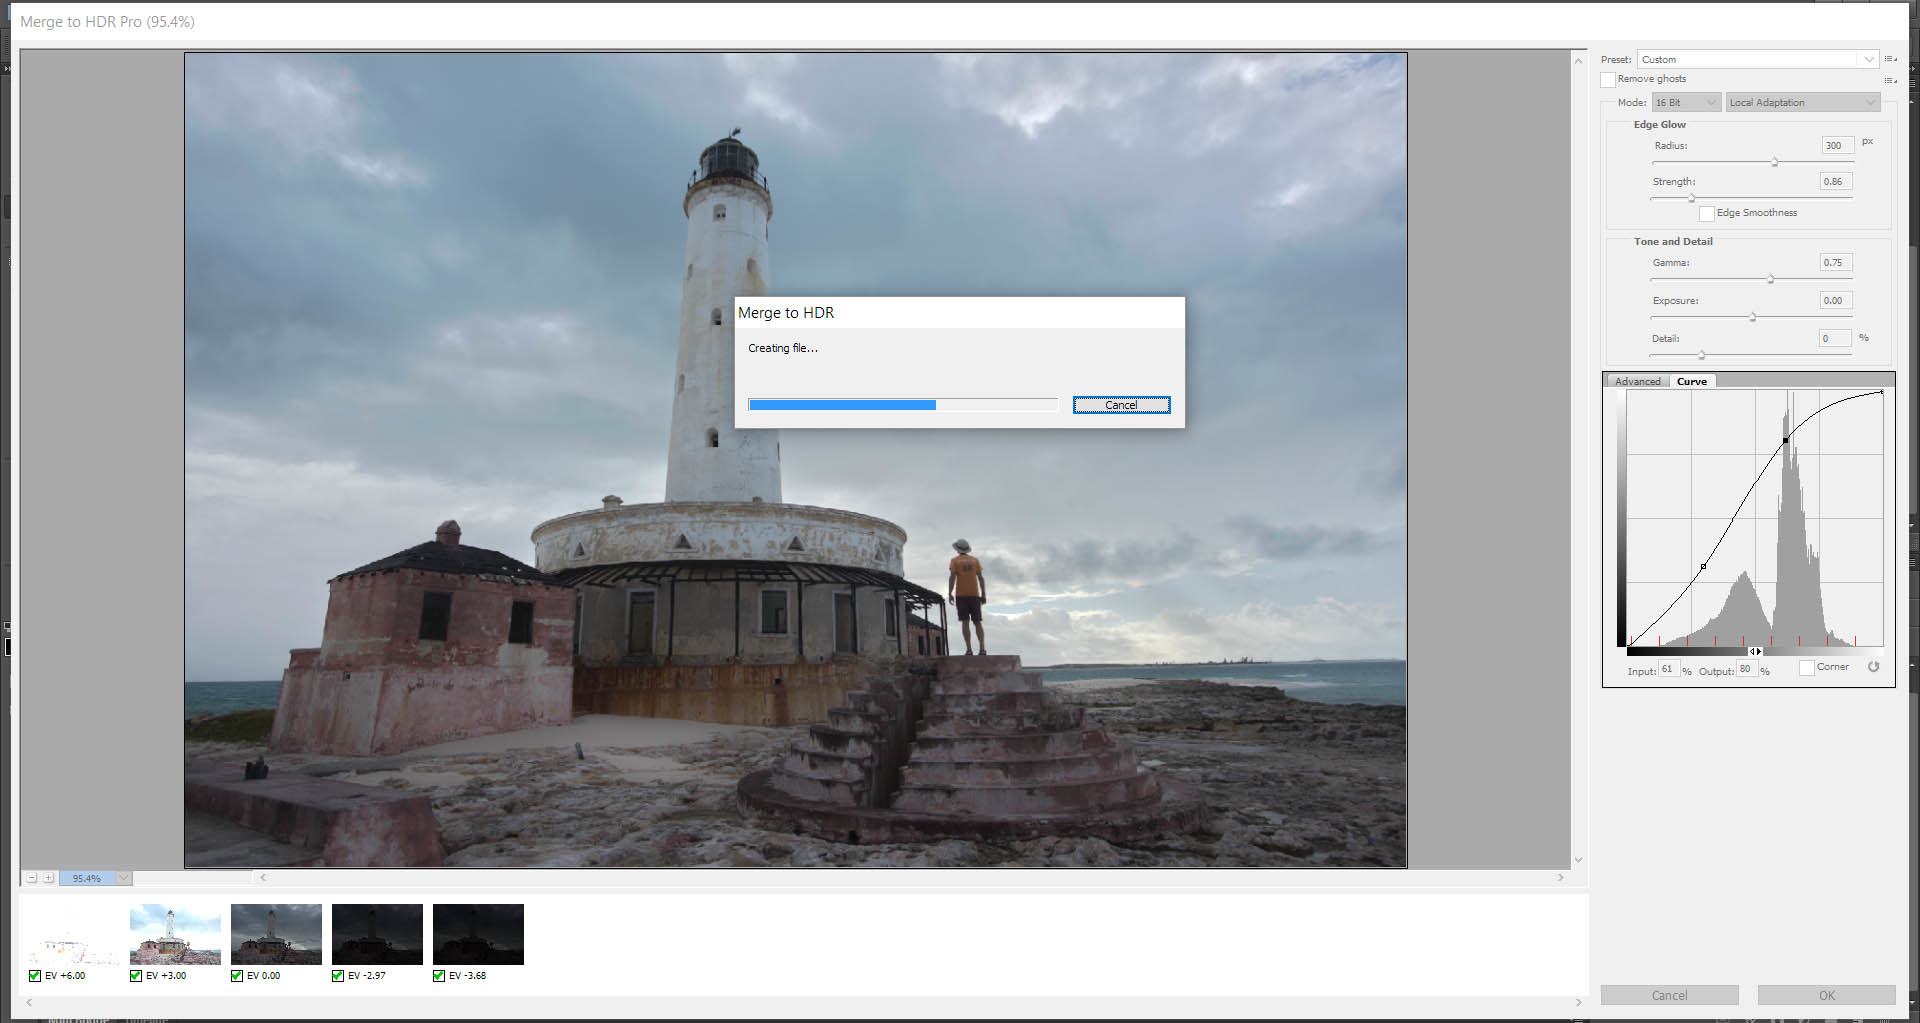
Choose a conversion method. Start by setting your bit depth to 32 or 16.
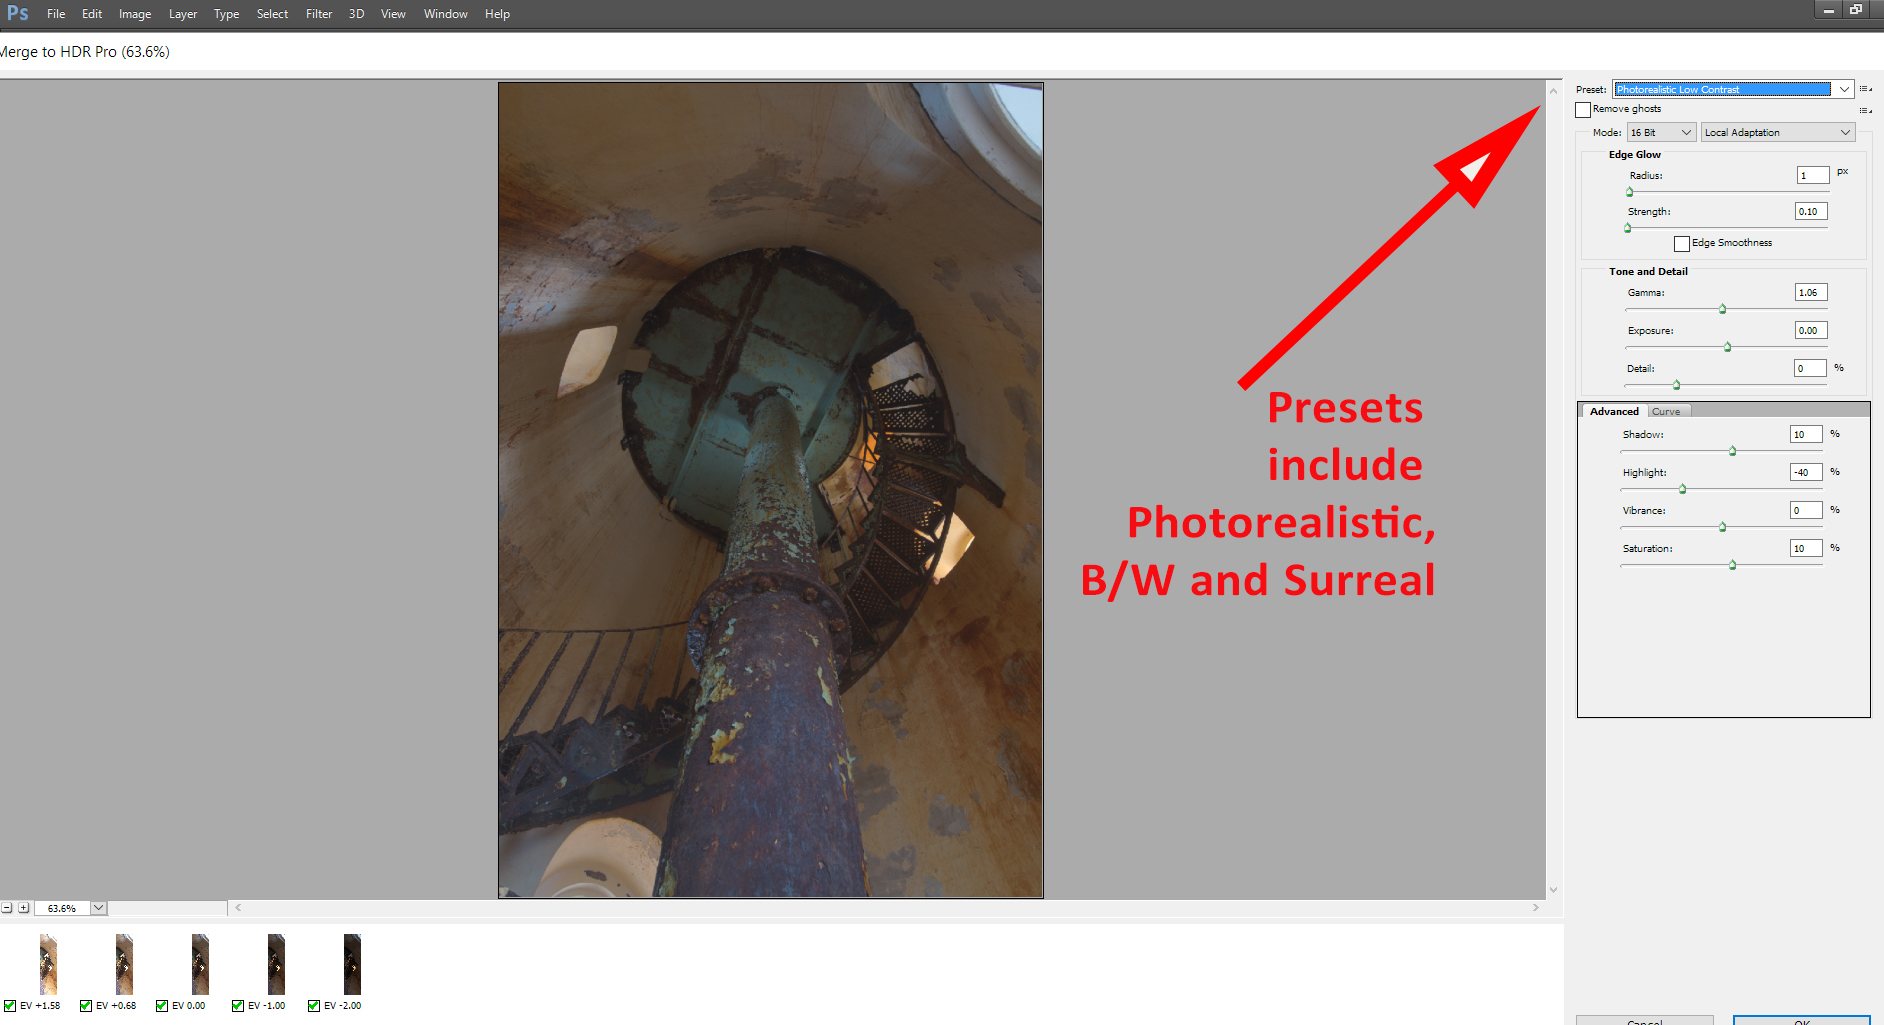
Try the Presets located in the upper right of the dialog. I use the Photorealistic most often. Click the “Remove Ghosts” check box. Ghosting is often caused by movement of subject or camera or cloud movement in a scenic.
GAMMA, EXPOSURE SLIDERS: The Exposure slider controls overall exposure brightness. The Gamma slider reduces or increases contrast. Highlight Compression preserves highlight detail. The Equalize Histogram takes the highlight and shadows to the normal contrast range of a regular, non-HDR exposure. Local Adaptation is somewhat like the Shadow/Highlight Photoshop dialog.
Start with a low Threshold of 0.5 and move your Radius slider to find a good looking image. Switch to the Threshold slider again to tweak and fine tune. Avoid creating halos at the edges of highest contrast.
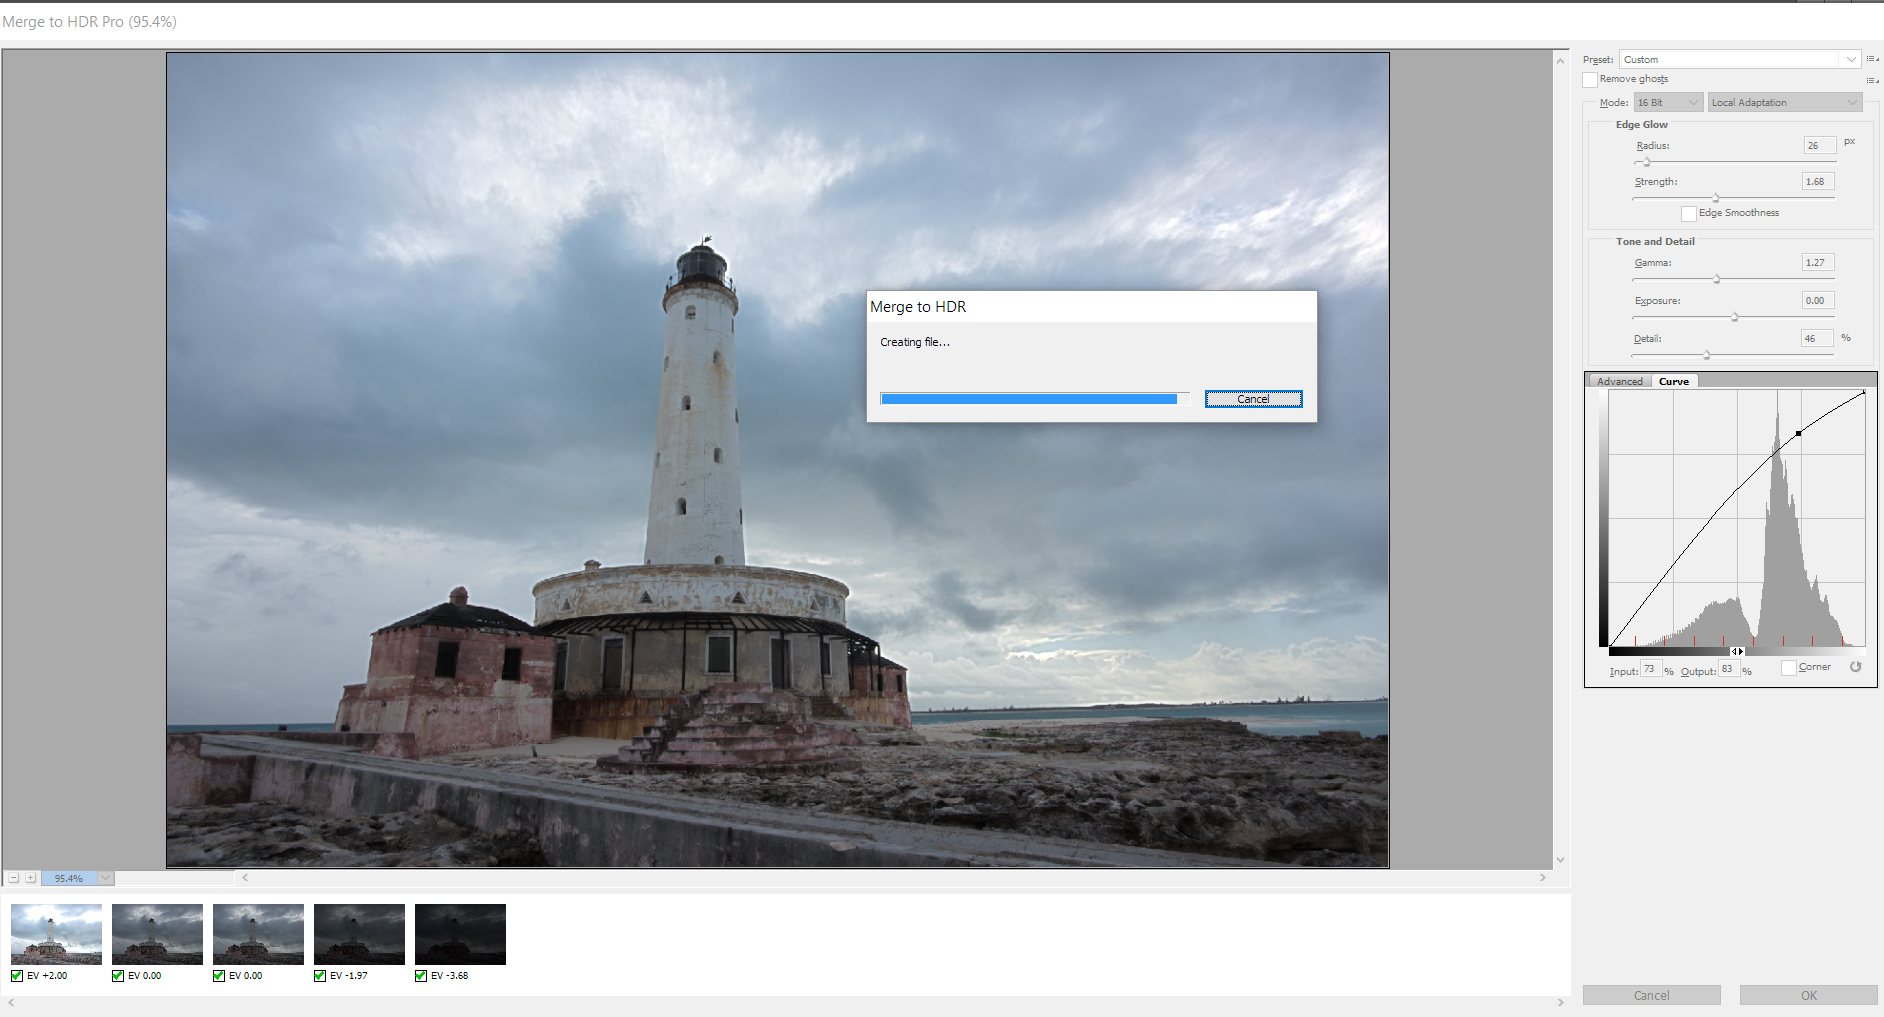
CURVES DIALOG: For other conversion options in the Merge to HDR Pro dialog, I use Advanced Curves. To do this, click the panel that says Curves.
A Tone Curve and histogram for appears for your HDR image. In the image above, at right, the Curves panel looks like Photoshop’s Curve adjustment, and we use it the same way to fine tune exposure, especially after choosing a Custom Preset such as Flat or Monochromatic.
Remember, your RAW images should be saved as TIFF files. If you need to save time and are not going to print the images, you may want to reduce the individual image file size of the TIFF files first, before processing them in an HDR editing program. HDR processing of large files takes a lot of time.
MORE SOFTWARE OPTIONS
A particular software platform may fit how you work, or be faster for you. Since I was trained on Adobe products, this article features Photoshop’s HDR Pro Export. I suggest you chrck out Photomatix Pro, NIK’s HDR Efex Pro Plug-In, and also Aurora for Mac. They all give excellent results.
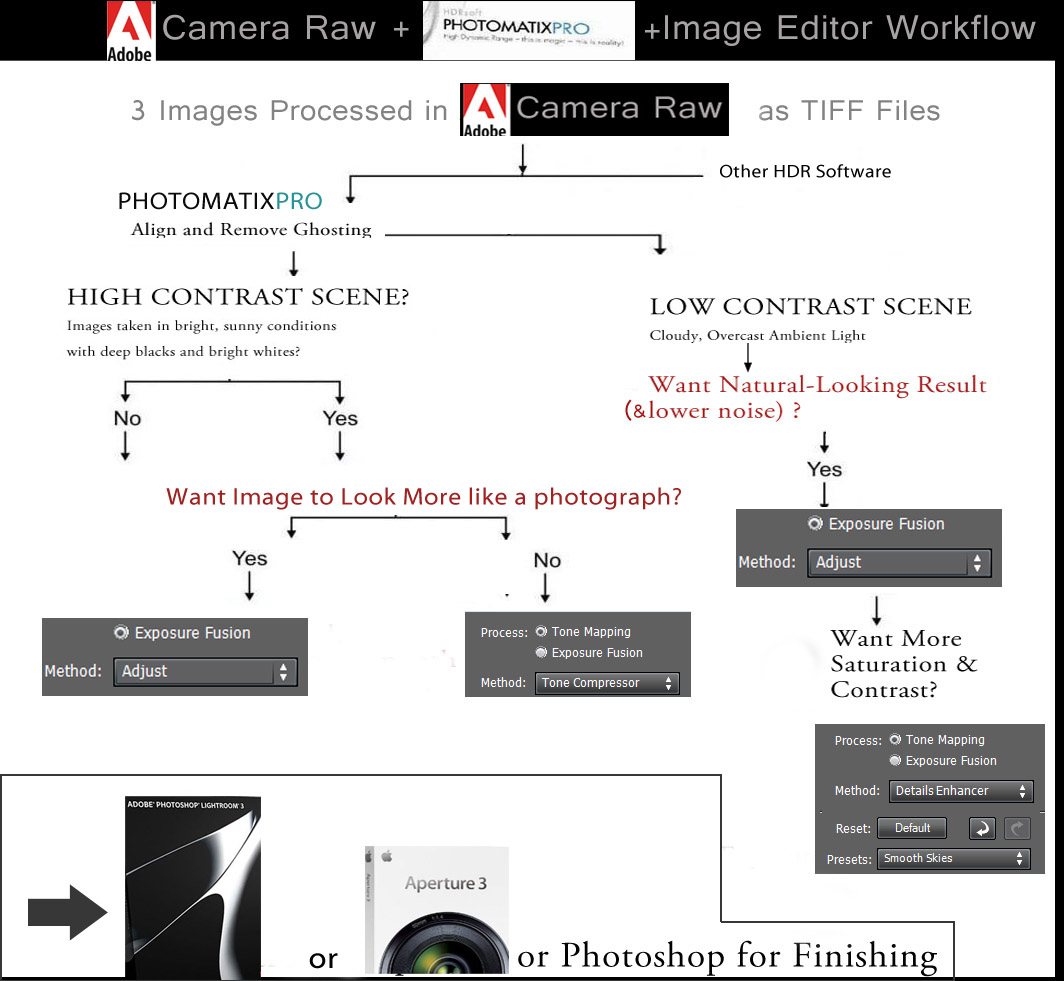
A PHOTOMATIX PRO HDR WORKFLOW
This workflow for processing a 3 shot bracket with RAW conversion in Adobe Camera RAW, to maximize the information that goes to Photomatix Pro. Then, Photomatix steps are: Exposure Fusion > Adjust and Tone Mapping > Tone Compressor. Use minimal saturation for realistic color.
Hope you have enjoyed this HDR In Lightroom tutorial, you might also enjoy these six HDR articles on Apogee by Jim Austin, MA, Adobe Certified Expert:
HDR Photography Tutorial Part 1
Beauty of Black and White HDR Photography
HDR Visions from Nine Photographers
How to Make High Dynamic Range Photographs
HDR Wildlife: Stillness in Motion
SOFTWARE USED
1. Aurora HDR Pro from MacPhun
2. Photomatix Pro
3. HDR Efex Pro from Nik


Leave a Reply