
One of the most common questions we get is about how to resize an image or photograph. So in this article we will discuss why you would want to resize your image and then walk you through the process in an easy, step-by-step method.
Why Should I Resize Images?
First off, the quality of the images captured by modern cameras is exponentially better than what was available only a decade ago. Although this is great if you want to print your photographs, the reality is that now most images are shared digitally rather than with physical prints.
And with more and more megapixels being captured in each image, the resources needed to store and transmit the image files becomes more burdensome. Due to this, many websites prevent users from uploading high resolution images, and others will automatically resize the image, reducing the resolution and quality without your input. So in order to maintain full control over your image which is being shared with the world, it is best to resize your photos yourself before uploading them.
Things to Know About Resizing an Image
Adobe Photoshop’s Lightroom is one way to do this, but there are many other software programs capable of resizing images in Windows and Mac platforms. Since we often need to downsize from our camera to Facebook, Instagram and for use in email messaging, let’s see how this process works in an easy, step-by-step method.
First, understand that your camera captures an Image Size, the computer stores a File Size. There are a variety of Image Types, also called File Types such as JPEG,TIFF and PSD.
Now, image size is not file size. Image size is the dimensions of your photograph on your screen. File Size is how much memory the picture takes on your computer’s hard drive. File size also gives us an idea of about how long it will take to download or transfer a picture file.
Since Facebook is the most popular social media site, let’s first see how to correctly resize for Facebook. Then, we will use Lightroom to easily downsize for email.
How to Resize Image In Lightroom
STEP BY STEP RESIZING FOR WEB & FACEBOOK
TIME: 5 to 10 minutes
Before Starting:
Download your photograph from your camera. Open Lightroom. Click Lightroom’s File Menu in the upper left > Import Photos and Video (Control+ Shift+ I on Windows/ Command + Opt + I on a Mac).
STEP 1: Open the photograph you want to resize in the Lightroom Library module.
STEP 2: Process your photograph in the Develop Module with Global and Local Edits for tonality and color such as Exposure, Contrast Highlights, Clarity, Detail, Lens Correction and Effects or Vignetting.
STEP 3: When you are done with editing, click File > Export. The “Export One File” dialog will pop up.
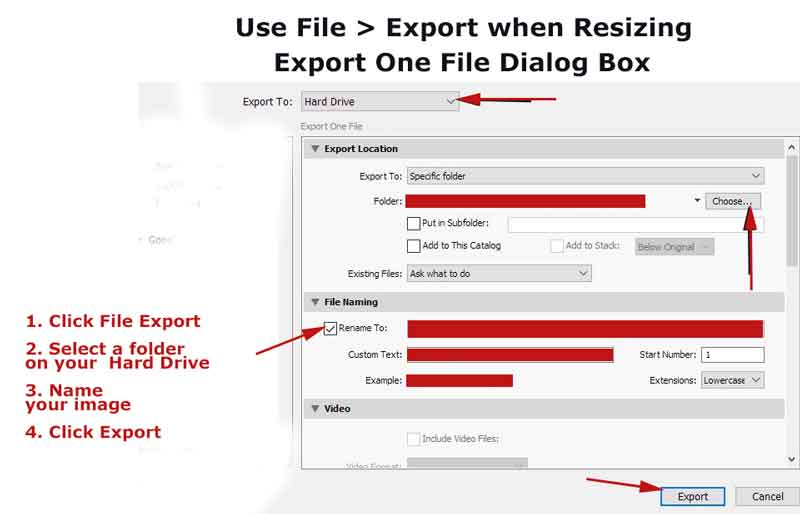
STEP 4: Chose a location to export the image, on your drive. From the drop-down, choose a specific folder on your drive to store the image.
STEP 5: Choose a name in the dialog box for your image.
STEP 6: Enter in nominal data to give your picture a specific dimension for Facebook. For Facebook, set your Image Type to JPEG. Set the quality at 100 (you may also choose 90 or 80 quality settings for a faster display on the web). Check Resize to Fit. Select Long Edge. Enter 2048 pixels for the long edge pixel dimensions. Double check that the dimensions are in pixels. Finally check the box for Sharpen for Screen, amount standard.
STEP 7: ADVANCED TIP for Facebook Header shot. I’m often asked how to downsize a picture for that picture we post to the top of our Facebook timeline.
- For a horizontal cover shot for DESKTOP OR LAPTOP viewing, you can resize a picture using all the settings outlined above in steps 1 through 6.
- However, for a Facebook cover image, resize your photograph to a size of 851 by 315 pixels, because that’s the size of your Facebook top image. For MOBILE devices, you may want to make this larger; use 1920 pixels by 1080 pixels for the pixel dimensions. IMPORTANT: be mindful that laptop and desktop views will look different, so try to avoid placing any important visual information near the top or bottom areas of your Facebook cover image.
STEP BY STEP RESIZING FOR EMAIL
Lightroom has a built-in application for downsizing photos for email which makes the process very easy.
START STEP 1: Highlight your photograph preview in the LR Library Module.
STEP 2: In Windows, RIGHT CLICK the preview image.
STEP 3: Select Email Photo. Set up your email provider (Hotmail, Gmail, Yahoo, etc).
STEP 4: Choose a size from Small to Large, or Email Photo. That’s it!
How to Resize an Image In Photoshop
You are in luck if you prefer to use Photoshop to resize your images, as Adobe has made it a very simple process to use the image editor for resizing. Photoshop allows images to be resized both smaller and larger, however it is important to keep enlargements minimal as it is very easy to lose the quality of the image during the process.
Guide to Enlarge an Image Using Photoshop
STEP 1: Open your photo with File > Open
STEP 2: In the menu, go to Image > Image Size to open the Image Size dialog box
STEP 3: Enter the desired pixel dimensions, file size, or resolution. This will change depending on the final use of the image
STEP 4: Select Resampling Method. For enlarging, we recommend using Bicubic or Bicubic Smoother for a softer image
STEP 5: Click OK and you are done!
Guide to Reduce an Image Using Photoshop
STEP 1: Open your photo with File > Open
STEP 2: In the menu, go to Image > Image Size to open the Image Size dialog box
STEP 3: Enter the desired pixel dimensions, file size, or resolution. This will change depending on the final use of the image
STEP 4: Select Resampling Method. For reducing, we recommend using Bicubic or Bicubic Sharper to keep detail sharper
STEP 5: Click OK and you are done!
TIP: During any resizing you can select the Constrain Proportions option to scale the height and width together
Additional Notes:
When you want to place one of your photographs on Facebook, web, or email, use the JPEG file type and a color space of sRGB. JPEG stands for Joint Photographic Experts Group. sRGB stands for “Standard Red Green Blue”. Think of it like a painters palette for a range of colors. sRGB is a color space created by Microsoft for printing, monitors and web that specifies the range of colors that can be displayed on a monitor or in print. Remember, sRGB is a color space, not a file type or file size.
What is file size? File size is measured in megabytes and gigabytes. Recall, we learned that file size is unrelated to how big the photo is displayed on a screen or mobile device. File size just measures how large the image is on the computer and give us a sense of the time it takes to email your photo or put it on social media.
Leave a Reply