
Spring has made its way towards summer and in many places the wildflowers and the flowers in the parks are either beginning to bloom or are already showing their vibrant colors. Now is the time to grab your camera and pop outside.
What, you live in the high country and still have snow on the ground or it’s too early for the spring flowers! No problem, you can still practice and experiment with flowers from your local florist or you can visit a Botanical Garden, so you’ll be ready to go out in the field when those flowers pop up in your area.
No matter where the flowers are, inside or out, there are a variety of flower photography tips and techniques that will make your photo sessions fun and enjoyable.

Start At or Near Home
Most often, you’ll capture images of just one flower or a small floral arrangement. Whichever you choose, it’s a great way to practice different camera, lighting and lens techniques.
1. Try an off-camera flash or use reflective materials from different angles and positions to see what types of light and shadow effects you can capture. Some of the intricate details deep within flowers can be enhanced within these light controlled settings and you’ll be able to more easily create some beautiful shots.
2. Play around with various backgrounds to enhance the flowers. A dark background can really make a flower pop out of the frame. Or, if you’re shooting from home, mirrors and glass top tables create wonderful reflections.
3. Since you don’t have to worry about a breeze blowing the flowers around, it’s good time to experiment with your lenses, extension tubes and teleconverters. Try working with extreme macro combinations and focus on the flower’s delicate details. Depending on your combinations, you can get some great magnification ratios–from 1:1 life-size to up to 4:1 life-size.
Note: Remember that the use of extension tubes and teleconverters decrease the overall depth of field with whatever lens is being used. If placed with a macro lens, depth will be measured in inches and millimeters instead of feet. Depending on the tube or teleconverter selected, you will lose up to 1-2 stops of light but you can adjust the camera settings to compensate for that loss (slower shutter, larger aperture, higher ISO).

Work with a variety of tight compositions and lighting with arrangements at home.
Time to Go Out into the Field
You’ll always have photo choices to make, so why not try them all. You may not have the opportunity to capture them again in a specific area. You can take the close-up approach to an individual flower, capture a small group of flowers, or you can take the landscape approach.
Here are a few tips and ideas to consider….
Hyperfocal Distance
In order to capture some of the best distance shots with a DSLR, use hyperfocal distance. Best described, hyperfocal distance is that point where a focus is obtained where both the nearest and furthest subjects will be sharp.
In days gone by this was somewhat easy to figure out, as lenses had markings on them that showed where the focus range was for any given f/stop and focusing distance. With most digital cameras having a different crop factor, the correct focal point for one lens at a particular setting doesn’t necessarily mean it’s the correct point for another camera, even if using the same lens and settings.
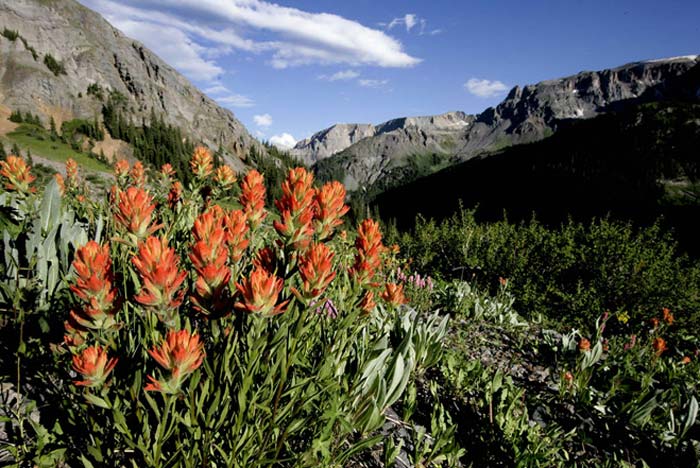
There’s nothing better than a patch of Indian Paintbrush close in the foreground
and some nice mountains in the background–perfect for using hyperfocal settings.
To figure out the combination that works for any given camera/lens combination you can:
1. Use the camera’s depth of field preview. To get a lot of depth, stopping down the lens to a stop or two from the maximum aperture will probably be the desired setting (for example, your lens maximum is f/22, so stop down to f/16). Very rarely do you want to fully stop down, as there is a bit of fall-off of sharpness at both ends of the spectrum on lenses (wide open or maximum depth). Make sure the closest, and potentially main subject, is a few feet away and get a focus a little beyond it. Use the depth of field preview to then see if everything is in focus. If not, tweak the focus in and out a little bit until the desired effect is achieved.
2. Obtain a hyperfocal distance chart for your particular camera. You can find one online and print it out or obtain one from an iPhone/iTouch application.
The best application I’ve found is called DOFMaster. It allows you to select the camera model, lens length and f/stop. It then shows where the near limit, far limit and hyperfocal distance of where the lens needs to be focused for maximum depth of field. This is one of my favorite iPhone applications and gets a lot of use during the flower season.
Lighting
1. Some photographers are advocates of cloudy days in order to achieve better saturation of colors. There are no hot spots, especially on white flowers.
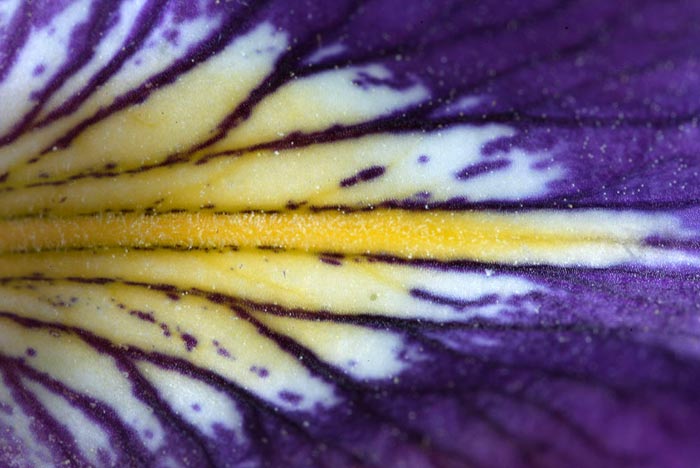
Whites are not blown out when clouds block the sun on this very tight shot of a wild Iris petal.
2. Try shooting after a rain. The raindrops left on some of the flowers can glitter with light and reflections. It’s a fun shoot and it can add a whole new dimension to your images.
Keep in mind: Flowers with more of a waxy texture will not maintain the moisture, but there will be plenty of petals around that will hold some drops.
A cloudy day in combination with extension tubes to get in tighter brings out the detail in this Monument plant.
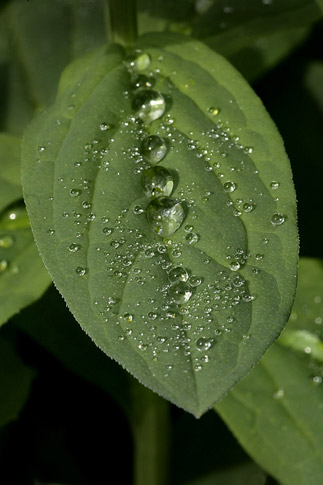
Take time to look all around for
the water drops on plants after a rain
3. Sunny days are good for incorporating a variety of lighting techniques. When photographing a flower, don’t just walk up and do one angle. Get the nice frontal view, but then move around and do the same flower from different angles so as to get front, side and backlighting. See what shadows you can capture. Getting low on the ground to get a flower with a nice blue sky in the background can create a wonderful contrast in colors. Backlighting will bring out very intricate details in the petals. Even silhouetting stamen on an opposite petal can create a stunning effect. And don’t forget to isolate some details while you’re in the process.
If the light is too harsh, which can happen early in the day, the use of a diffuser can help with controlling the light. A polarizing filter can also be used to take the sheen off of reflective petals. Reflectors or a hat are good objects to help block the light when needed.
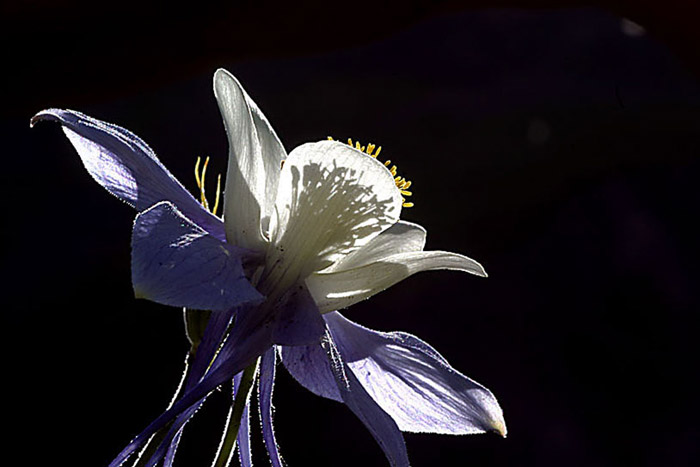
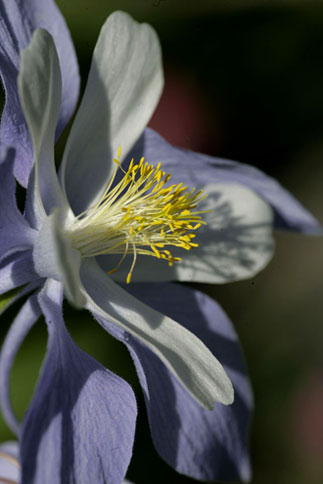
Changing angles can create some very dramatic lighting as shown here with
directional lighting not hitting the background but putting strong light on this columbine.
Depth of Field
1. Depth of field is critical in softening potential distracting background elements in the photo. Use the depth of field preview to look at the background as much as the critical focus of the subject. Make sure the supporting objects that may be prominent in the image are soft and out of focus.
2. When working a nice field of flowers, look to do both close-up work as well as the entire field so the whole story can be told. One in-focus flower with a soft background works nicely in conjunction with a shot of an entire field that is fully in focus.
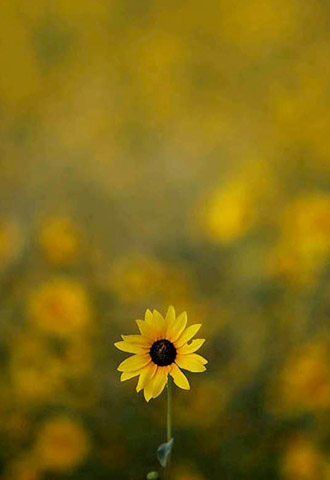
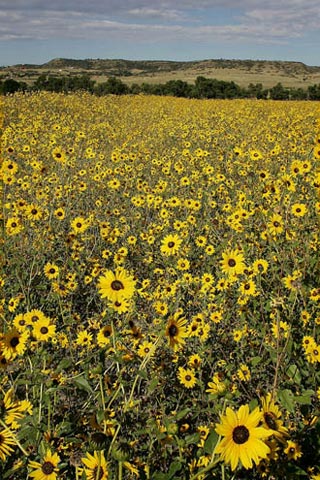
Two views of the same area using a wide variance in depth of field.
Angle of View
1. No matter if the subject is an individual flower, a full field or garden park shot, the angle of view is important. Keep the camera as parallel as possible to the subject to maximize depth of field.
2. When shooting a full field of flowers, angle the camera down a little bit to help enhance the effect of the field falling away in the distance.
Utilizing sunlight and shadows, a side angle and a close-up view creates a very appealing image.
Getting Up Close & Capturing Sharp Images
1. Pay attention to your angles when shooting close-up. A slight angle could cause the petals on one side of a flower to be sharp while those on the opposite side would be out of focus.
2. Try using mirror lockup, but only with a tripod and shutter cable release. With sharpness being critical for close flower shots, the chance for any camera shake with the reverberation of the mirror hitting can mean the difference between sharp and very close to sharp.
3. If you’re using a telephoto lens, try not to use either extreme. Just as with f/stops, there is a little bit of falloff with sharpness at both ends of the focal range.
4. Bumping up the ISO a little bit to get a faster shutter speed is also worth exploring. Once the wind kicks up due to the thermals created by the sun, one or two stops might mean the difference between a nice shot and a great shot.
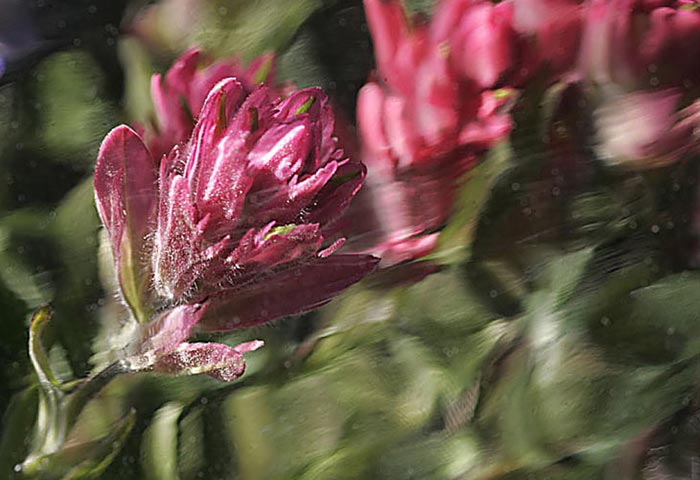
5. If the wind is blowing a bit too much, try out some techniques for abstracts. Panning or zooming can create some interesting effects. Using items such as Mylar or a water glass (seen with lead photo at top) can also make for some interesting shots.
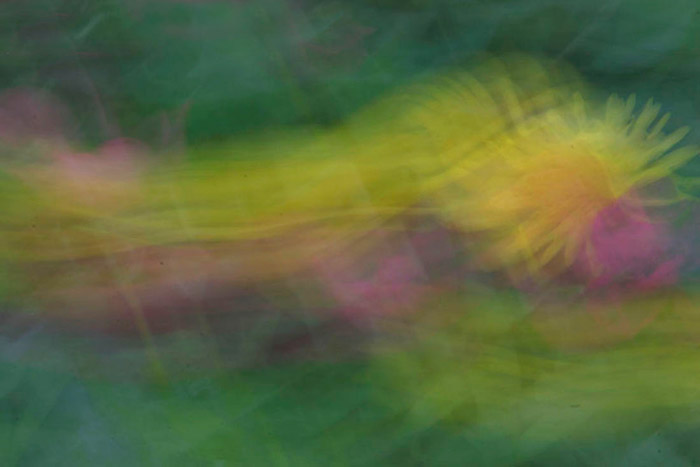
Getting creative allows for more time in the field and is great fun.
No matter what location you choose to shoot, in the home, at a botanic garden, at a park, or in the field, take the time to look around and find the right flowers. Working with various pieces of equipment, trying all the angles and playing with lighting techniques will make for a fun session of shooting. Give yourself an entire morning of shooting and you’ll find that once you get into it, those hours will pass as if they were just minutes.
The colors and grandeur of flowers, whether it’s a full field, a garden, or a close-up of the intricate details of a single flower, is a sight to behold. And once your shot is printed and hanging on your wall, their stunning beauty will live on.
by Andy Long
First Light Photo Workshops
All text & photos: © 2011 Andy Long. All rights reserved.

Leave a Reply