
Part 1 covered the design concepts of Line, Color, and Value Placement of the Subject.
When you’re composing a great photograph, there are many aspects to keep in mind.
In addition to light angle and quality, depth-of-field, and shutter speed for effect, there’s another set of items to think about if you want to create a perfect composition–design elements. Using one or more design elements helps to make the shot more appealing to the viewer and draws the eye directly to what you want to portray.
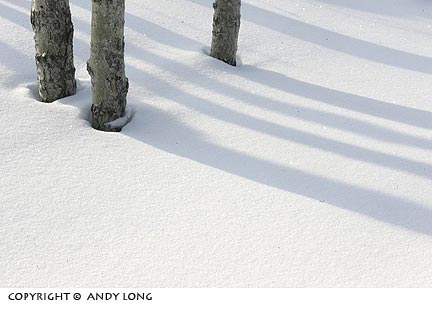
Shadows can add the illusion of depth and portray shape. The result is most dramatic when the sun is low.
SHADOWS
Managing shadows could be considered a part of working with light, but the concept can be grouped with design elements, as well. Shadows can play a subtle part in an image—for example, when you use an animal’s shadow in an interesting way.
They can also be a major part of your work when your goal is to portray the shapes created by shadows or to create depth. Shadows on a monochromatic subject will add the illusion of depth to the overall scene. You also can use shadows from an arch or doorway to frame your subject.
Another way to use shadows is to have them create a dark background to bring out something in the foreground that is nicely lit.
To show shape, you need to find a subject that has some prominent edges that cause shadows to make the shot. In this situation, it’s best to have the light coming from the side, so you have a good mix of light and shadow throughout the scene.
If you’re able to get in position so your subject is receiving light and the background is still in the shadows, you’ll be able to create the effect of having the subject jump out of the background. The result will be most dramatic when the sun is very low and sneaking around a corner or through some trees.
Shadows define the shape and without shadows, there would be no impact.
Shadows provide depth to an otherwise two dimensional art form.
ISOLATING THE SUBJECT
As a photographer, you try to make your pictures stand out from the crowd. To do this, you can experiment with various techniques to make each shot better than the one before and better than those of other photographers.
One method is to force your subject to jump out of the background by placing your subject in the light while the background is dark, silhouetting, or using shallow depth-of-field to keep your subject in focus while the background appears blurred.
There is no better way to make your image jump off the page than to use a black background while the subject in front is nicely lit.
When the sun is on the horizon and the angle of the light beams is such that they cut through trees or around a bend, shining a spotlight on the subject, you have the best chance of creating this effect. Another way to accomplish your goal is with a flash.
If the subject is tucked into a dark area, such as a group of trees, you can use flash directed at the subject to highlight it while keeping the background dark. Because exposure is critical, spot metering is preferable so you don’t include any of the background. If you get a reading off the background, you’ll try to add too much light to the scene, and your main subject will become washed out by too much light.
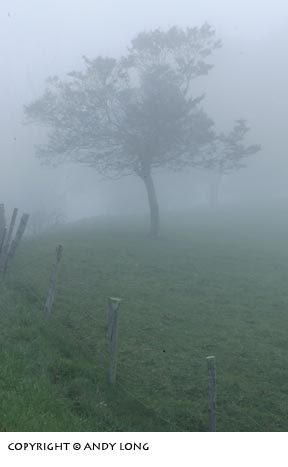
Fog helps isolate a subject from its surroundings.
Use an aperture as wide open as possible to blur the background. This will help isolate the subject in the foreground.

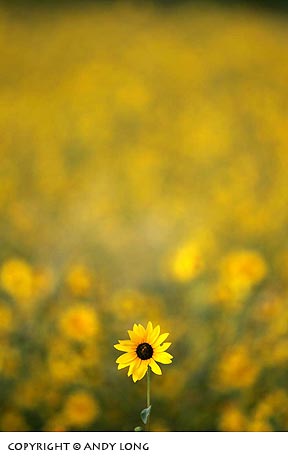
Above: Use contrast in color to isolate a flower.
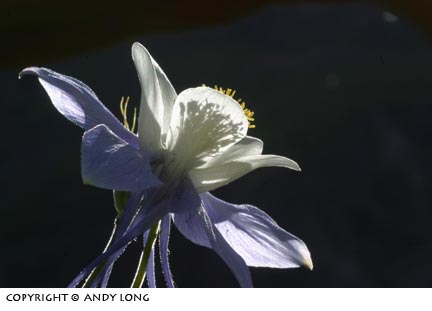
Left: Using selective light is a good technique to isolate a subject.
Another route to isolating your subject is to use storm clouds. They can create dramatic images, especially if the sun peeks through to put just a bit of light on your main subject. Again, you want to get your reading off the main subject instead of the dark background. By spot metering the subject, you’ll make the background appear even darker, allowing your foreground subject to become even more prominent.
Yet another method involves silhouetting. Whatever the subject, it needs to be strong in order to draw the viewer’s eye. The background needs to be light. A background with strong color is helpful but not necessary. When doing silhouettes, you have three options:
You can use a blank sky behind your subject, place the sun directly behind your subject, or have the sun showing next to your subject. While you think of the sun as the primary source of natural light in creating a silhouette, it doesn’t have to be. The moon, particularly when it’s full, can offer unique opportunities. Water is also a good background for creating silhouettes.
The isolating technique most people are familiar with is to blur the background by having the aperture as wide open as possible.
This method works best with flowers and wildlife. For flowers, primarily close-ups, blurring the background is fairly easy to accomplish, as macro equipment doesn’t allow for much depth-of-field. However, when you’re working with wildlife, you’ll need to look for animals that are not being overly active.
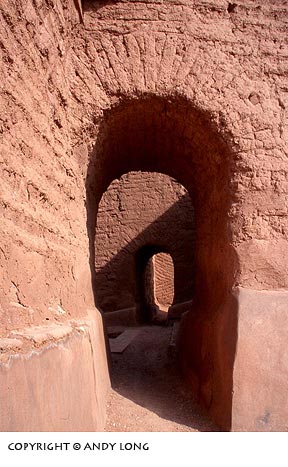
FRAMING THE SUBJECT
Of the different ways to incorporate design elements in a photograph, framing is the one in which you have to look for a second subject to create the final product. In line, you can use a feature such as a fence to help bring the eye into the frame, but with framing, you can’t avoid using a secondary subject, one that could eventually become the main point of interest when the picture is finally composed.
Trying to find ways to incorporate framing into a photo can be as simple as finding a colorful autumn tree branch to fill an empty sky above a mountain crest–or as complex as finding a background that will fully cover the perimeter of your foreground subject.
No matter what you use to frame the subject, the only hard rule to follow is don’t have any portion of the main subject protruding into or through the frame. Permitting the two to blend together or overlap takes away from the visual appeal of the image.

Above: One cactus is used to frame the others in the background.
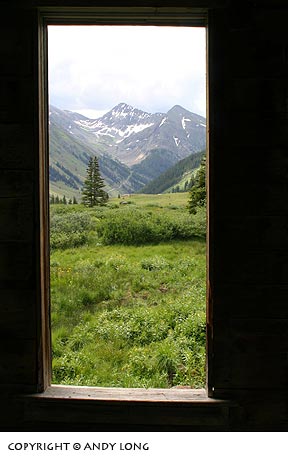
Left: A window makes a perfect frame for this mountain scene in the background.
The first idea that comes to mind when you’re imagining a frame is that it needs to completely surround the subject—the way a picture frame surrounds an image. This doesn’t always have to be the case. As long as the object(s) used to frame fills a void and helps bring the viewer’s eye towards the main subject, the purpose of the frame is attained.
Some objects make good obvious frames–a cattle chute on a ranch, an archway, an overhanging tree branch, or even a window with a nice view. However, when the frames aren’t so obvious, you have to use your creative eye to find an object that works well. An image that utilizes Checkerboard Mesa at Zion National Park to frame a lone tree is a fine example. This image also shows how important it is to keep the framed subject within the confines of the frame.
The main idea of a frame is to bring added emphasis to your subject. While subtle, a frame can also create a little depth to the overall image if there is contrast in either the size or the distance between the subject and the frame. Whatever you use as your frame, try to create an interesting shape within a shape.
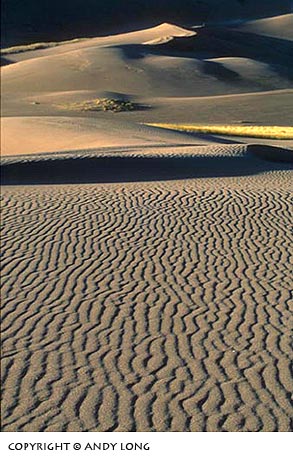
PATTERN AND TEXTURE
While it seems like an unlikely pairing, patterns and texture actually work together quite nicely. In nature, when you move in tight on a particular subject, you’re able to see the intricacies of it. Some subjects work well when you’re looking at both pattern and texture.
Extreme close-ups of wildflower petals are a great example. Here you can use both elements to create a shot that can stand alone for either the texture or the pattern of the leaf. Another way to combine the two can be done with mounds of snow. You can find the most texture shortly after a quantity of snow has fallen.
Depending on where you are, the patterns can also be very interesting. A great location for shooting mounds of snow is Yellowstone National Park where the terrain creates excellent compositions.

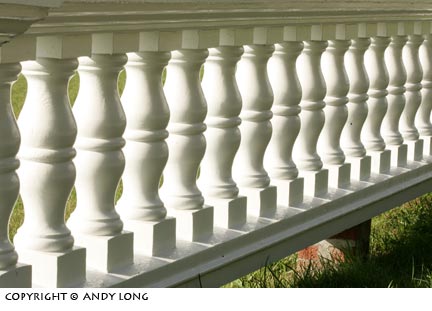
Above: The rail of a porch is nothing but a study in patterns.
Left: The soft turn of a single paintbrush leaf is brought out with macro equipment.
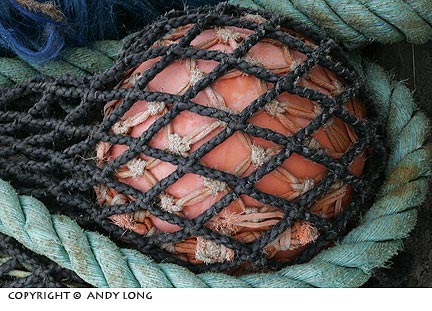
Above: Patterns and texture often work together in this shot of old fishing gear.
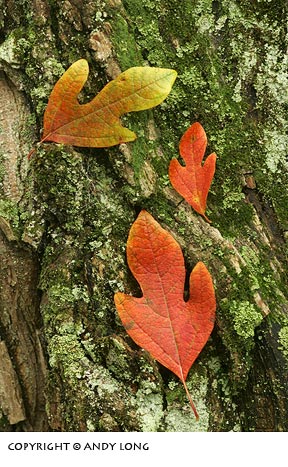
Left: Patterns and texture can work well together. Here we have the repeating pattern of the leaves against the texture of an old log.
If you’re looking only at patterns, you have many locations and subjects to explore. Repetition in patterns can provide a good subject study.
For example, close-ups of barrel cactus allow you to show the many clusters of needles filling the frame. A group of rocks along a shoreline can also be a great subject, especially if they have a lot of color and different shapes. When you’re looking at patterns as the primary emphasis of the picture, a lot of repetition will accentuate the pattern. A group of shingles on the side of an early 20th century home is a perfect example, as is a cluster of mushrooms.
Many subjects lend themselves to pattern-and-texture work. Some may be obvious at first glance, but there are other times when you have to really look at your options for a while before you can realize what’s in front of you.
Read Part 1: Line, Color and Value Placement of the Subject
Read Part 3: Shape and Form, Reflections, and Combining Multiple Elements
by Andy Long
First Light Photo Workshops
All text, screen shots & photos: © 2013 Andy Long. All rights reserved.

Leave a Reply